Pioneer DIY Ductless Mini Split AC Review
Installing new Pioneer ductless mini split AC units has dramatically changed the indoor climate in our home.

Our home has been cooled with window AC units for over twenty years. They have served their purpose and done a fantastic job of providing air conditioning and heat when needed. But, anyone who has lived with window units knows the downsides, like excessive noise and poor efficiency.
When the window unit finally failed in my office, which is located in a separate building, I knew it was time to evaluate other options. My office is also a man cave, and watching movies and TV shows with a loud AC unit is not desired.
This led me down the road of researching DIY ductless mini split AC units and learning how to install one myself. I finally landed on the Pioneer brand for a few reasons, which I will discuss in this article. Enjoy!
Living 15 Years With Window AC Units
Over the years, things will change in a home, and some of those changes may come in the form of room additions. We have added a large dining room, office, and sunroom to our home without ever upgrading the AC. It was time for a change.
Like I mentioned earlier, the window AC unit we had in my office (in a separate building on our property) finally failed after 15 years, so it was time to replace the unit or upgrade to mini split units.
Many of the other window AC units we have in our living room and master bedroom have been having issues cooling, so it wasn’t going to be long before those units failed as well. We were also getting tired of the noise from the window units while watching TV, and the musty smells needed to go as well.
Sourcing Mini Split AC Units
I started sourcing a mini split AC unit by calling a local mechanical company to come out and give us an estimate on installing a new mini split unit. We live in Texas, so air conditioning is more important to us than having heat, although our winters have been pretty cold around here lately.
I was in the need for two mini split units to be installed on two separate buildings. The mini split for my office is a standard installation, with the unit being installed on an outside wall. The unit we required for our dining room and kitchen area would require more planning.
I intended to spend around $700 to install a new window AC unit in my office. This was for a standard 18,000 BTU LG unit with heat. After doing some quick research online, I saw that many of the lower BTU mini split units could be purchased for under $1,000.
There was a conflict in the schedule with the AC company that was going to come out to give us an estimate. We spoke with them briefly on the phone to find out a ballpark price for having mini splits installed. Over the phone, the company quoted that a single zone Mitsubishi unit would cost around $4,000-$6,500 installed.
Because this was way out of my budget, I called around and got similar quotes from other AC companies using what are considered to be “premium” brands. This leads me down the DIY route and spending time on YouTube learning the ins and outs of mini split AC installation.
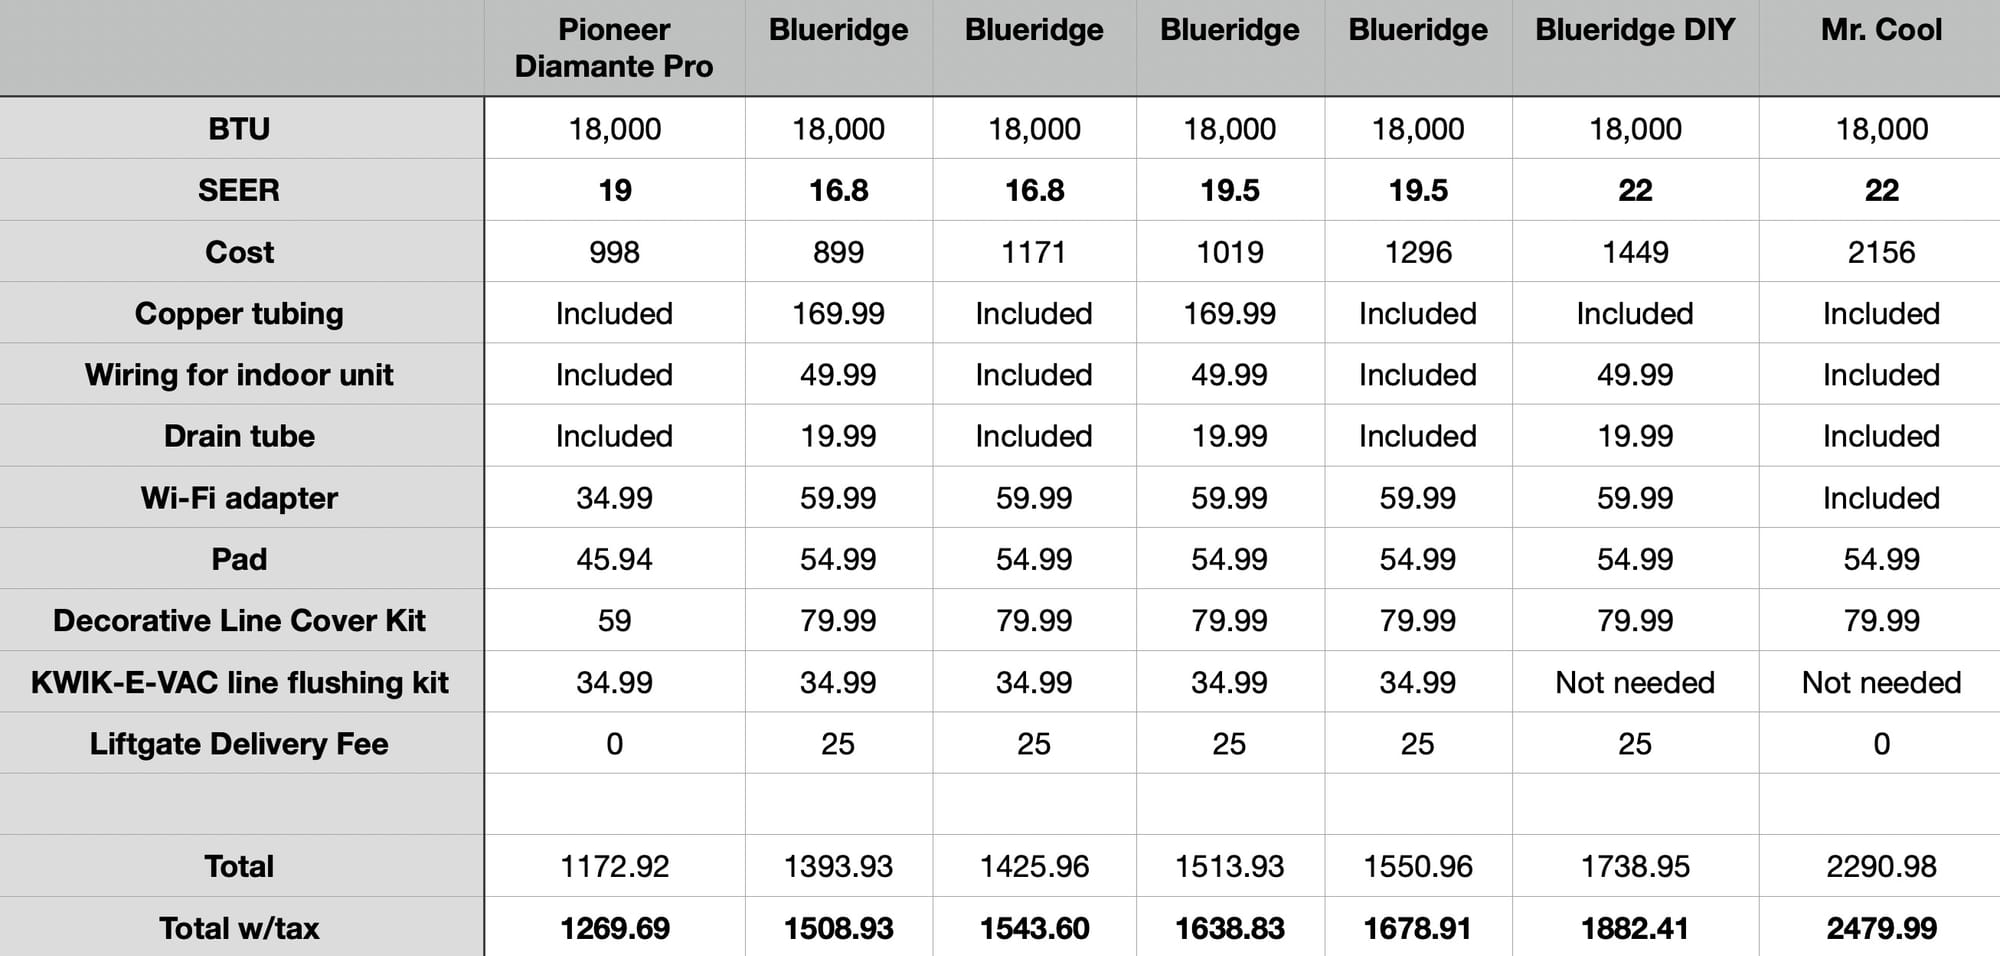
Mr. Cool DIY Mini Splits
If you search online for a DIY mini split AC unit, you will most likely come across the Mr. Cool brand. They are one of the most popular options for DIY installations because they offer a pre-charged copper line set that does not require to be vacuumed for the installation.
This may sound foreign to you, but standard mini split AC units require the copper lines to be vacuumed to remove all the oxygen and contaminants before you release the refrigerant. The DIY refrigerant lines offered by Mr. Cool don’t require this and can be connected by anyone who knows how to use a crescent wrench.
The problem with Mr. Cool for me was their units were double the price of the Pioneer brand. Yes, fewer tools were needed for the installation, but buying those tools doesn’t come close to making up the difference in price. Mr. Cool was not the mini split AC for us.
Phone Call With Alpine Home Air Products
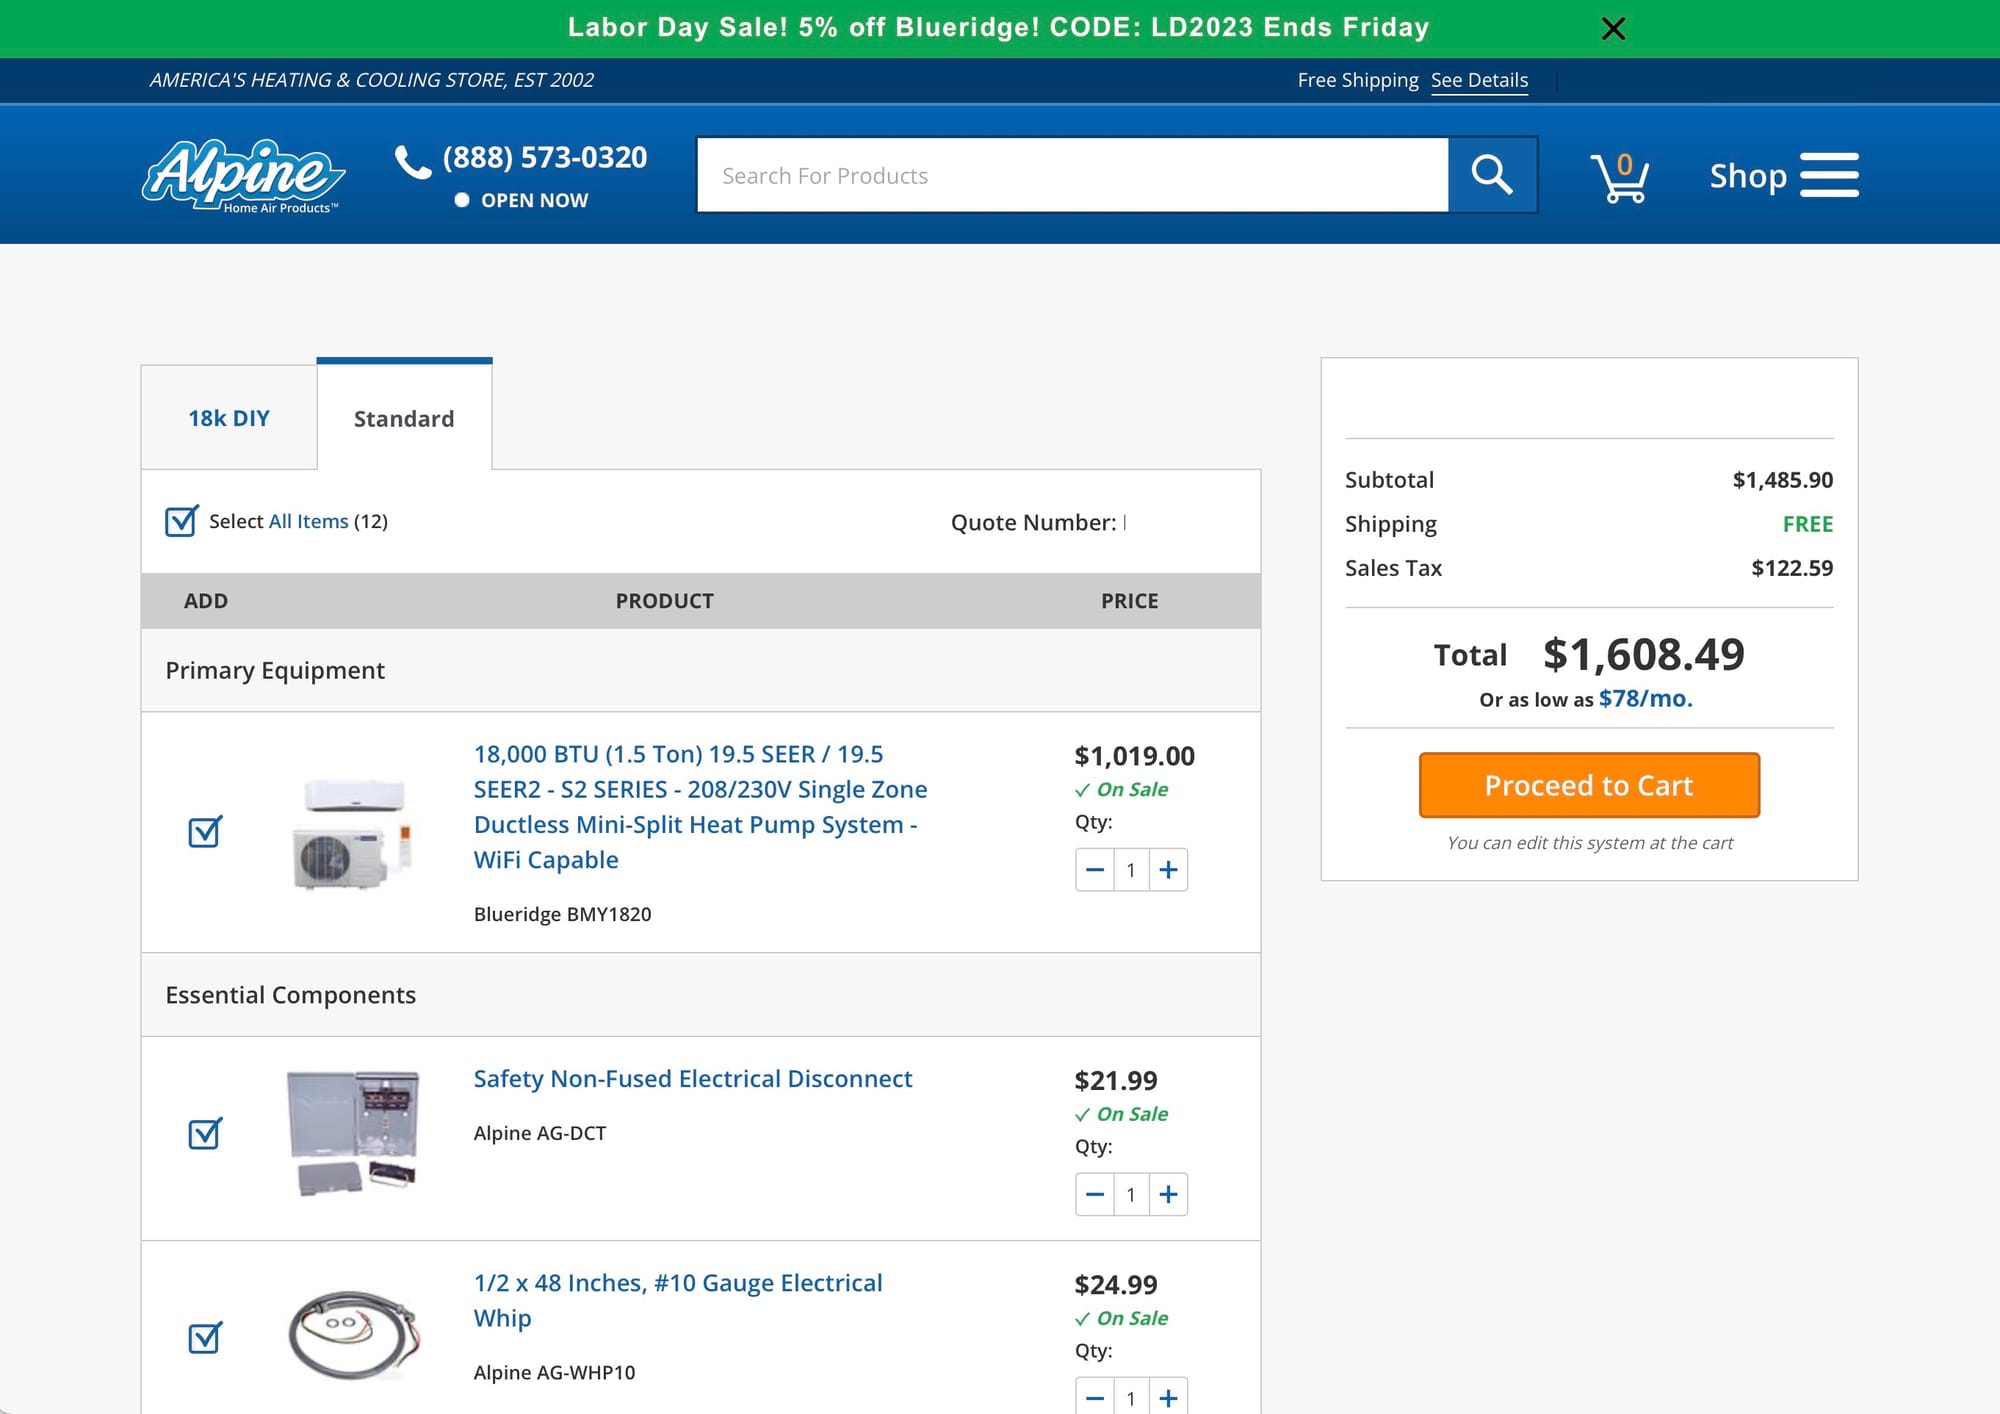
If you want a company to design you a mini split system and hold your hand, then Alpine Home Air Products is probably the company for you. They had the absolute best presentation of any company I spoke to, and their interview questions were thorough, to make sure you got the correct system for your application.
Alpine Home Air sells the Blue Ridge brand of mini split AC units. They offer their mini split units with the standard copper lines, or you can opt for the DIY lines similar to what Mr. Cool was offering.
The reason I did not go with Alpine Home Air is because they were around $400 more for the equivalent unit in the Pioneer lineup. Now, buying from Pioneer was easy, but planning everything out took more time than if I had just gone with Alpine Home Air.
Being that we are technicians by trade since we own a garage door company, I was ok with the additional planning and work that had to be done to save $400 per unit. In the end, my goal is to install four mini split AC units, so If I could get the first one right, I would save thousands of dollars.
Phone Call with Pioneer Mini Split
My first phone call with Pioneer was with a representative on the other end of the line ready to answer my questions. Phone calls with Pioneer were very basic, and no one tried to close the deal with any type of pressure.
Their employees act as if they are non-commissioned and always standing by to help when you need it. They did not have a presentation or script prepared, so it was quite opposite of the phone call with Alpine Home Air. If I had to guess, I would say the employees with Alpine Home Air are commissioned off their sales.
During a three-week period, I called Pioneer Mini Split about five times to ask specific questions related to ordering my new mini split AC units. Because I had never installed a mini split, I did not know what to expect or what I required.
After reading the owner's manual front to back for the models I was purchasing, I made the purchase of two new mini split AC units. The units shipped out of Florida and arrived in Texas in about five business days. Everything arrived as ordered and with no damage.
Pioneer Mini Split Models We Purchased
We ended up purchasing two mini split AC units to start with. The first is an 18,000 BTU unit for my 600 sq ft office and the second was a 24,000 BTU unit for our dining room. The office has 8ft ceilings, while the dining room has a 10ft ceiling that lowers down to an 8ft ceiling in our kitchen.
Here are the two units we purchased:
- Pioneer® Diamante Pro Series 18,000 BTU 19 SEER2 Ductless Mini-Split Air Conditioner Inverter+ Heat Pump Full Set 230V with 16 Ft. Kit. SKU: WYT018GLFI19RL
- Pioneer® Diamante Pro Series 24,000 BTU 19 SEER2 Ductless Mini-Split Air Conditioner Inverter+ Heat Pump Full Set 230V with 16 Ft. Kit. SKU: WYT024GLFI19RL
Here are the accessories we purchased:
- Floor Mounting Base Kit for Split Air Conditioning Systems × 1
- Non-Adhesive Wrapping Tape for Piping Kit. 2" Wide, 50' Long × 1
- 60A Non-Fusible AC Disconnect Box 230-Volt × 2
- 6 Ft Plastic Flexible Whip 10 AWG 3-Lead Conduit × 2
- Wireless Internet Access & Control Module for Pioneer® Diamante WYT Series Systems × 2
- Decorative PVC Line Cover Kit for Mini Split Air Conditioners & Heat Pumps × 1
- Mini Split R410a Low Side Suction Charging Service Gauge Hose Set 5/16" Port × 1
Everything we ordered was precisely what we needed, except the non-adhesive wrapping tape. The mini split AC units already come with some grey wrapping tape included, which worked fine for wrapping the pipes that came out of the line cover kit over to the outside unit.
The total cost for 2 mini split AC Units and all accessories shipped to our door was $2,647.98. We applied a 5% discount to the order that was given to us by Pioneer.
Tools Purchased for Mini Split Installation
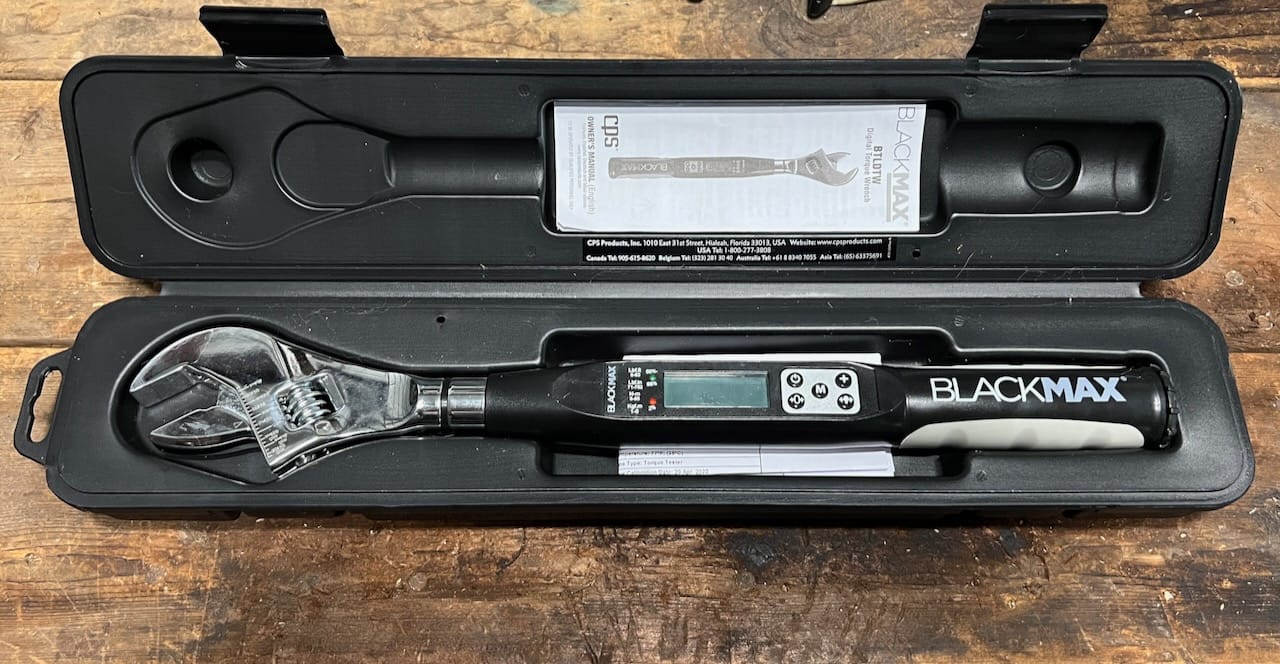
Because I was saving so much money installing the two mini splits myself, I purchased some high-end HVAC tools to make sure my copper tube connections were correct. It was stressed over and over in YouTube videos that most problems with installation are at the copper tubing connections, where the flaring nuts are tightened.
Here are the tools I purchased online:
- CPS BlackMAX BFT850K Lightweight R-410A Clutch-Type Eccentric Flaring Tool Kit
- CPS BLACKMAX BTLDTW Adjustable Electronic Torque Wrench
- ZENY 3,5CFM Single-Stage 5 Pa Rotary Vane Economy Vacuum Pump 3 CFM 1/4HP
- Refrigeration Technologies-RT100S Big Blu Micro Leak Detector
- Equipment Pad for Ductless Mini Split Air Conditioner Heat Pump Outdoor Condenser Units 18x38x3
I also intend to install two more mini split AC units so that dilutes the cost of the tools even more. The total cost for all tools purchased was $600.06. I probably didn’t need to purchase professional HVAC tools, but all of my flaring connections are holding great, and we did not have one issue torquing down flaring nuts.
Pioneer 18,000 BTU Ductless Mini Split AC for Office

A bearing finally completed failed in the window AC unit I had in my office, so getting that unit replaced was top priority. You can see in the photo above where I filled in the opening where the window AC used to reside. I still have more work here, trimming it out, so it looks correct.
The Pioneer indoor unit for the 18,000 BTU unit is 39” wide, and it fits nicely in this area. I left over 6 inches of room between the unit and the ceiling to make sure there was adequate airflow, since the intake is at the top.

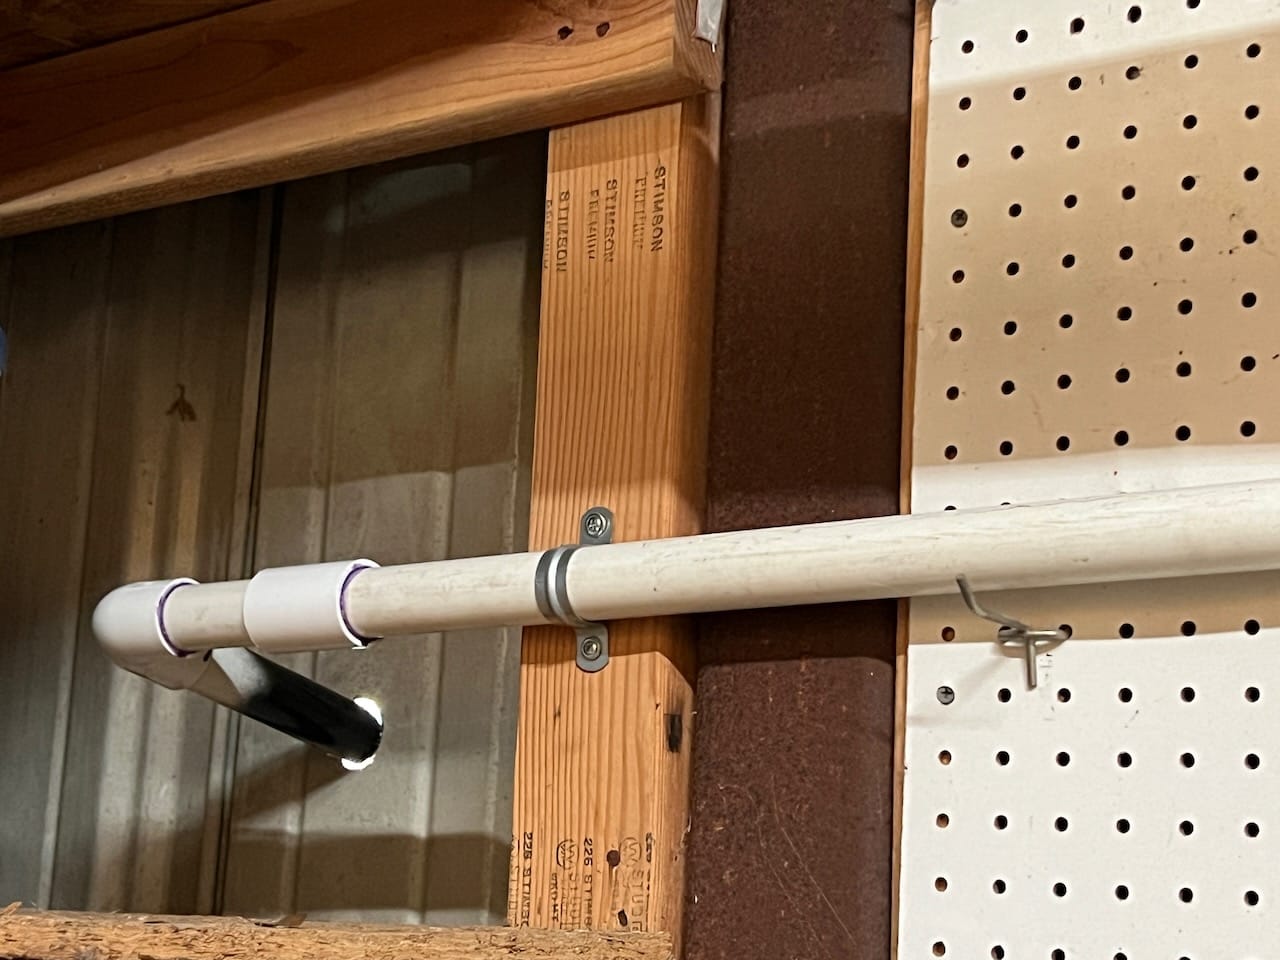
The electrical disconnect, pigtail, and line cover set were all purchased directly from Pioneer. These accessories made for a nice, clean installation that any professional would be proud of. The included grey non-adhesive tape was used to wrap some exposed lines to protect them from the sun.
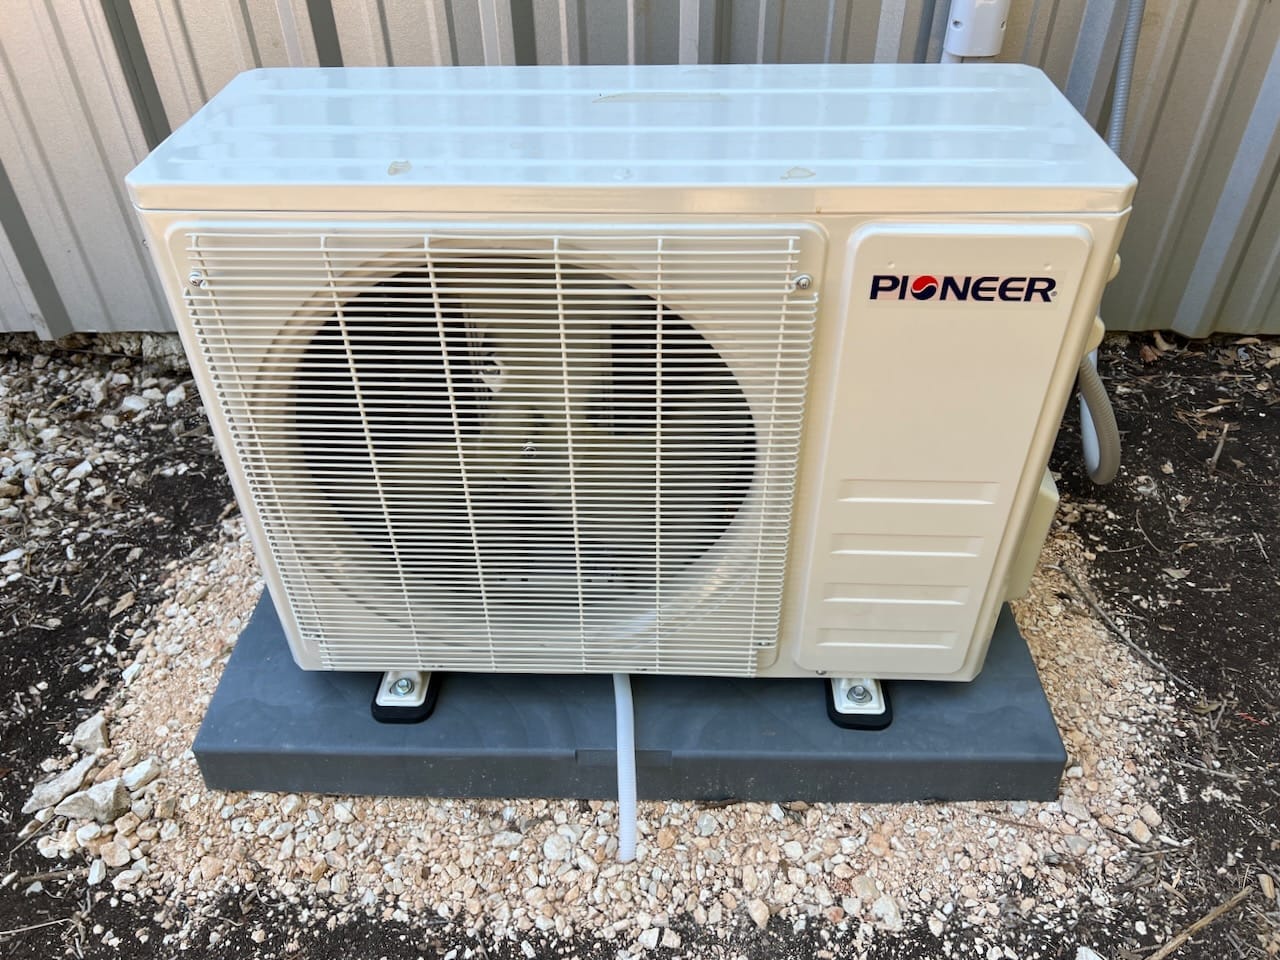
The Pioneer 18,000 BTU outdoor unit is mounted to a polypropylene AC pad that is designed for mini split AC units. The pad is sitting on three bags of base material we purchased from Home Depot and tampered down. The pad is 18"D x 38"W x 3”H.
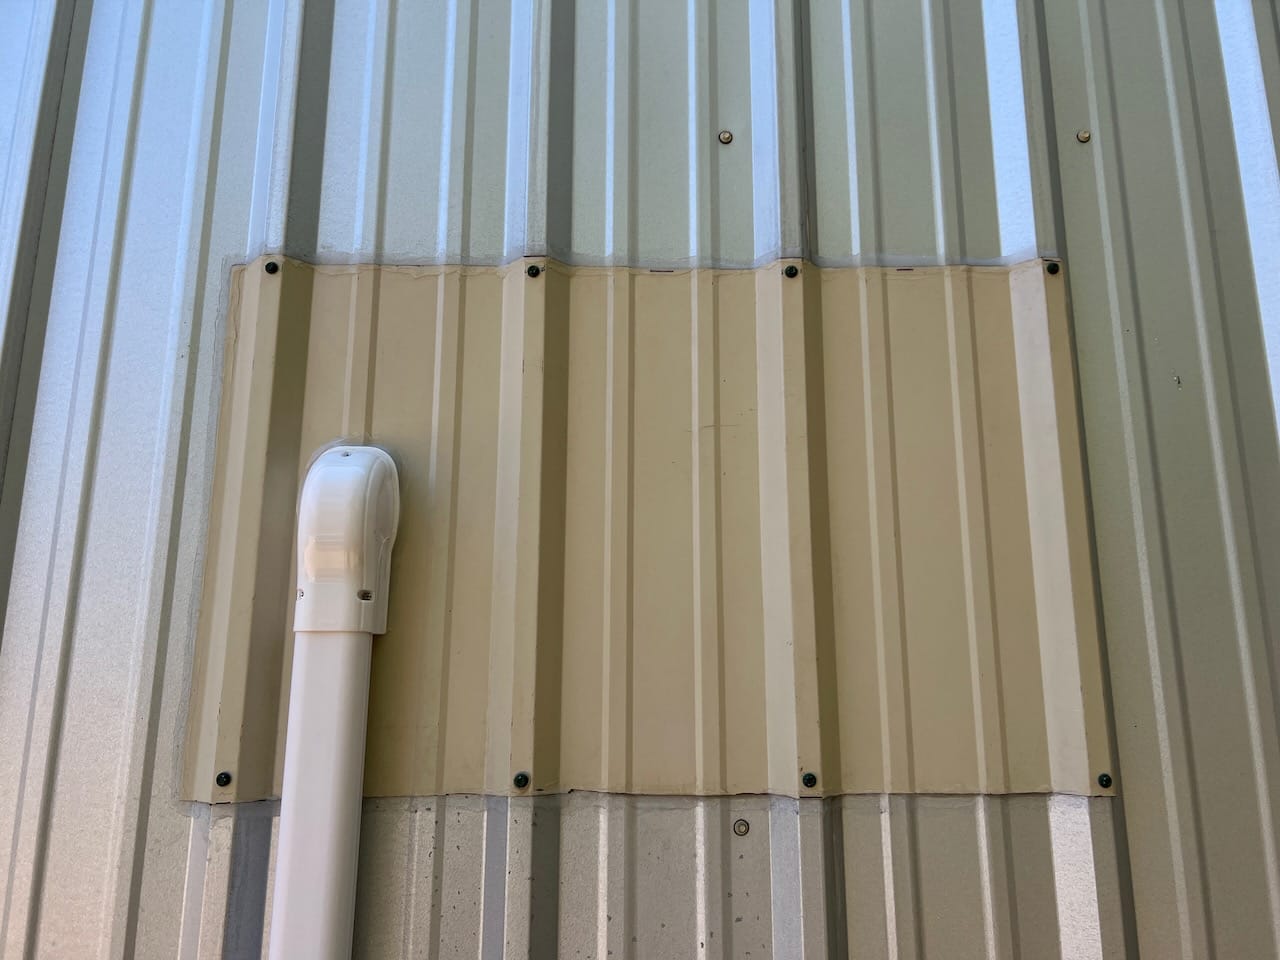
The outside of the building is metal R panel. Because metal is so expensive right now, I did not try to purchase a full piece to match the exterior. We had the tan color lying around in our stockpile. This is a side of our office that faces a creek that no one ever sees.
Pioneer 24,000 BTU Ductless Mini Split AC for Dining Room

The indoor unit for the 24,000 BTU Pioneer mini split is larger, coming in at 46” wide. It is also a little deeper and taller and requires over 8 inches of room between the unit and the ceiling, so it will have enough volume of air to do its job. We squeezed this unit in perfectly between some home decor like it had been there since day one.
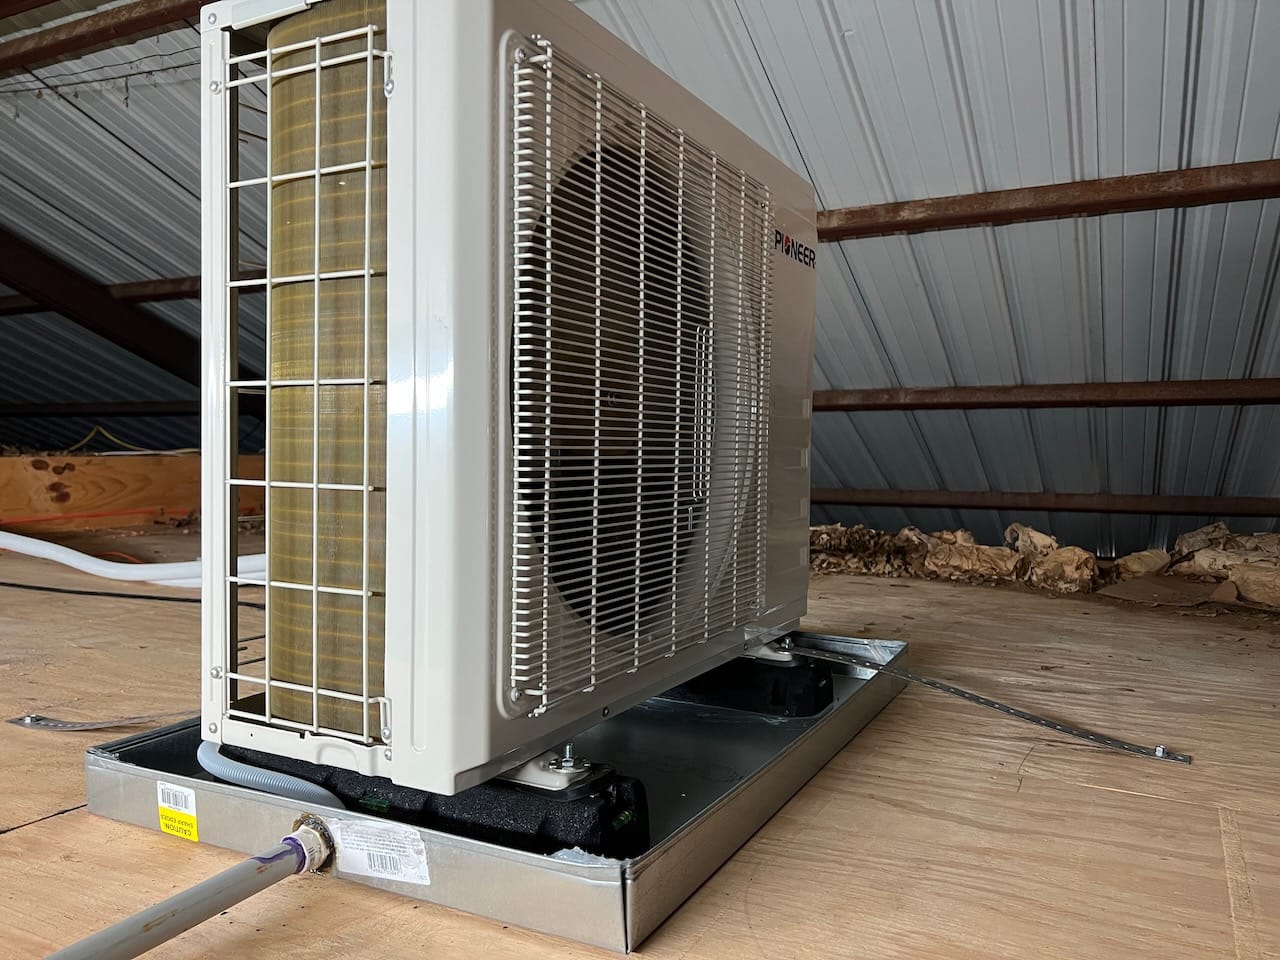
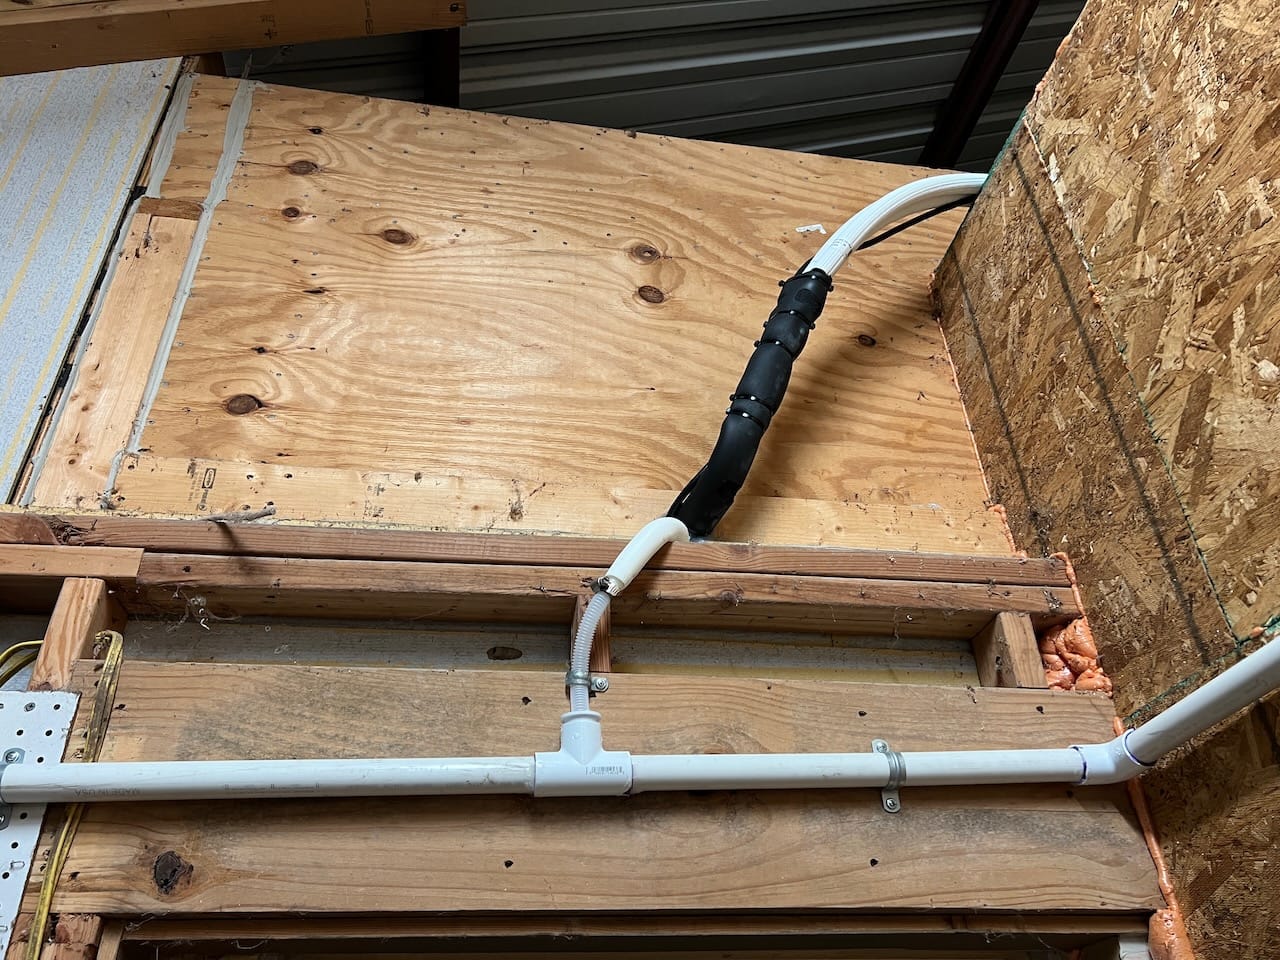
The outdoor unit for the 24,000 BTU dining room AC was not mounted in a traditional setting, which is usually outside a building. Because of our situation and layout, I chose to mount this unit above one of our offices inside a high-quality AC drip pan.
The outdoor unit is secured with two pieces of heavy strapping to prevent movement. It is also mounted on the two heavy-duty rubber floor mount isolation blocks we purchased from Pioneer to make sure no vibration is transferred throughout the building. They work great as we do not even know the unit is running.
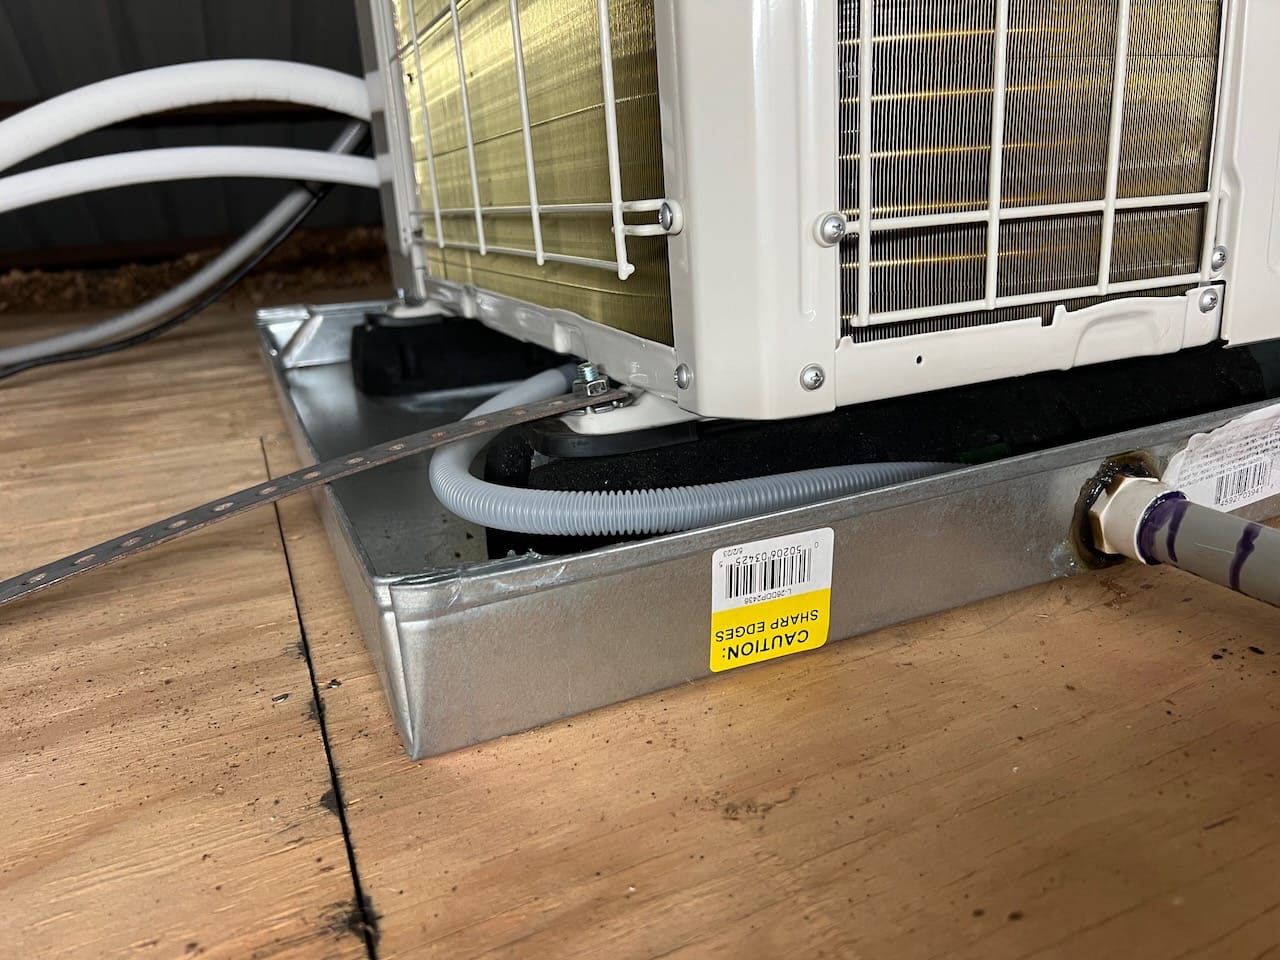
I scoured the internet looking for someone who has done this before, but could not find much information. The drain tube that comes out of the bottom of the outdoor unit runs into the drip pan overflow pipe.
The drip pan is mainly serving as an emergency overflow system in case excessive liquids were to accumulate under the unit. This is really the only way to install the unit when it is sitting on top of wood.
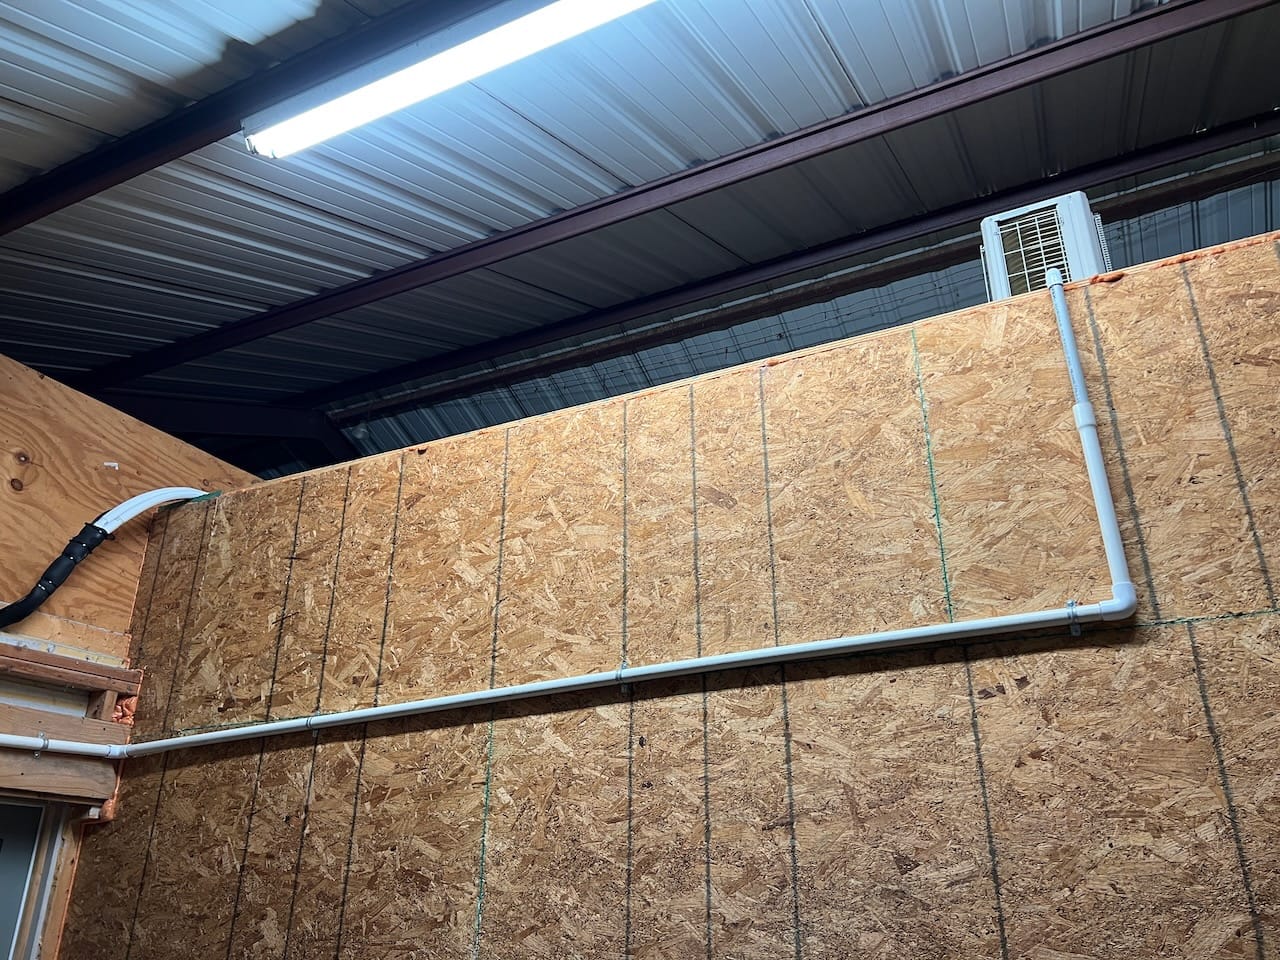
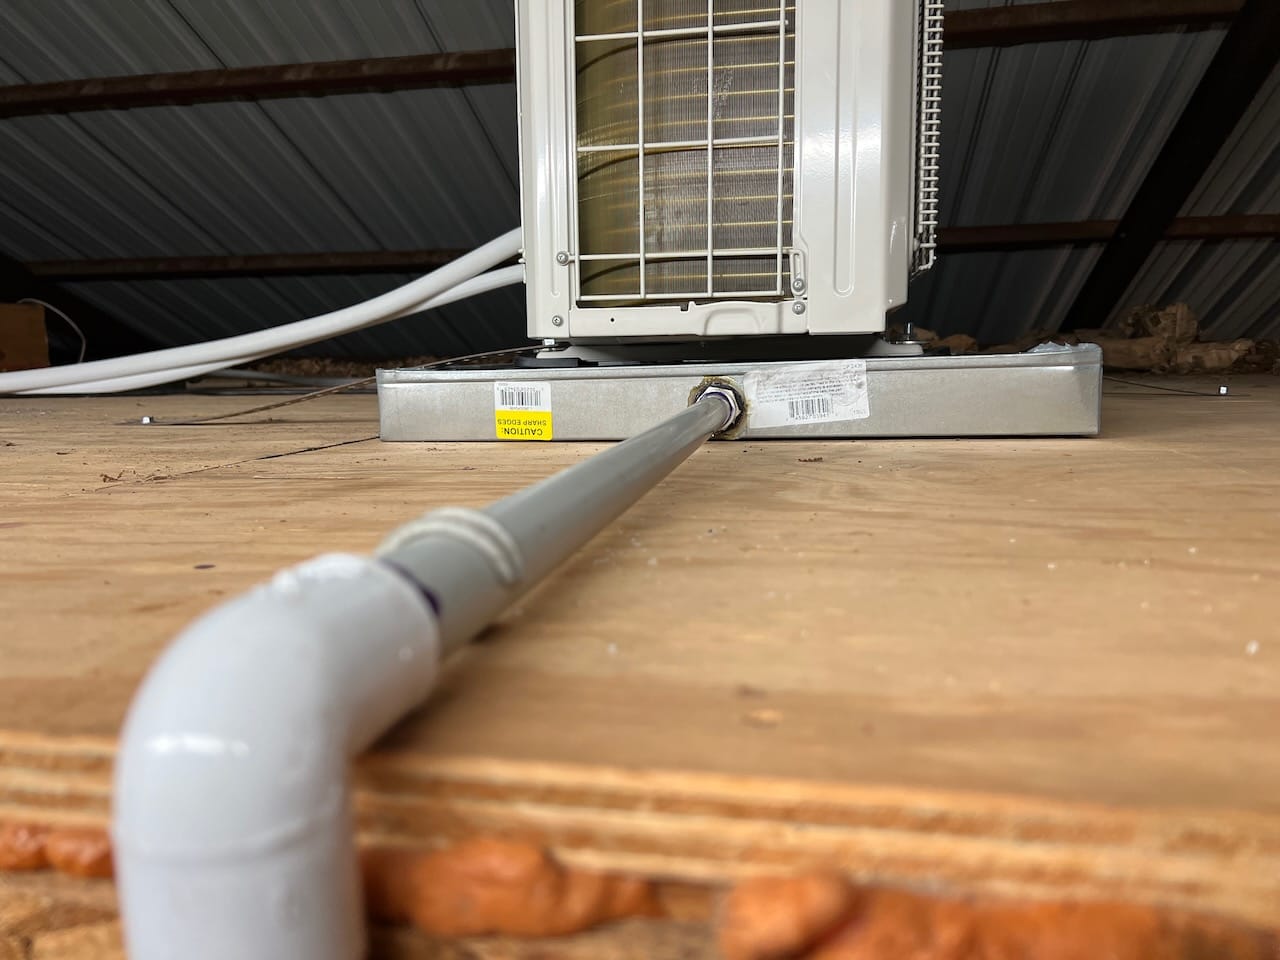
Because the outdoor unit was mounted above a structure, we needed a way to get all the dripping condensation out of the building. To achieve this, I built a PVC drain system that collects the water from the indoor and outdoor units.
The lines coming out of the wall are the refrigerant, electrical, and drain lines for the 24,000 BTU unit we installed in our dining room. The drain line pours directly into the PVC drain system I designed, which takes it outside the building.
Here is the end of the drain pipe system as it exits outside the metal building and drips onto the ground. It was a rather straightforward install for the AC unit. I think I ended up spending more time installing the drain system that I did installing the AC unit.
It has been brought to my attention that it will be difficult to wash the coils on the outdoor unit if needed since it is sitting above our office. This might have been a mistake in the long-term installing it this way, but I did save around $800 not having to buy additional materials and hiring an AC company to add refrigerant.
One option is to keep a close eye on the coils and use a vacuum cleaner to keep the coils clean. Only time will tell if this will work to keep the system properly maintained and running efficient. So far, I’m happy with the installation.
Pioneer Airlink Wi-Fi App
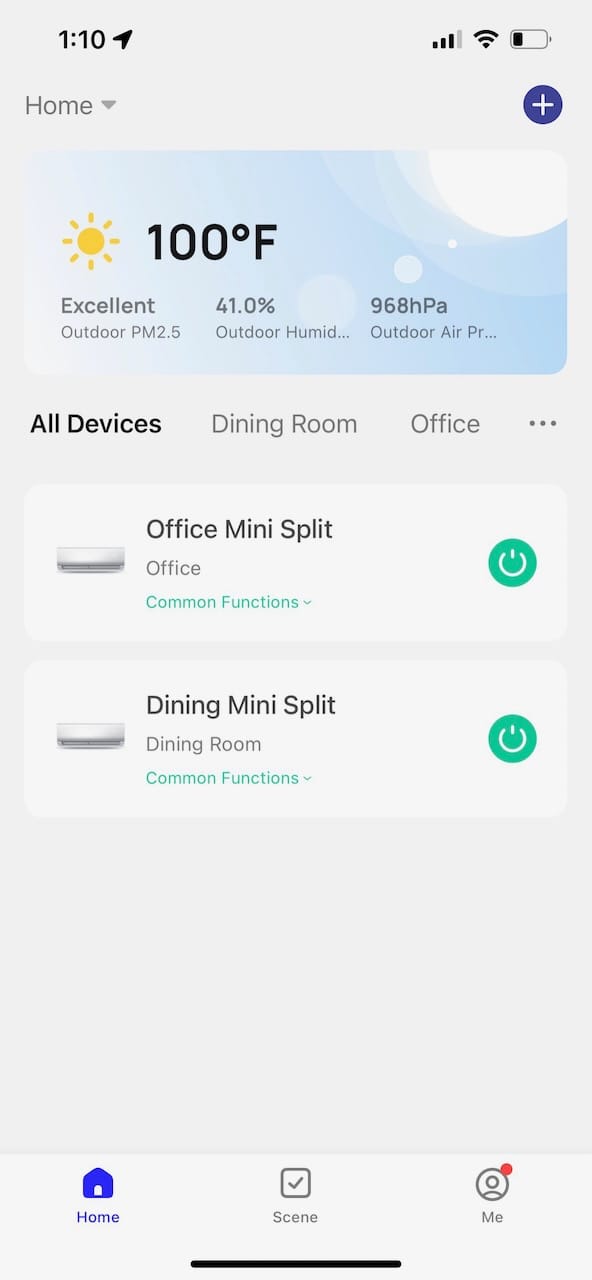
The Pioneer Airlink App is actually a nice, clean app to use. It is not perfect, but it does exactly what I require it to do, and the design is simple and intuitive. The home screen pictured above will list all the available AC units you have paired with the app.
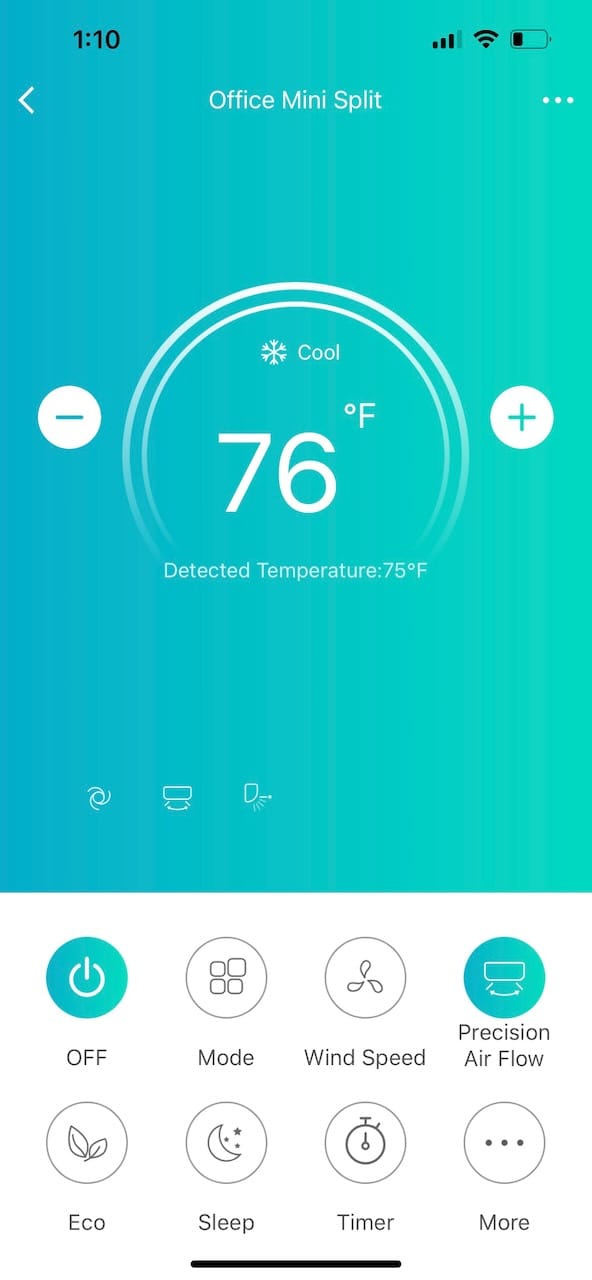
Once you click on one of your AC units, you will be taken to this next screen that will display the set temperature for the unit. This is where you can change options like Mode, Wind Speed, and Precision Air Flow. You can also turn on Eco mode, Sleep, or set a Timer.
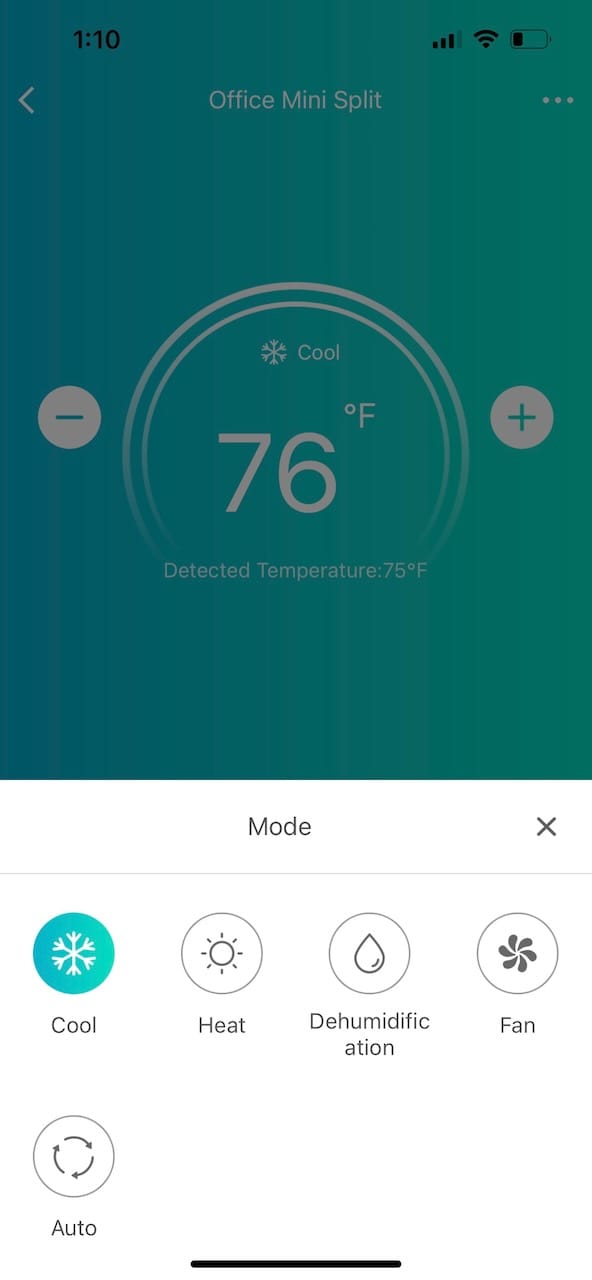
The Mode option is where you can select between Cool, Heat, Dehumidification, Fan, or Auto. When you select a different mode, the background color will change. For instance, the Cool mode is a turquoise background while the Heat mode is an orange background.
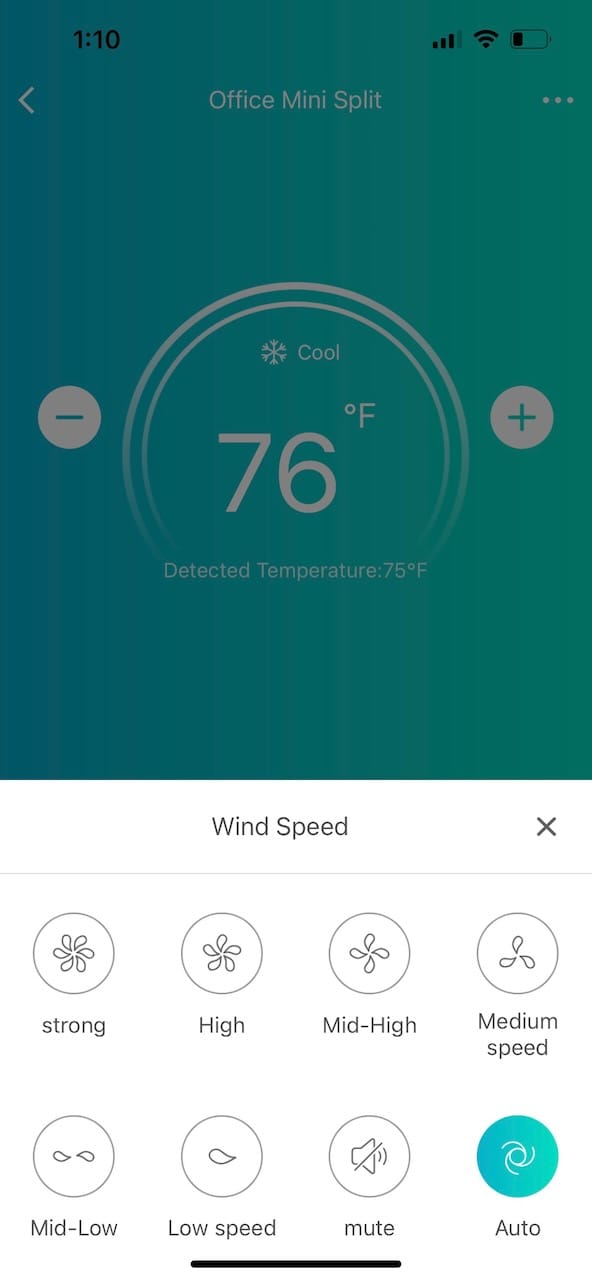
There are many options to select under the Wind Speed menu. If you are trying to cool a room down quickly, you can select Strong, which puts the AC in Turbo mode. The Mute speed is nice if you're trying to watch a movie, and Auto mode automatically selects the correct speed to get the temperature close to the current setting.
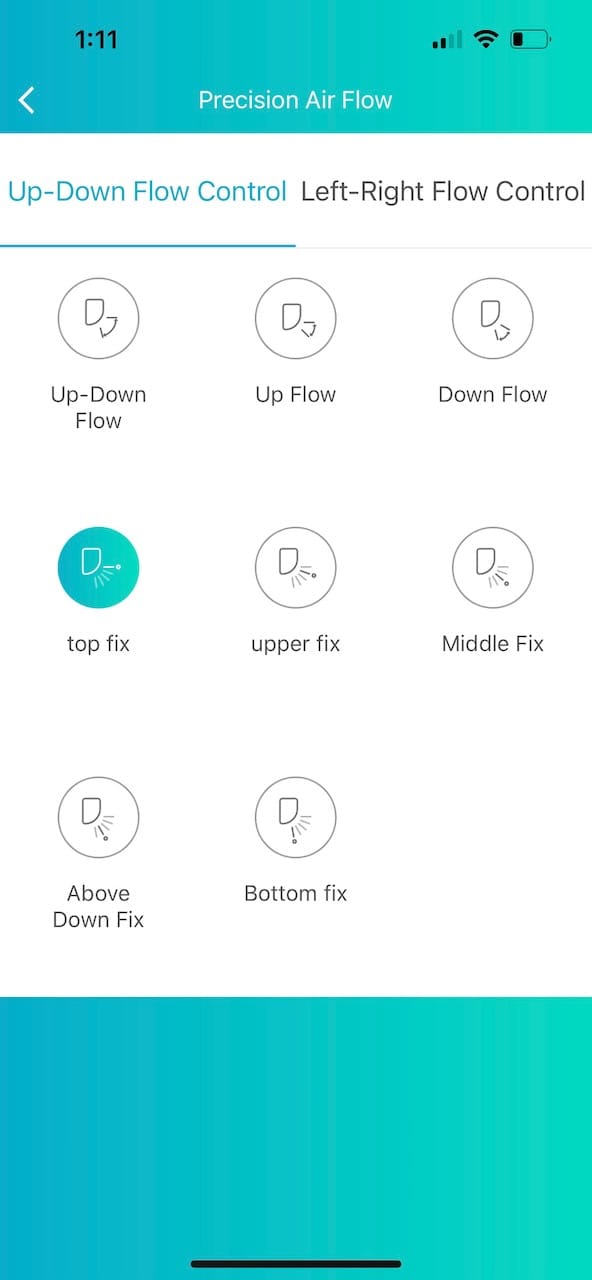
The Precision Air Flow option gives you complete control over how the dual louver system pushes air into the room. You can control the up and down louver along with the left to right louvers independently, so the air is being directed where you need it most.
Connecting Pioneer Airlink Wi-Fi to Mini Split AC
Connecting the Pioneer Airlink app to the new mini split was not intuitive. I tried the standard instructions in the app, and it would not program. I finally figured it out by following some different instructions I found on the internet.
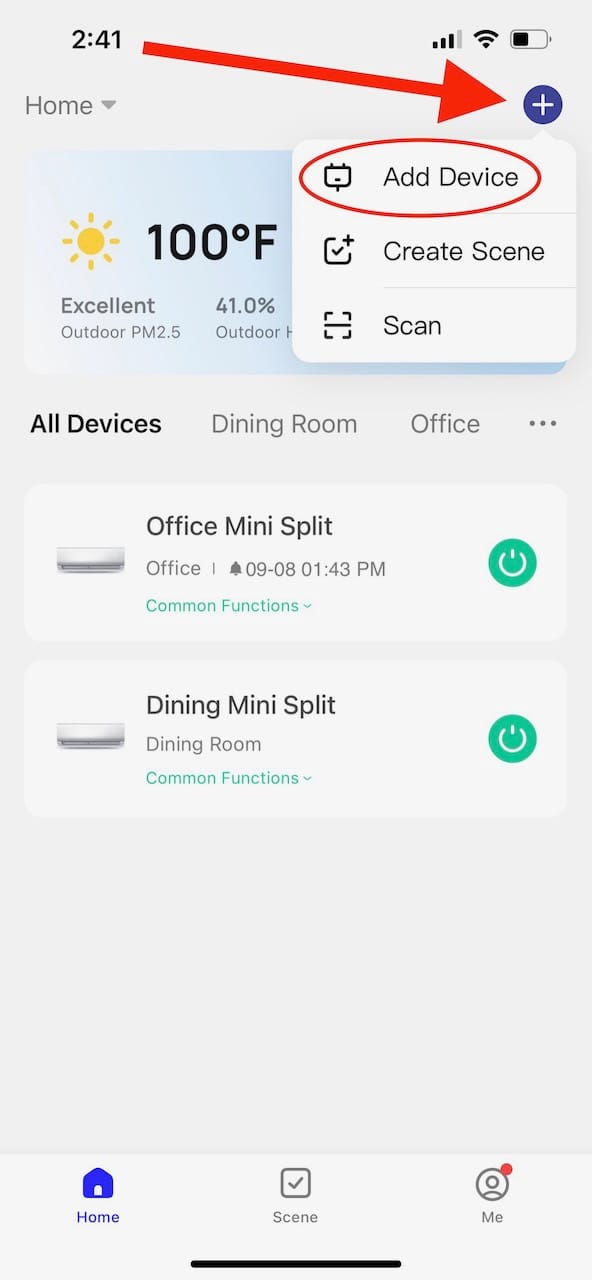
You need to click the plus button in the upper-right corner and select “add device”. This will take you to the next screen.
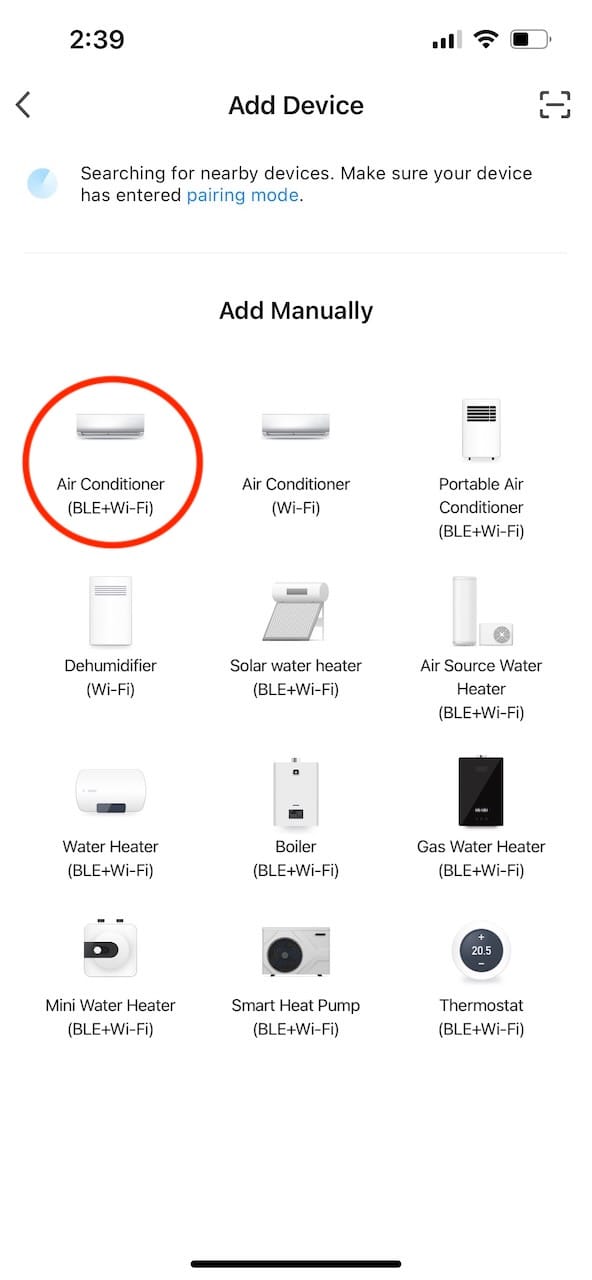
This next screen will be searching for devices. I selected the Air Conditioner option (BLE + Wi-Fi) in the upper left. The next step is the most critical.
The instruction manual will tell you to flip your breaker or reset the unit. I tried flipping the breaker and that did not work. I could not figure out where the reset button was, so I didn’t use that option.
What finally ended up working was turning off the AC and turning it back on with the remote. As soon as you turn it on, PRESS the DISPLAY button 6 times in a row within 6 seconds. It was at this point the Pioneer Airlink App found the AC in pairing mode and I named it accordingly.
Cutting Down Copper Refrigerant Lines
The Pioneer mini split AC units come standard with 16ft of copper lines. The outdoor unit is charged with enough refrigerant from the factory to accommodate 25ft copper lines without any new refrigerant being added.
You can cut down the copper lines, so your installation looks cleaner, but it is recommended to leave at least 10ft of copper line in service. If you take more than 6ft off, refrigerant is supposed to be removed from the unit, so the right amount is in the system.
I left the full 16ft copper lines in place on our dining room unit, but I cut off 9ft of copper line on the office unit, which left me with 7ft in service. I did this before I was informed to make sure not to remove too much copper tubing as it could cause issues.
I called Pioneer technical support, and they informed me it should not be an issue. If the unit does have problems due to the copper lines being too short, it will not cool down properly. My unit is currently keeping my office so cold I could hang meat. So far, there have been no issues and hopefully, it stays that way.
A Note About The Heat on Mini Splits
If you try to test the heat on a newly installed Pioneer mini split and the temperature outside is above 86F, the unit will not turn the heat on. This is built-in protection for the heat pump, so no one accidentally leaves the unit running heat on full blast in the summer and burns up the pump.
Conclusion
The overall experience with purchasing, installing, and using our new ductless mini split AC units has been great. So much so, we intend to install two more units here in the near future in our living room and master bedroom.
The added efficiency of going from 10 SEER window units to 19 SEER mini splits should help reduce our overall electrical bill. The cool, quiet operation along with the built-in heat will help tame the Texas summers and winters for years to come. Thank you, Pioneer, for all your help and support!


