How To Fix Chamberlain & LiftMaster Error Codes
LiftMaster openers feature a self-diagnostic system that uses error codes to communicate what issue you are having with your garage door.
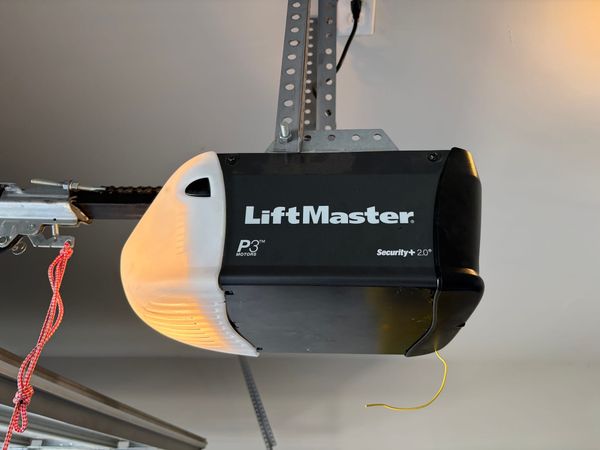
Chamberlain and LiftMaster residential garage door openers manufactured after 2011 have a built-in error code system that uses UP and DOWN arrows or digital wall controls to help you identify common problems. This self-diagnostic system makes it easy for homeowners to quickly identify and resolve their issues without having to call a service company.
These newer Chamberlain and LiftMaster openers will feature UP and DOWN arrows for limit adjustments, next to a yellow learn button. Older openers will feature a diagnostic error system as well, and we will include links to those charts at the end of this article.
PLEASE NOTE: The advice in this article will also be applicable to Craftsman garage door openers, since Chamberlain has been manufacturing their openers for over twenty years.
What are Chamberlain and LiftMaster Error Codes?

Chamberlain and LiftMaster openers with a yellow learn button will have UP and DOWN arrows that are used to make travel adjustments. These arrows also serve a secondary purpose by flashing a specific number of times to display the error code for your garage door opener.
The UP and DOWN arrow buttons next to the yellow learn button will flash a diagnostic code, then pause before repeating. By counting the UP and DOWN flashes on the arrows, you can use the diagnostic chart to identify what issue you are experiencing.
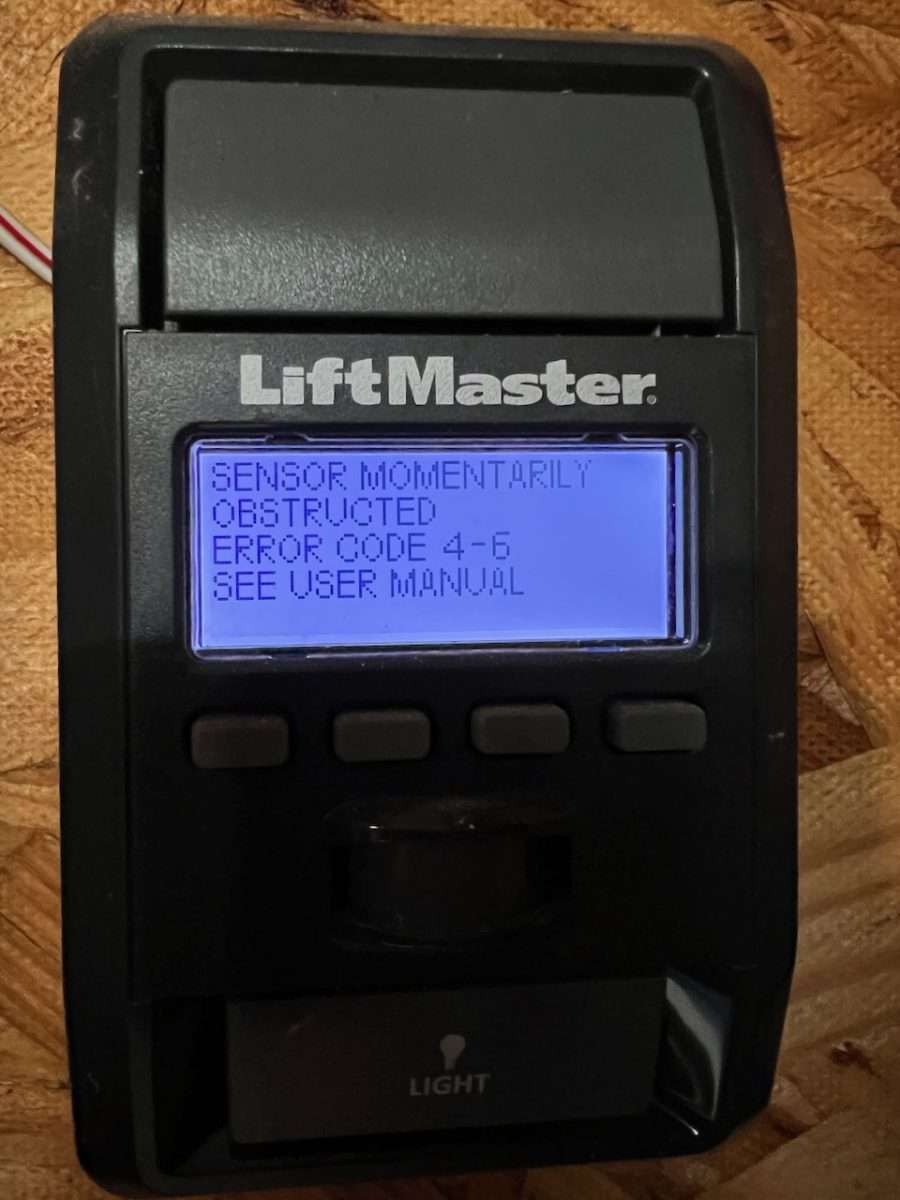
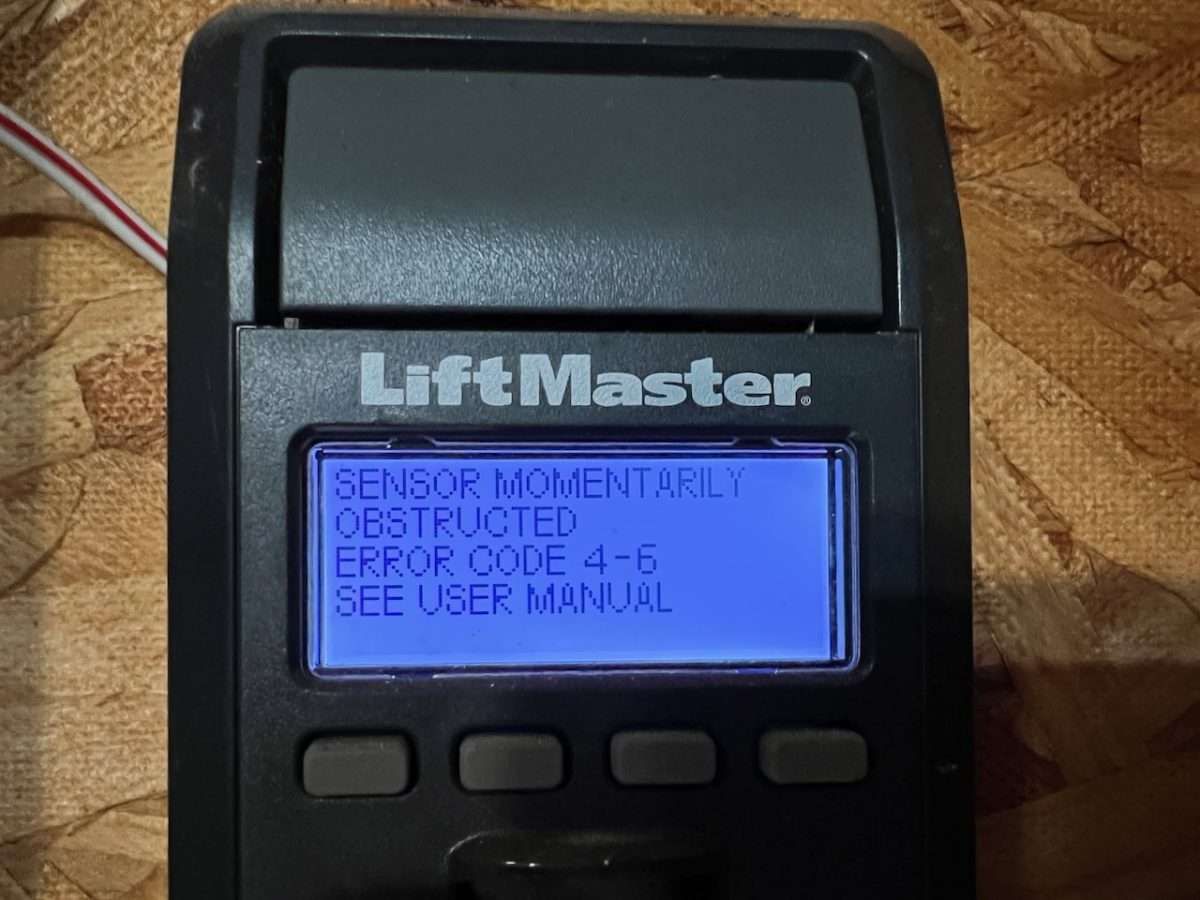
Premium Chamberlain and LiftMaster garage door openers with digital wall controls will display error codes on the wall control screen. These alerts make it easy to quickly identify which error code you are experiencing.
Chamberlain and LiftMaster Error Codes Diagnostic Chart
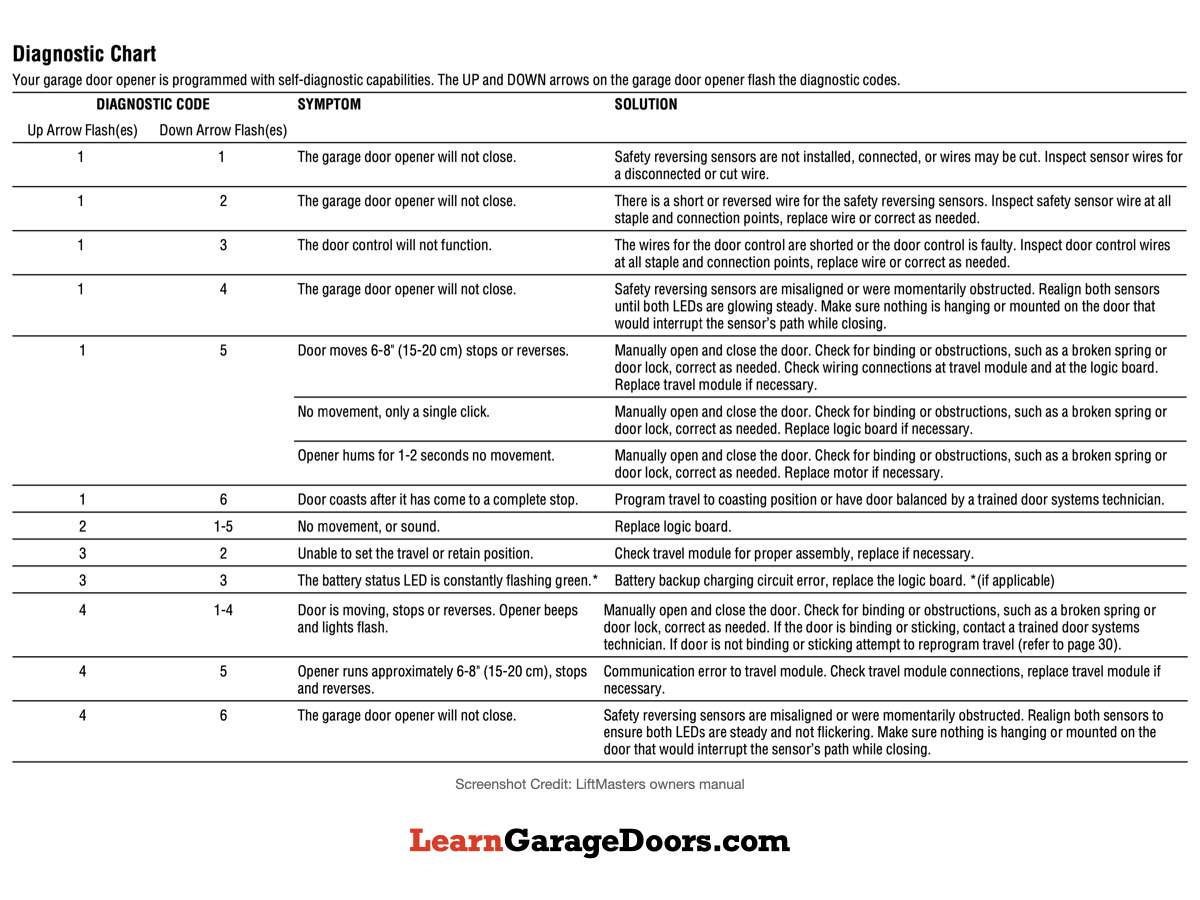
By counting the number of flashes on the UP and DOWN arrows on your garage door opener Motörhead, you can use the chart above to determine the symptom and solution to your problem. This chart applies to all Chamberlain, LiftMaster, and Craftsman openers with a yellow learn button and UP and DOWN arrows.
How to Fix Error Code 1-1
Symptom: The garage door opener will not close.
This particular close error code is related to the safety sensors not being installed, or a wire has been cut. First, make sure your safety sensors are properly installed.
Next, make sure the wiring is not damaged or cut. If your sensor wiring runs in the walls and attic, you may need to check continuity on the wire to make sure there are no breaks in the wiring.
How to Fix Error Code 1-2
Symptom: The garage door opener will not close.
Error code 1-2 also deals with the garage door opener not closing, but this time it is telling you there is a short or reversed safety sensor wire. It is common to puncture a wire when stapling them down during installation.
The metal staples can break the insulation, causing it to short out the sensor wire, which will prevent the opener from closing. A visual inspection of each staple will be required to rule out a short in the wire from staple penetration.
A reversed wire is when you get the polarity wrong when connecting the wires. The white to white and black to black colors need to be confirmed when wiring Chamberlain, LiftMaster, and Craftsman sensors.
How to Fix Error Code 1-3
Symptom: The door control will not function.
If the wall control button will not activate your garage door opener, you need to first check the wiring for a short or possibly a reversed wire. The red and white wiring is designated for wall controls and must be connected white to white and red to red for it to operate properly.
If you have stapled down the wall control wires, make sure one of the staples did not penetrate the wiring or break the insulation. This will cause error code 1-3 to display, as the staple could have shorted out the wire.
How to Fix Error Code 1-4
Symptom: The garage door opener will not close.
This error code is similar to 4-6, but for some reason not displayed as frequently. The 1-4 error code will show when the safety sensors are misaligned or were momentarily obstructed.
Check to make sure the green and amber lights are glowing steadily on your safety sensors and nothing is hanging down from your garage door that could obstruct the sensors.
How to Fix Error Code 1-5
Symptom: Door moves 6-8” stops and reverses.
If your garage door moves a few inches and reverses, first check your garage door to make sure it opens and closes manually without any issues. If everything feels good on the garage door, the travel module may need to be replaced on the opener.
If your garage door is hard to pull down to close, the springs on your garage door may be incorrect or need adjusting. The garage door opener can detect too much force when closing, and will reverse and go back up if necessary.
Symptom: No movement, only a single click.
If there is no movement with your garage door opener and all you hear is a click, first start by unplugging the unit for a minute or so. This will reset the unit.
Once the unit is reset, you may need to reprogram the limits. If everything is running good afterward, then you’re good to go. If you're still having the same clicking issue, the circuit board most likely needs to be replaced.
Symptom: Opener hums for 1–2 seconds. No movement.
If the opener motor hums for 1–2 seconds and shuts off with no movement in the chain or belt, you most likely have an internal failure inside the motor. This could be due to age, or maybe the opener has been pulling an unbalanced garage door.
If your motor has to be replaced, you will most likely have a complete new system installed. Motor replacement is costly and if your garage door is unbalanced, it has most likely prematurely damaged other parts on your opener as well.
How to Fix Error Code 1-6
Symptom: Door coasts after it has come to a complete stop.
If your garage door is coasting past its set travel point during operation, you most likely have the wrong springs on your garage door, or they need to be adjusted. Improper springs on garage doors can cause excessive wear on automatic openers.
First, try reprogramming the travel limits to see if that resolves your issues. If not, call a garage door company to adjust or replace your springs, so your door is properly balanced.
If you have an extremely heavy overlay garage door, and it's coasting, you may have the wrong opener installed. LiftMaster makes a specific opener for garage doors with excess weight and mass. Have a garage door company install their heavy duty residential opener and your coasting issues will be a thing of the past.
How to Fix Error Codes 2-(1-5)
Symptom: No movement, or sound.
If you are seeing 2 flashes on the up arrow and 1–5 flashes on the down arrow, you most likely are not hearing any sound or movement from your opener. If that is the case, your circuit board needs to be replaced.
How to Fix Error Code 3-2
Symptom: Unable to set the travel or retain position.
If you have tried programming the travel limits several times, and it won’t hold its set position, the travel module will need to be replaced. This is a module that monitors and controls the up and down travel for the opener.
How to Fix Error Code 3-3
Symptom: The battery status LED is constantly flashing green.
If you have a garage door opener equipped with a backup battery, there will be an indicator light in the same area as the yellow learn button. When all things are operating correctly, this light will be solid green, meaning your battery is fully charged.
If the indicator light is flashing green, this means the backup battery is charging. This will occur when you first plug in the garage door opener, and after you have been running the opener with the backup battery.
If your green light never stops flashing, you are having an issue with your circuit board, and it will need to be replaced to resolve the problem.
How to Fix Error Codes 4-(1-4)
Symptom: Door is moving, stops, and reverses. Opener beeps and lights flash.
Error codes 4-1, 4-2, 4-3, and 4-4 are usually associated with the door stopping or reversing. We will cover error code 4-2 in depth in the next section because of how common it is to receive this code.
First, check to make sure your garage door is balanced and running good manually. By doing this you will find out if there are any obstructions, broken springs, or locks accidentally activated.
If your garage door is not binding or sticking, try reprogramming the travel limits to see if this resolves your issues. If your garage door is binding, call a trained garage door professional.
How to Fix Error Code 4-2
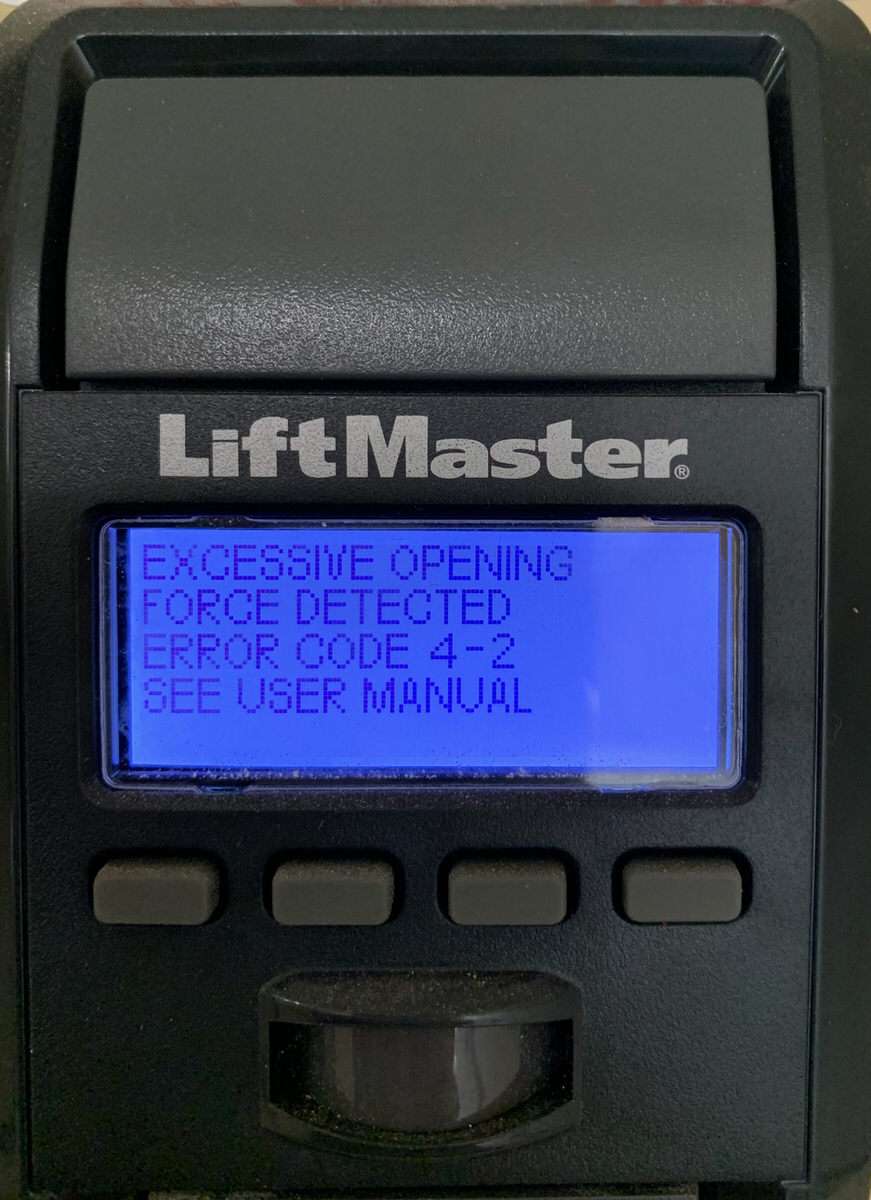
Symptom: Excessive opening force detected.
If you are experiencing error code 4-2, this is related to excessive force while the garage door opener was trying to open the garage door. What this means is your opener has detected the garage door was too heavy to open.
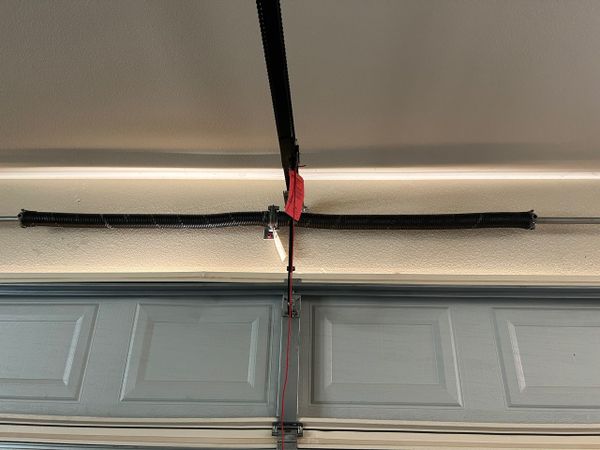
Broken Spring on Your Garage Door
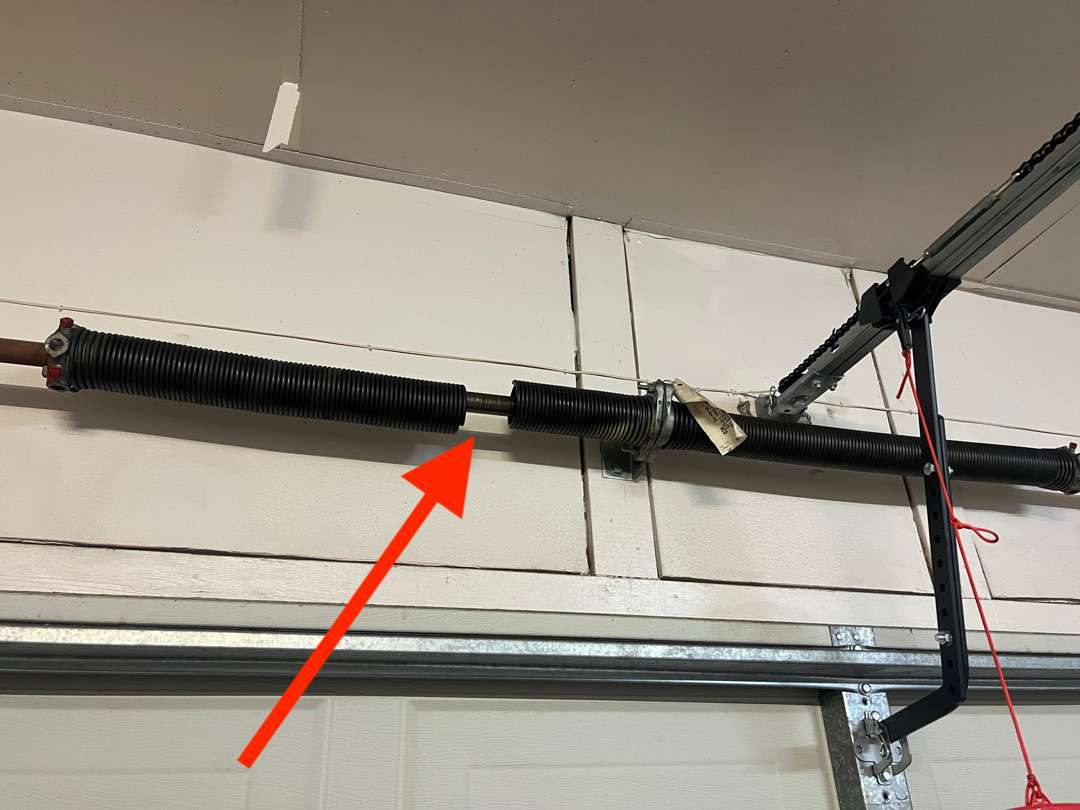
99% of the time, when a homeowner is experiencing error code 4-2, their garage door has a broken spring. The springs on a garage door are what lift the full weight of the door, not the automatic opener. It is only in place for convenience.
Your garage door may have torsion springs, extension springs, or Wayne Dalton Torquemaster springs. No matter which type of spring you have, you can easily check if a spring is broken by trying to lift the door manually. If it is too heavy to lift, you most likely have a broken spring.
Garage Door is Locked
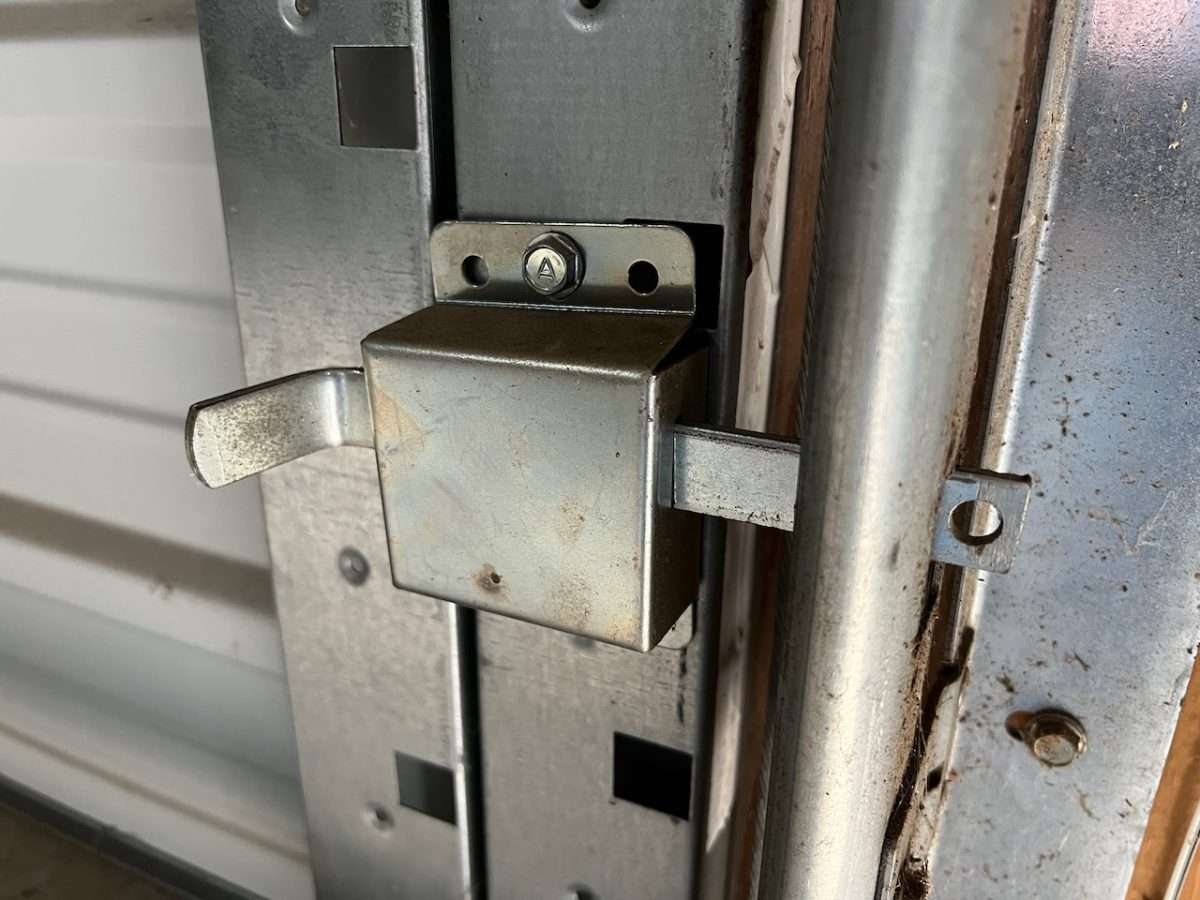
Although not as common, the lock on your garage door may be engaged through the track if you’re receiving the diagnostic error code 4-2. This happens when someone in your home has locked the inside lock and tried to open the garage door with the automatic opener.
Opening the garage door while it’s locked can also cause your door to come off track. When a garage door goes off track, one side will usually sit higher than the other side because the cable has come off the drum. It’s best to call a service company if your door has come off track.
LiftMaster 98022 Wall Mount Opener
If you are getting the excessive force error code on a newly installed LiftMaster 98022 opener, then you or the installer most likely has not set up the Door Profile on the unit. Below is a link to an article I wrote on the subject that goes into more detail.
Excessive Force Error on LiftMaster 98022? Here’s Why
How to Fix Error Code 4-5
Symptom: Opener runs approximately 6-8”, stops, and reverses.
If your garage door opener consistently runs 6-8” down, stops, and reverses, you most likely are having issues with your travel module. Newer garage door openers with DC motors feature a travel module that communicates with the circuit board.
If the travel module connections are fine and haven’t been tampered with, the module itself most likely needs to be replaced. You can attempt this repair yourself or call a garage door service company.
How to Fix Error Code 4-6
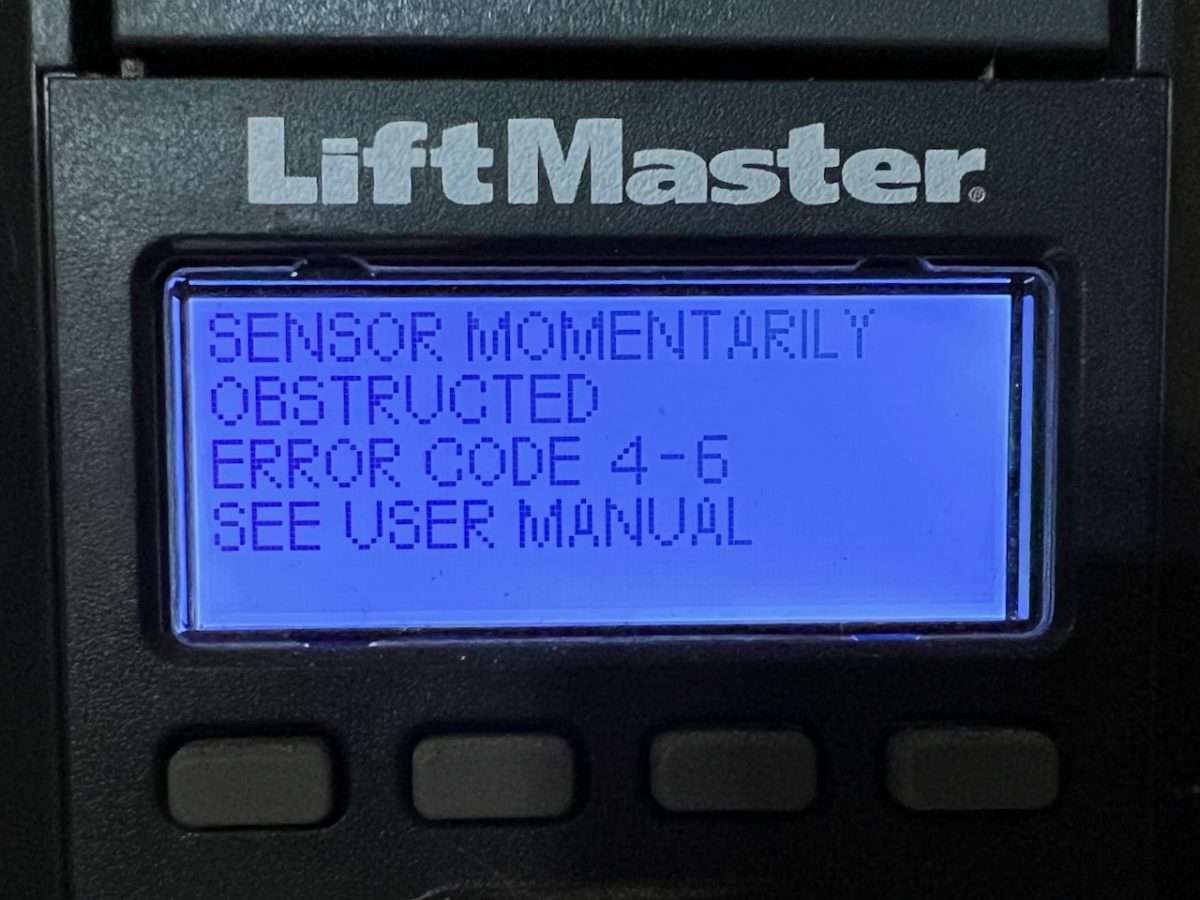
Symptom: The garage door opener will not close.
Error code 4-6 is the most commonly searched diagnostic code for Chamberlain and LiftMaster openers. If you see this error code on your wall control or flashing 4 up 6 down on your opener arrows, you are having issues closing your garage door due to safety sensor alignment or obstruction.
Chamberlain, LiftMaster, and Craftsman garage door openers will have a solid green light on one side and a solid amber light on the other side. If the green light is off or flashing, your safety sensors are blocked or misaligned.
Blocked Safety Sensors
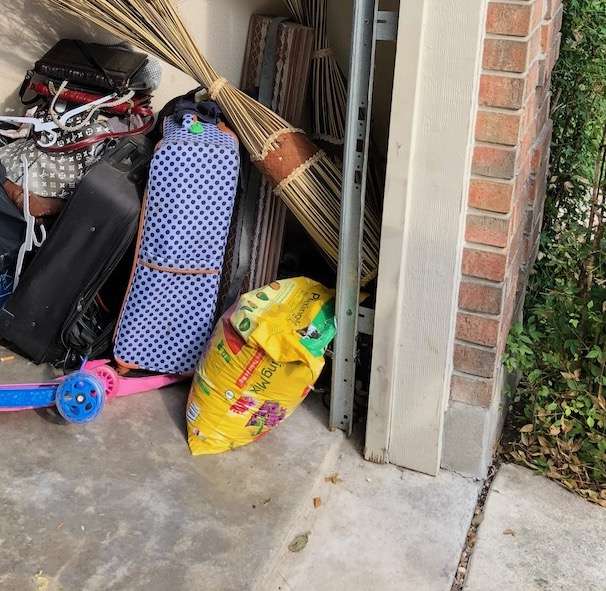
First, check to make sure nothing is blocking your safety sensors. Any obstacle like a bag of potting soil, garden tools, gas cans, or trash cans can easily block the safety sensor beam, preventing your garage door from closing.
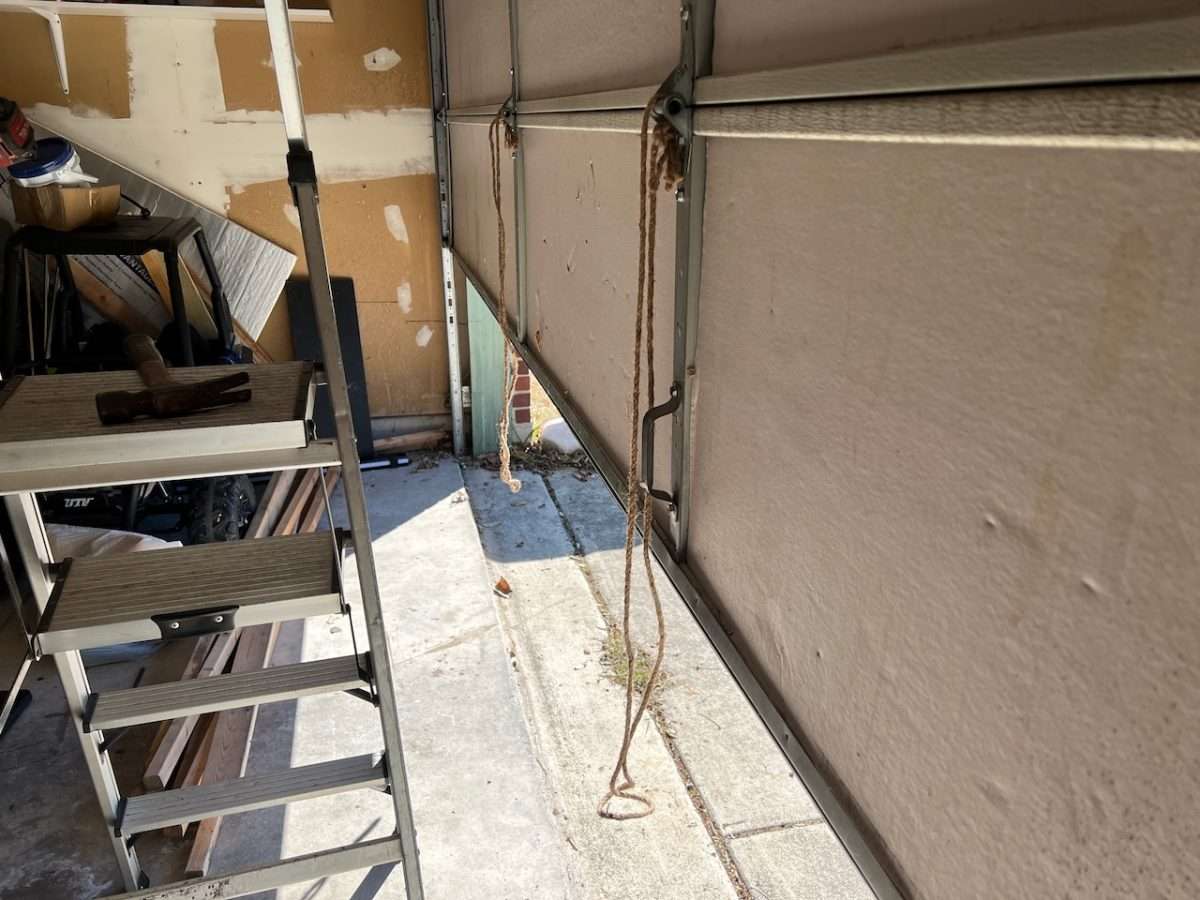
Another common issue we see is when the garage door is closing down, and it reverses at the last minute and goes back up. This is usually caused by something hanging off the garage door like a rope or debris such as leaves and spider webs.
Keeping the bottom of your garage door clean will go a long way in preventing issues like these. Try to resist the urge to attach or hang items on your garage door, as they can disrupt the operation of the door and opener.
Safety Sensor are Misaligned
If you are still experiencing diagnostic error code 4-6, check to make sure your safety sensors are aligned correctly. Walk up to the sensor and look down to make sure the sensor is lined up across the opening of the garage door with the corresponding sensor on the other side.
If the sensors are slightly off, this can add up to a lot over a span of 16ft. Try using the concrete key or lip on the concrete as a guide for alignment if your garage has one.
Error Code 4-6 is Showing, But Sensors are Aligned?
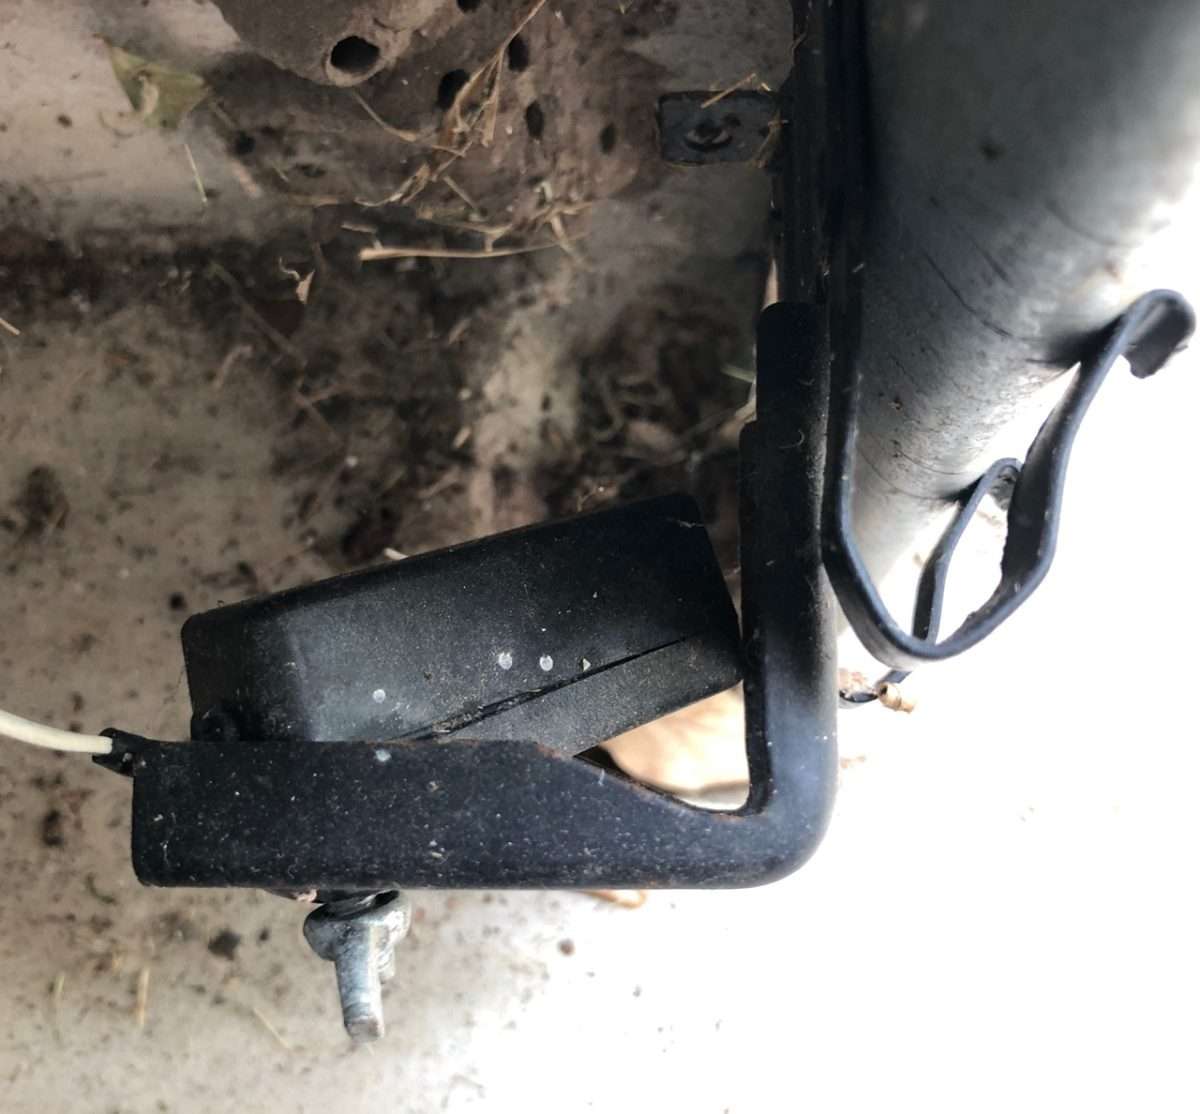
If your safety sensors are aligned, and you’re still getting the 4-6 error code, take a closer look at the safety sensor lights. You many need to get down on your hands and knees to look closer at the green or amber light.
If the green or amber light is lightly flickering up close, but looks solid from a distance, then the sensor alignment is still off. Try adjusting the safety sensors again until the flickering stops.
If you can’t get the flickering to stop or alignment is not working, you may need to replace the safety sensors. The sending and receiving sensors can get weak over time, causing the garage door not too close.
How Do I Clear or Reset Error Codes?
The way you clear or reset error codes on Chamberlain and LiftMaster openers is by fixing the problem and running the unit. In this article, we have laid out the symptoms and solutions for all the error codes on units with a yellow learn button.
Taking your time to find a cut or shorted wire or manually running your garage door to see if it’s balanced are the first steps when trying to reset these error codes. After you have found out what is causing your issue, run the unit several times from the wall button and all the error codes will be reset.
Diagnostic Codes for Older Chamberlain and LiftMaster Openers
Older Chamberlain and LiftMaster garage door openers that only feature a single learn button also have self-diagnostic capabilities. The LED light next to the learn button will flash various times, then pause before repeating, which lets you know what issue your opener is having.
Below is the complete list of links to the Chamberlain and LiftMaster diagnostic codes on their websites. The Sec+2.0 myQ line item is the newer openers with UP and DOWN arrows that we discussed earlier in this article.
The remaining units on the list are older units along with some diagnostic codes for jackshaft openers. Some jackshaft openers like the 8500W will also feature UP and DOWN arrows that will flash error codes when there is a problem.
| Type of Garage Door Opener | Where to Find the Diagnostic Codes |
|---|---|
| Sec+2.0 myQ | Garage Door Opener Diagnostic Codes |
| AC garage door openers | What the flashing LED next to the learn button means |
| 3800/3900/8500/RJO20/RJO20C | Diagnostic codes for Residential Jackshaft Opener (RJO) |
| 8500W, LJ8900W, LJ8950W | Diagnostic Codes: Wi-Fi Residential and Light-Duty Commercial Jackshaft Operators |
| 2500B, 2500D, 3500 and 3850 -DC Unit | 2500B, 2500D, 3500 and 3850 - Diagnostic code chart |
| 2500 | 2500 - Diagnostic code chart |
Credit: support.chamberlaingroup.com
Conclusion
Having issues with any appliance in your home is never a good thing. New technologies have brought forward interesting ways to interact with appliances in our homes. Resolving common issues is no exception.
The Chamberlain Group has done a fantastic job incorporating their diagnostic error code system into the Chamberlain, LiftMaster, and Craftsman line of openers. Hopefully, this article will help you better understand the error code being displayed, so you can resolve your issue and move forward with your day.