How To Repair a Garage Door Hinge
Repairing a broken hinge on a garage door can be simple or nearly impossible depending on the brand of your garage door.
The upward-lifting sectional garage door is an invention that celebrated its 100th anniversary in 2021. One-piece and carriage house doors were all that was available if you wanted to fully enclose your garage pre-1921.
The new “All Purpose Door For Garages, Factories, and Boatwells” was mounted on the back of a vehicle as a display unit and driven around to show prospective buyers. It was definitely an interesting time in history.
A standard double car width garage door has 15 hinges, which is what allows the sections to go from vertical to horizontal in a matter of seconds. There are many parts that go into making this happen, including rollers, hinges, hardware, brackets, tracks, cables, drums, springs, shafts, bearing plates, etc.
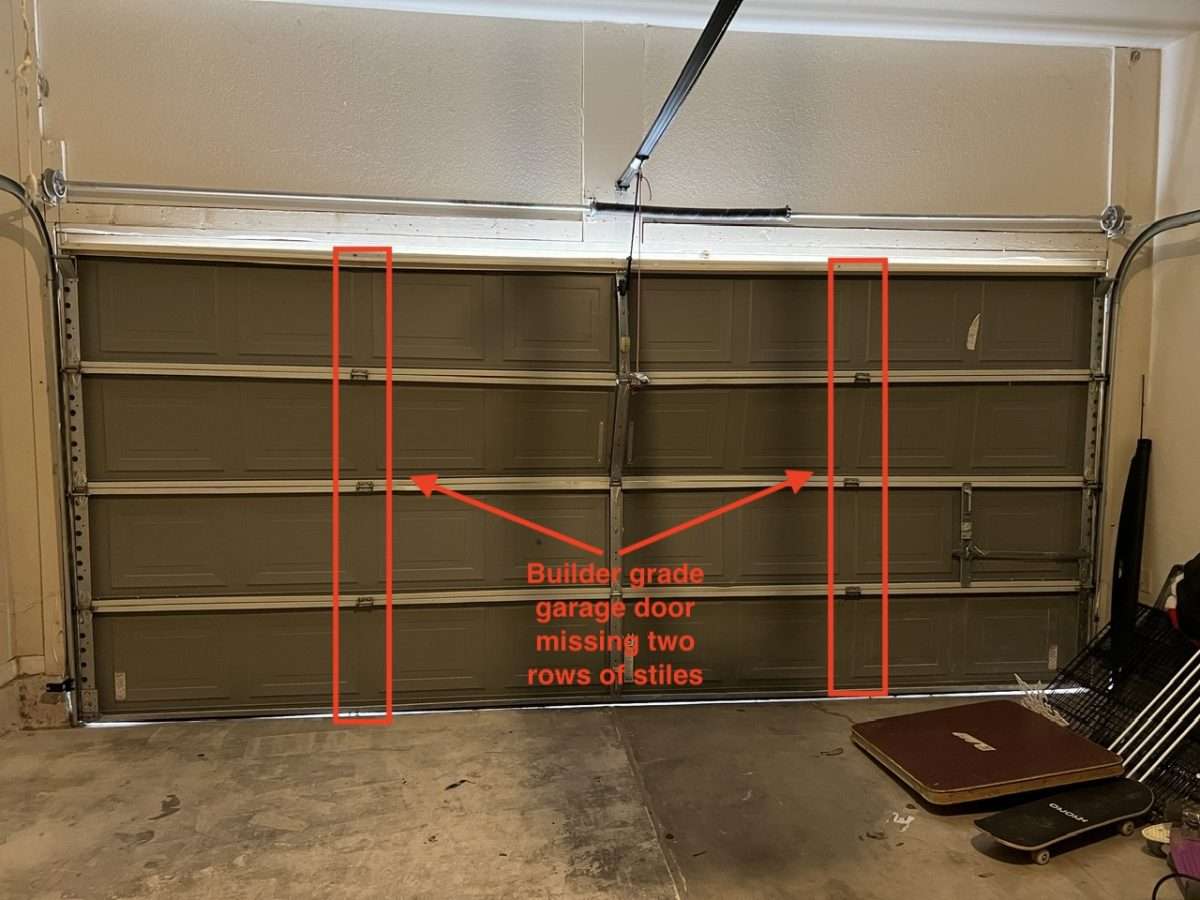
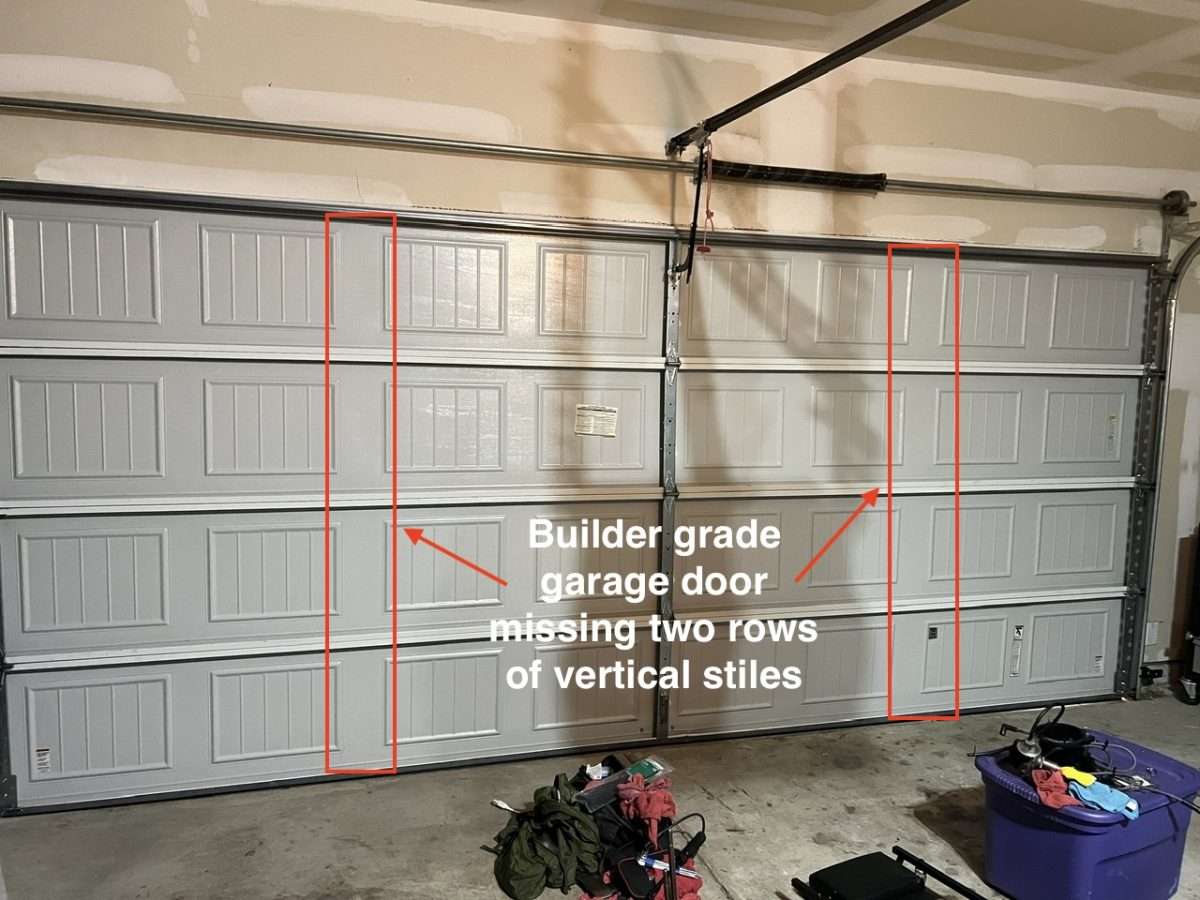
With all these moving parts, hinges are one of the most common garage door repairs. This is especially true today with the rise of “builder grade” garage doors being installed using thinner metal than in previous years.
Let’s take a look at the most common hinges on the market today and discuss what it entails to have them repaired.
First, Disable the Automatic Opener
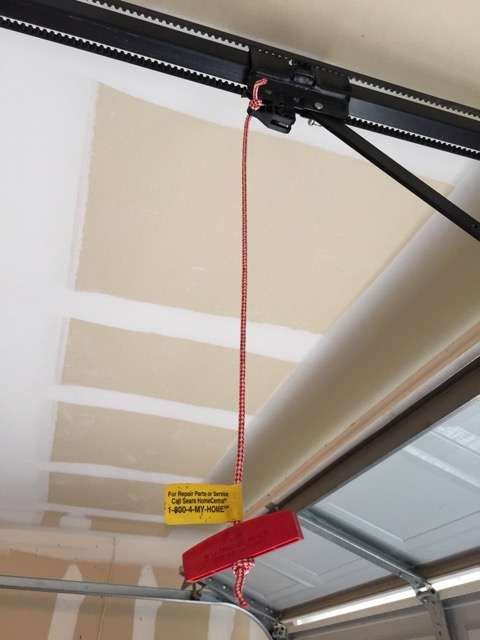
Anytime you're working on a garage door, you want to disconnect the automatic opener from the garage door. The reason for this is so no one comes home and opens the garage door while you are working on it. This could injure someone, knock someone off a ladder, or damaged the door.
You can pull the red emergency release rope to disconnect it from the garage door. Make sure you know how to reconnect it if you intend to release it. Next, you can unplug the automatic opener from the ceiling, which will insure no one can accidentally open it while you're working.
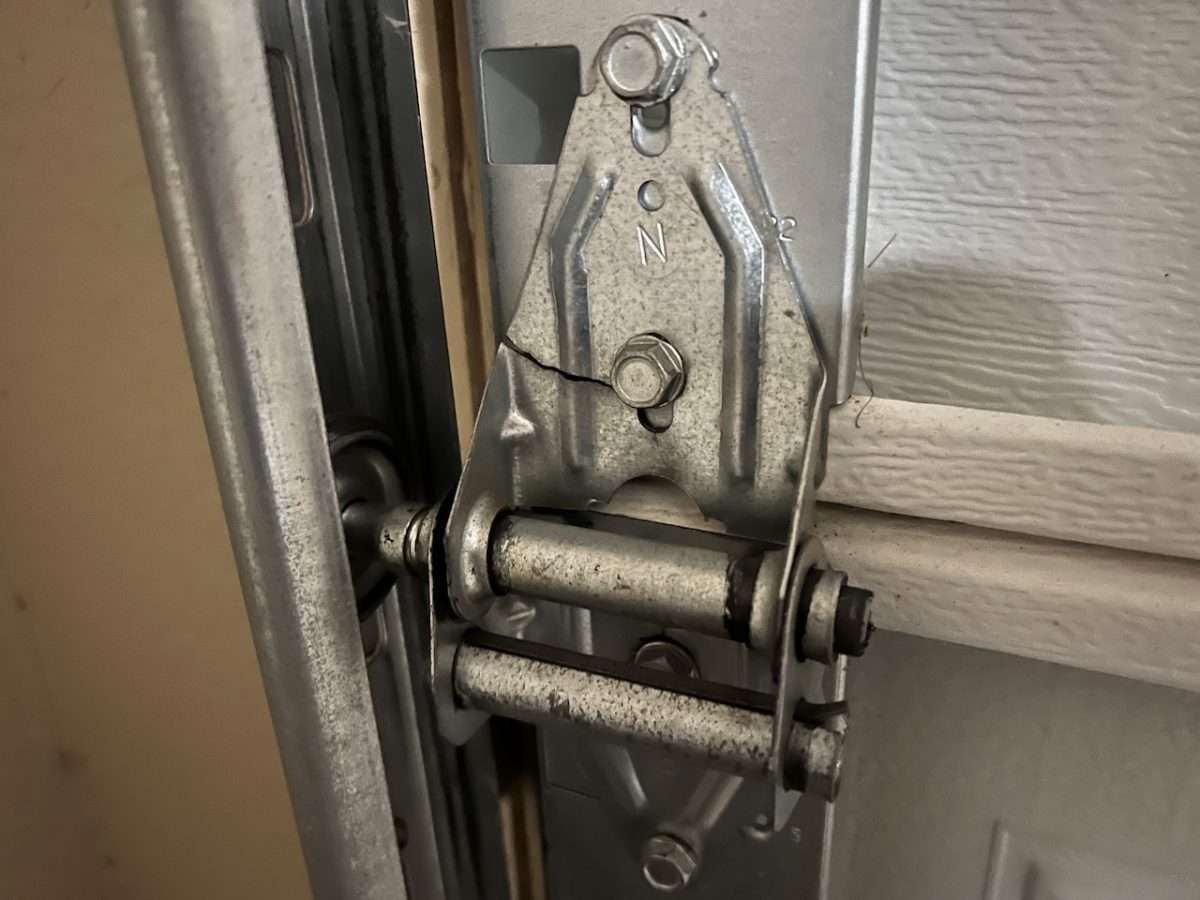
Signs of a Cracking Garage Door Hinge
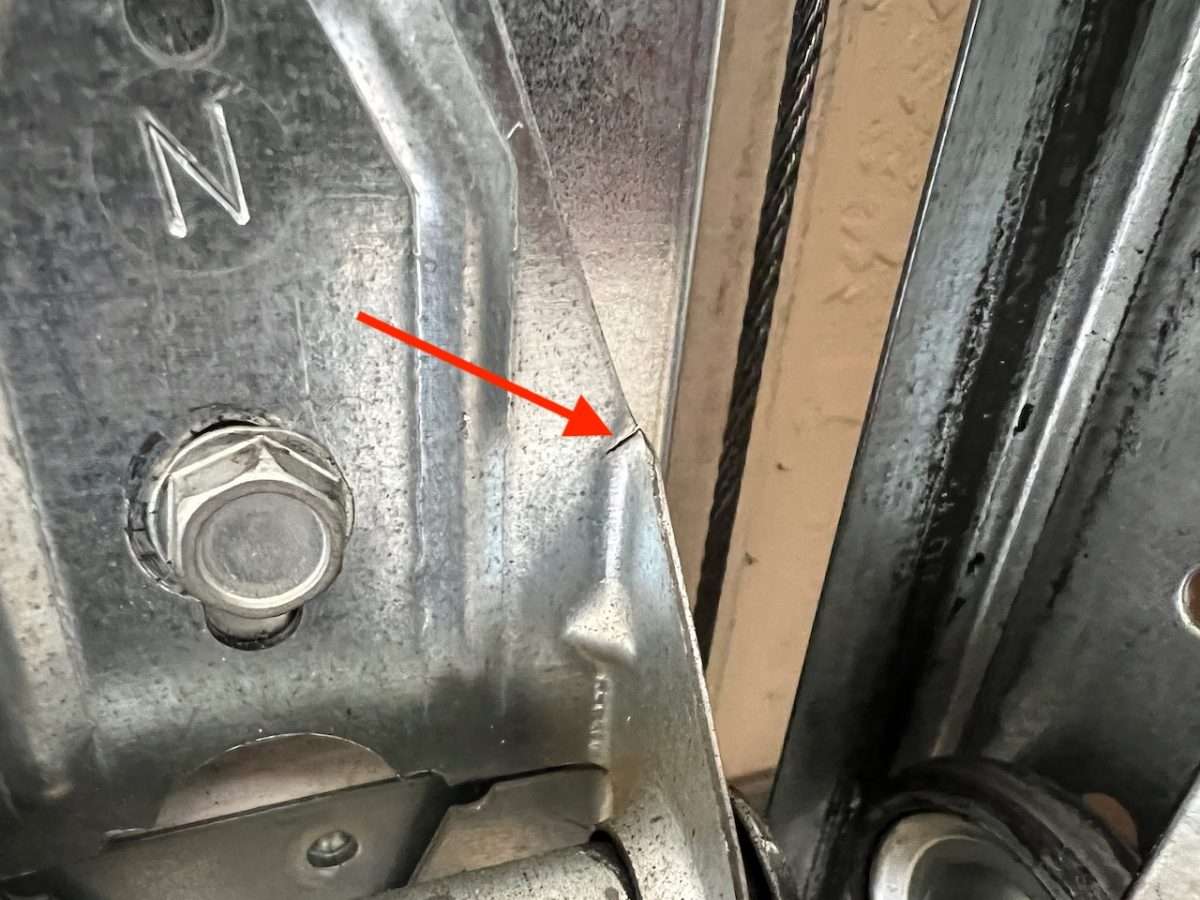
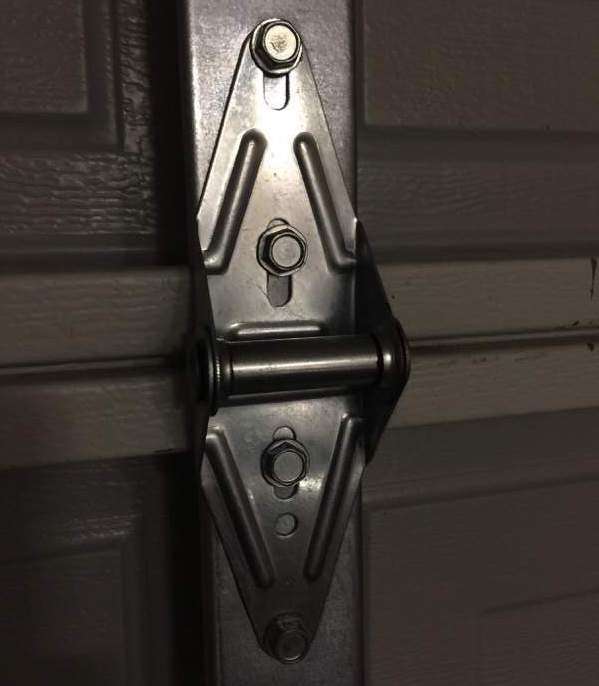
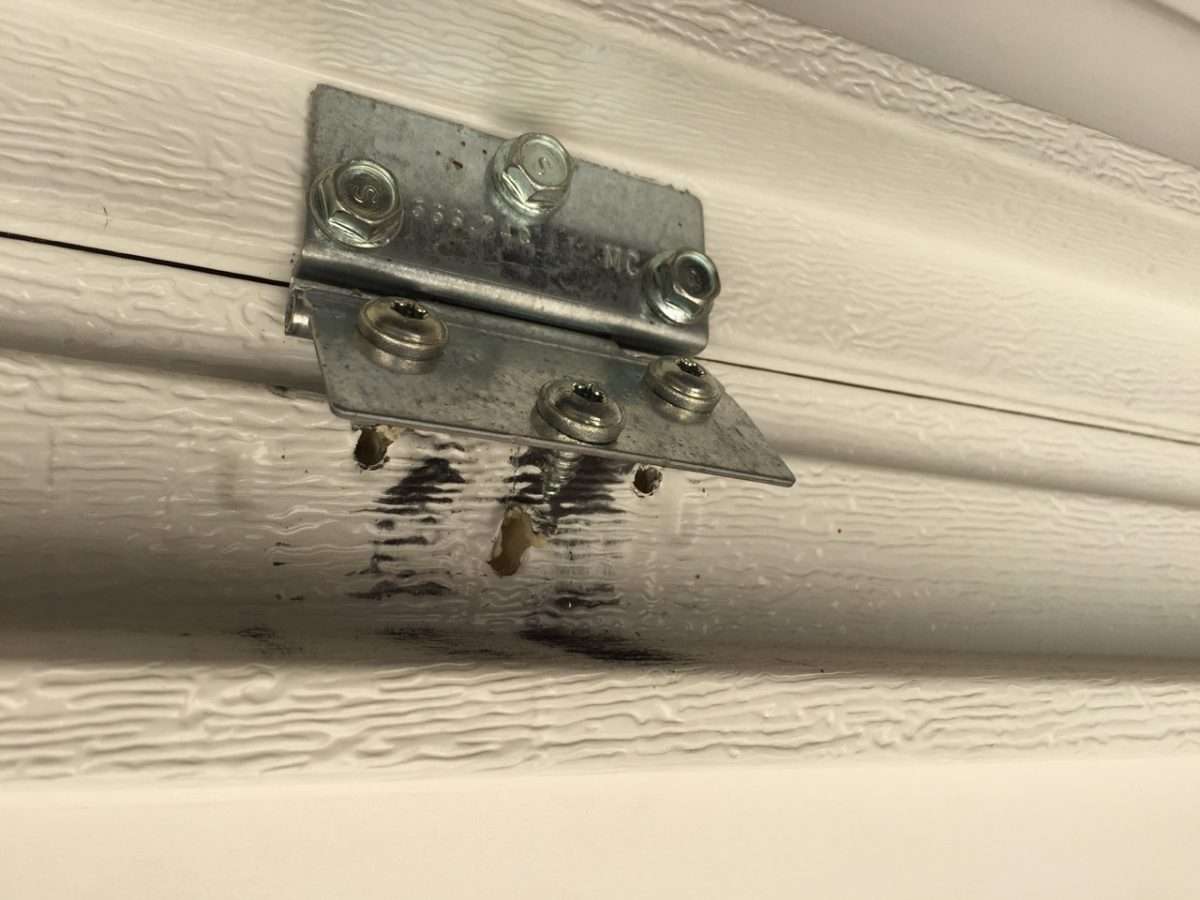
There is a lot of stress placed on garage door hinges, especially on the end where the rollers are attached. These end hinges carry the load of the garage door when it is in the horizontal track, so they are usually the first to fail.
As illustrated in the photo above, a stress crack is starting to form in the corner of the hinge. If you inspect the hinges on your garage door and start to see this, it would be good to get those replaced before they completely fail.
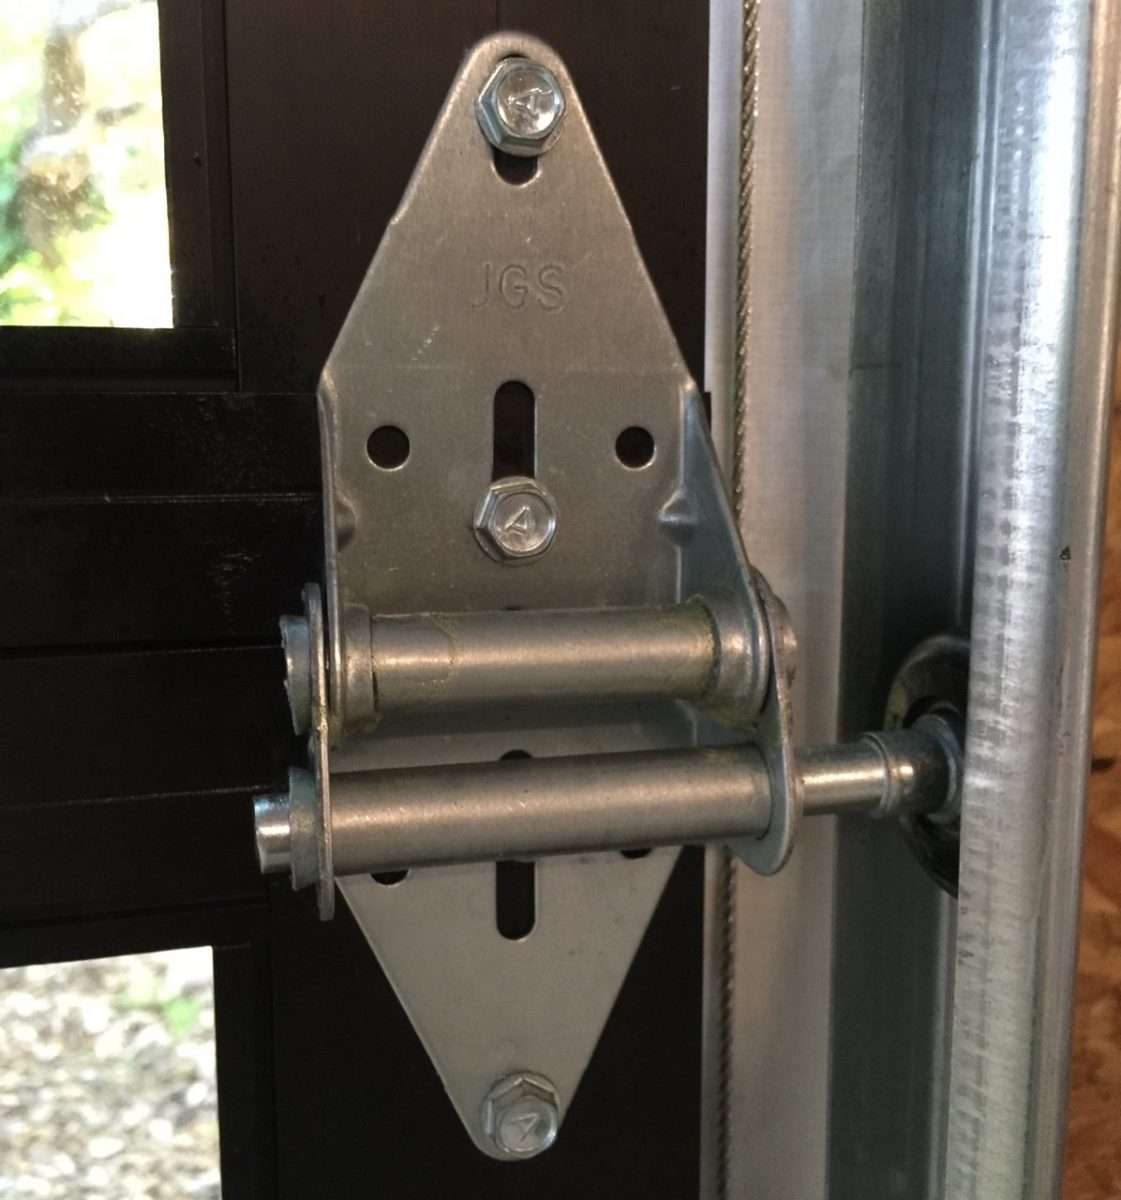
Standard Garage Door Hinge Locations
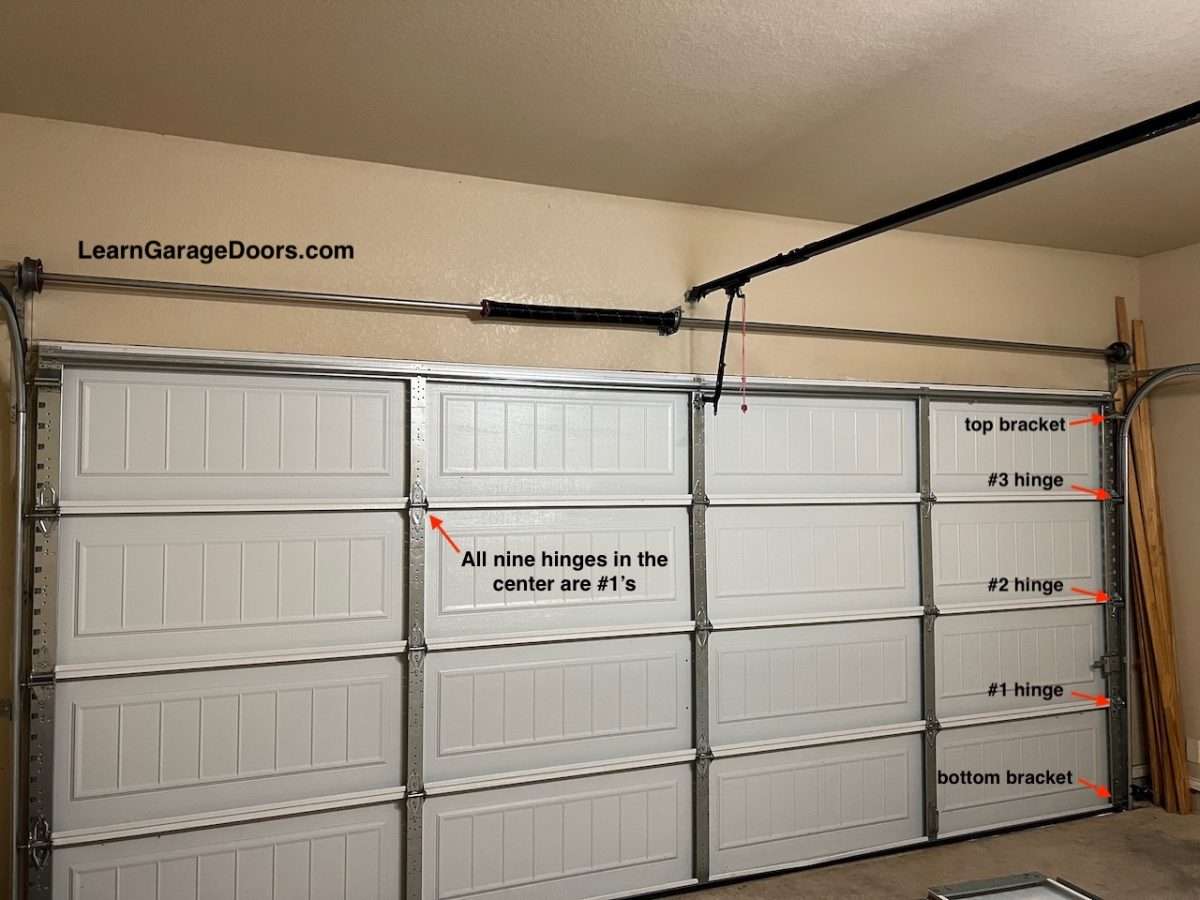
Garage door end hinges are numbered starting with the #1 hinge, which is installed where the bottom section meets the second section. The next hinge up will be a #2, then a #3, and finally a top hinge on a 7ft tall residential garage door. If you have a 8ft tall garage door, you will most likely have a #4 hinge if your garage door consists of five sections.
The reason garage door hinges are numbered is that there is a progression in the offset of the roller as you go up the garage door. This is because the vertical tracks are leaning inside the garage, which allows the door to close properly when in operation.
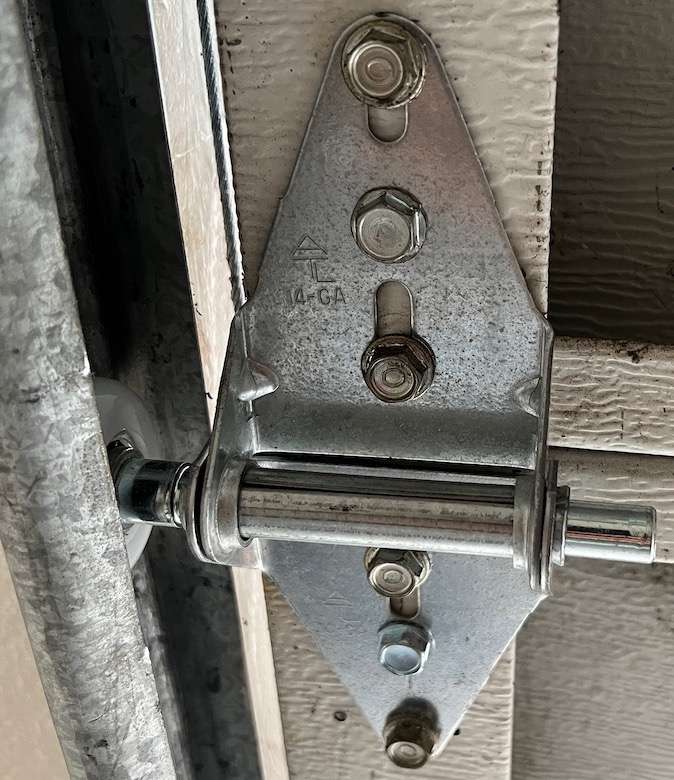
Standard Garage Door Hinge Repair
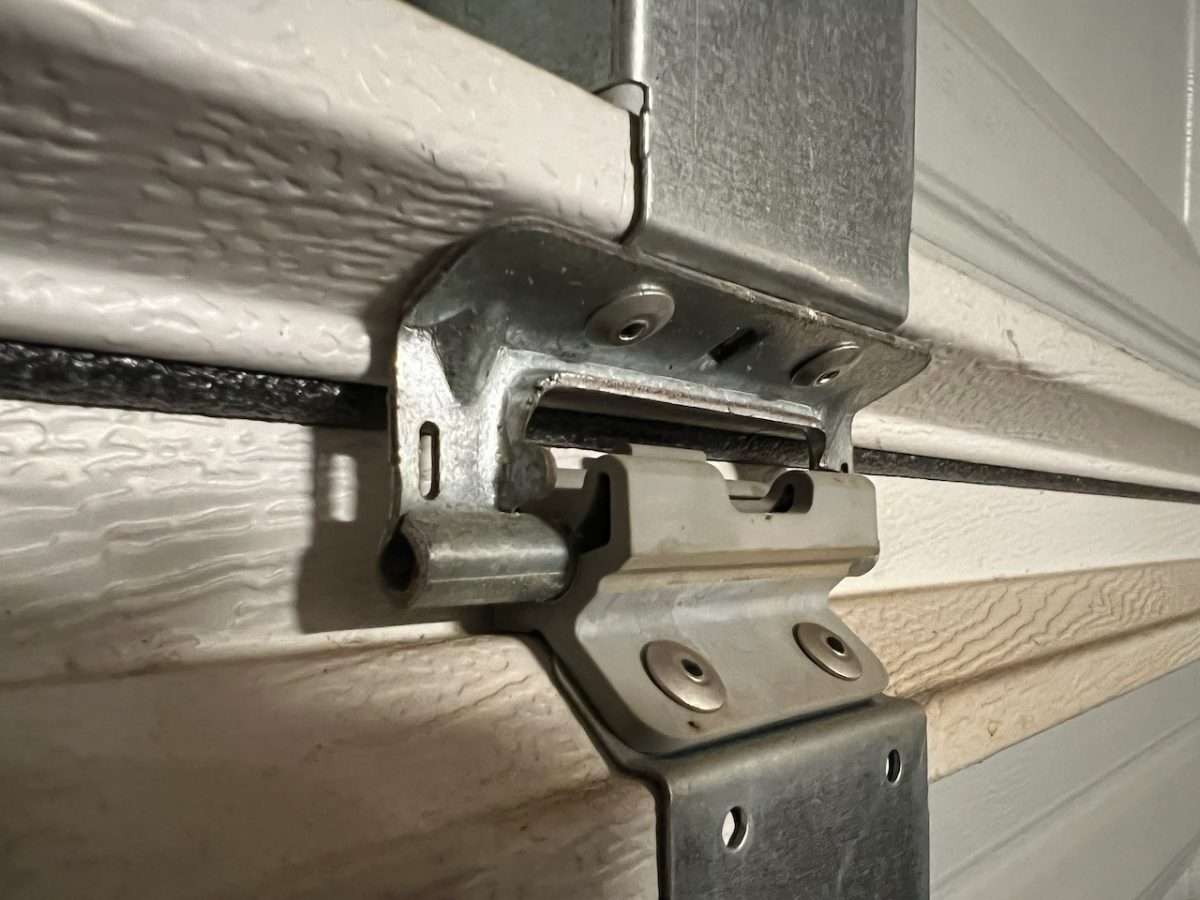
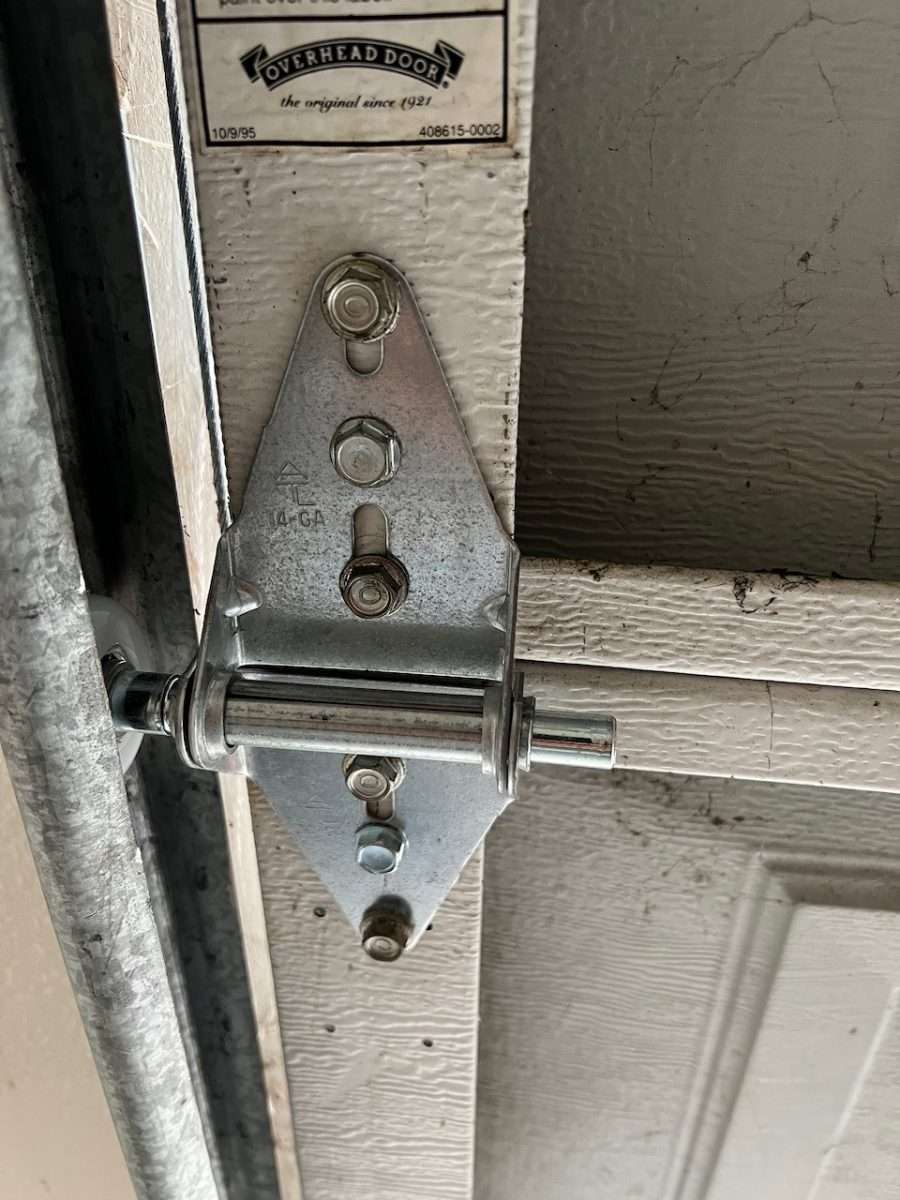
With the rise in competition with home builders in competitive markets, standard garage door hinges are not standard anymore. Gone are the days of heavy duty 14 gauge commercial hinges being the norm on residential garage doors. Instead, we have everything ranging from 18-20 gauge metal all the way down to plastic hinges that snap together.
The hinge in the photo above is an 18 gauge hinge with a narrow body. These builder grade hinges are not as wide as the 14 gauge commercial hinges, and they use much thinner metal, which leads to premature failure.
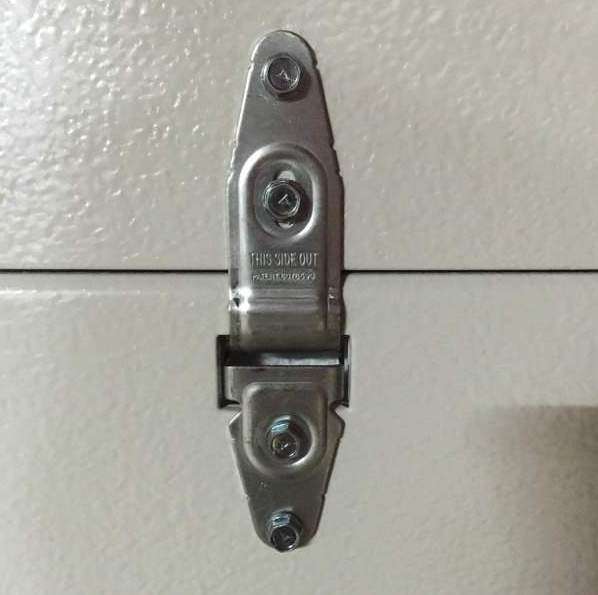
How to Remove a Garage Door Hinge
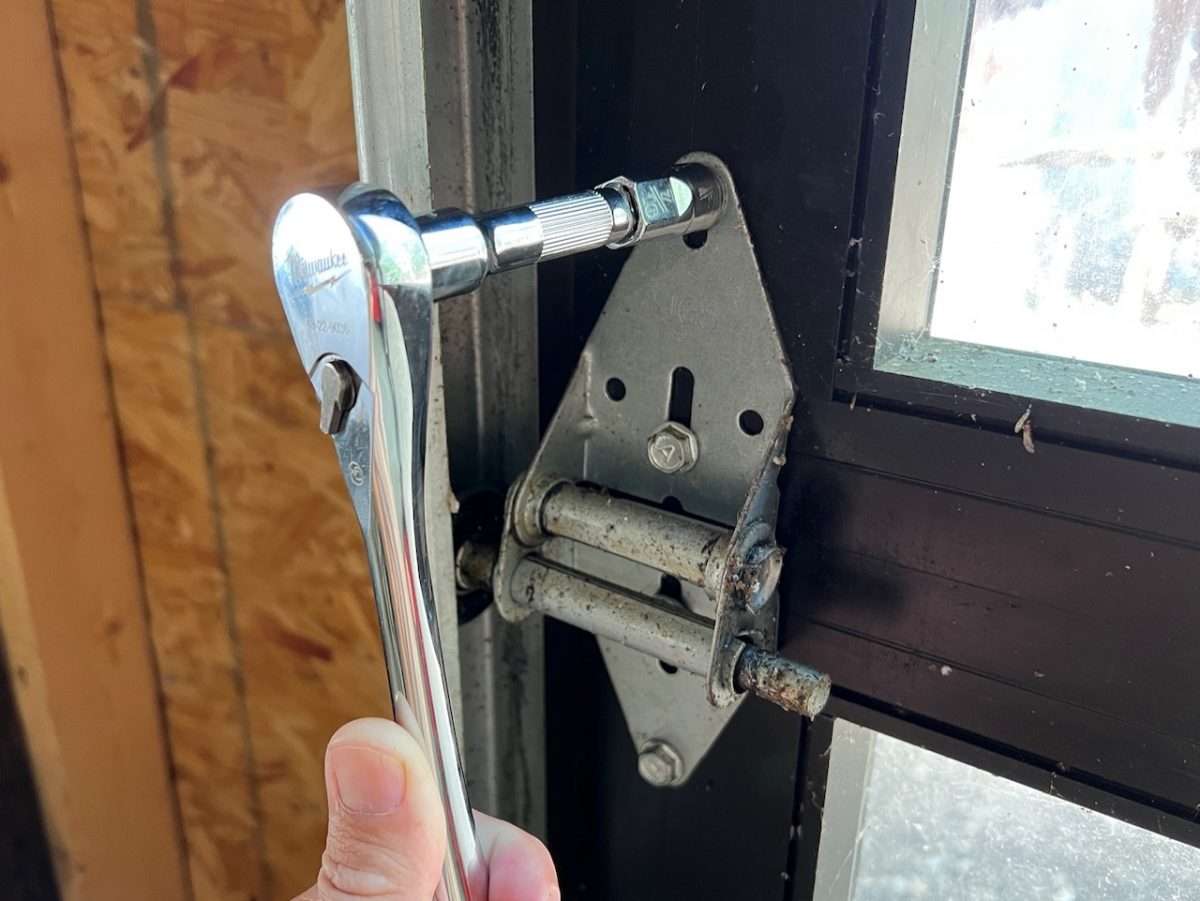
Most garage door hinges are attached with four screws that can be removed with a 7/16” socket. You will want to do this with the garage door in the down position, and make sure to only remove and replace one hinge at a time. Once you remove the hinge, you can pull the roller out, so you can reinstall it in the new hinge.
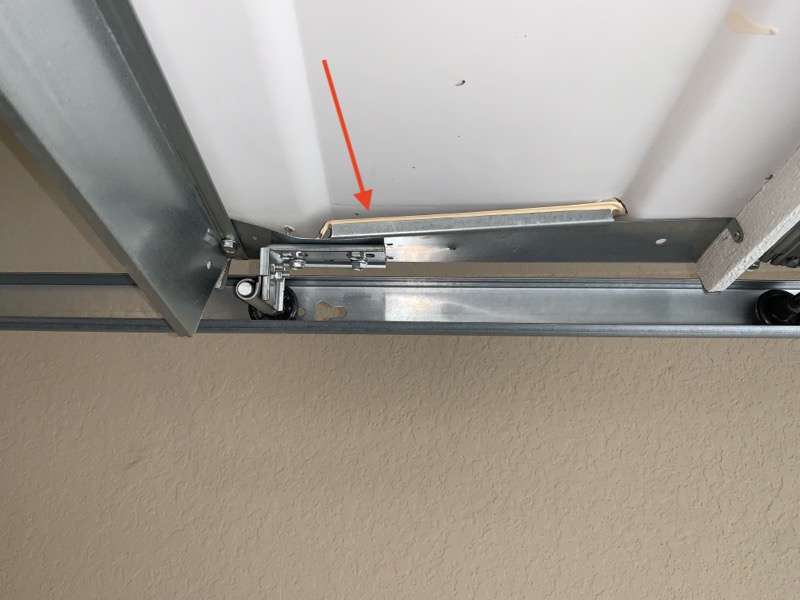
Installing Your New Garage Door Hinge
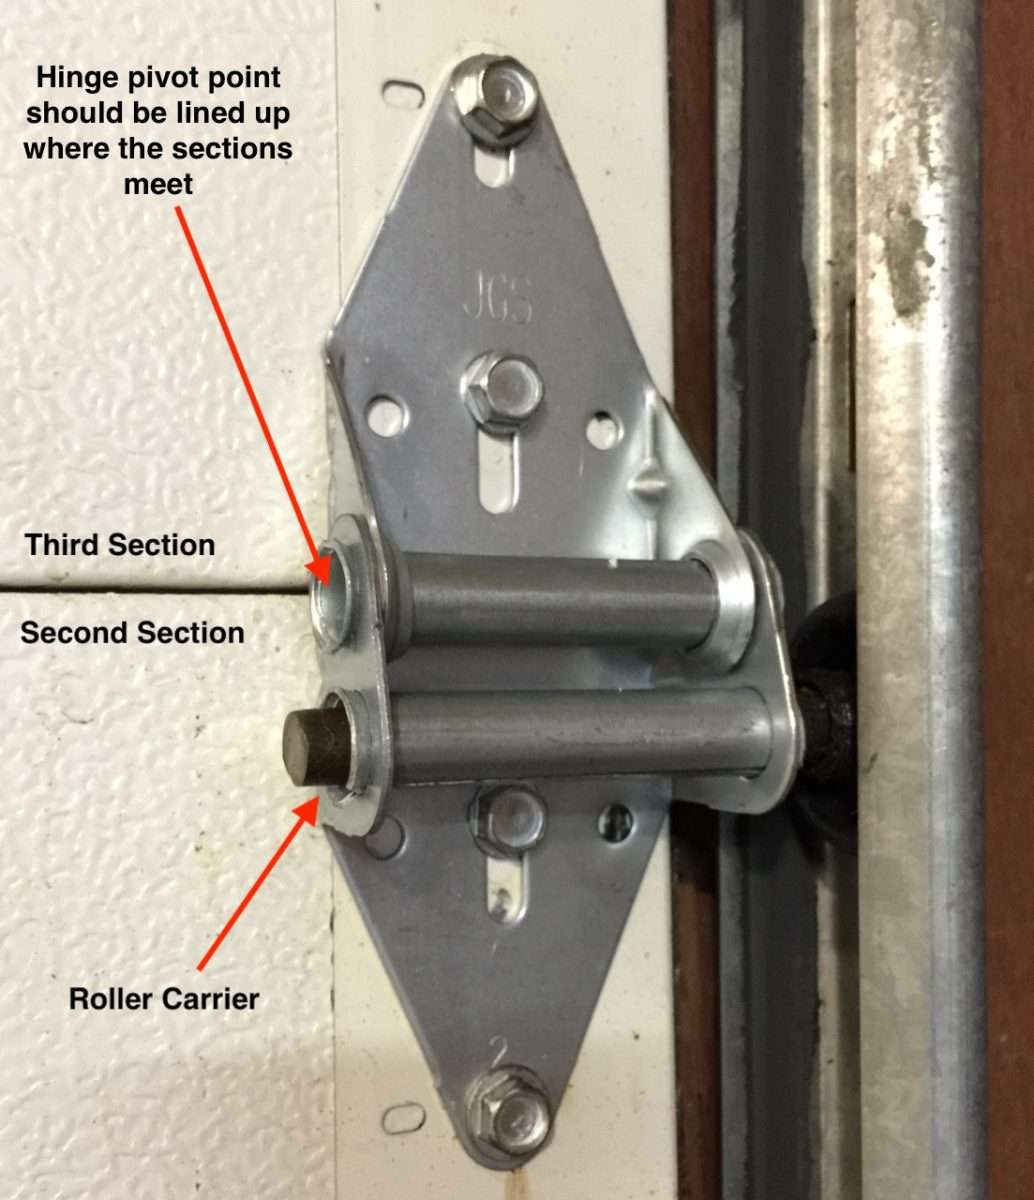
As we have shown in the image above, the hinge pivot point needs to be lined up where the two garage door sections meet on a standard garage door. This ensures proper operation when opening and closing the door. If you are going back with similar hinges, you will most likely use the same holes on the garage door. If they are stripped out, try installing some self tapper screws into fresh metal, so the hinge is securely fastened to the garage door section.
The roller for the #1 hinge will be inserted into the pivot point of the hinge. There is not a secondary offset roller carrier on the #1 hinge. When installing the roller shaft into any hinge, it is a good idea to spray some garage door lube on the shaft, so it moves freely inside the carrier during operation.
The #1 hinges are also what hold a standard double car width garage door together in the center using nine hinges. Your door may have less if it is a cheaper builder grade configuration.
Double Standard Hinges
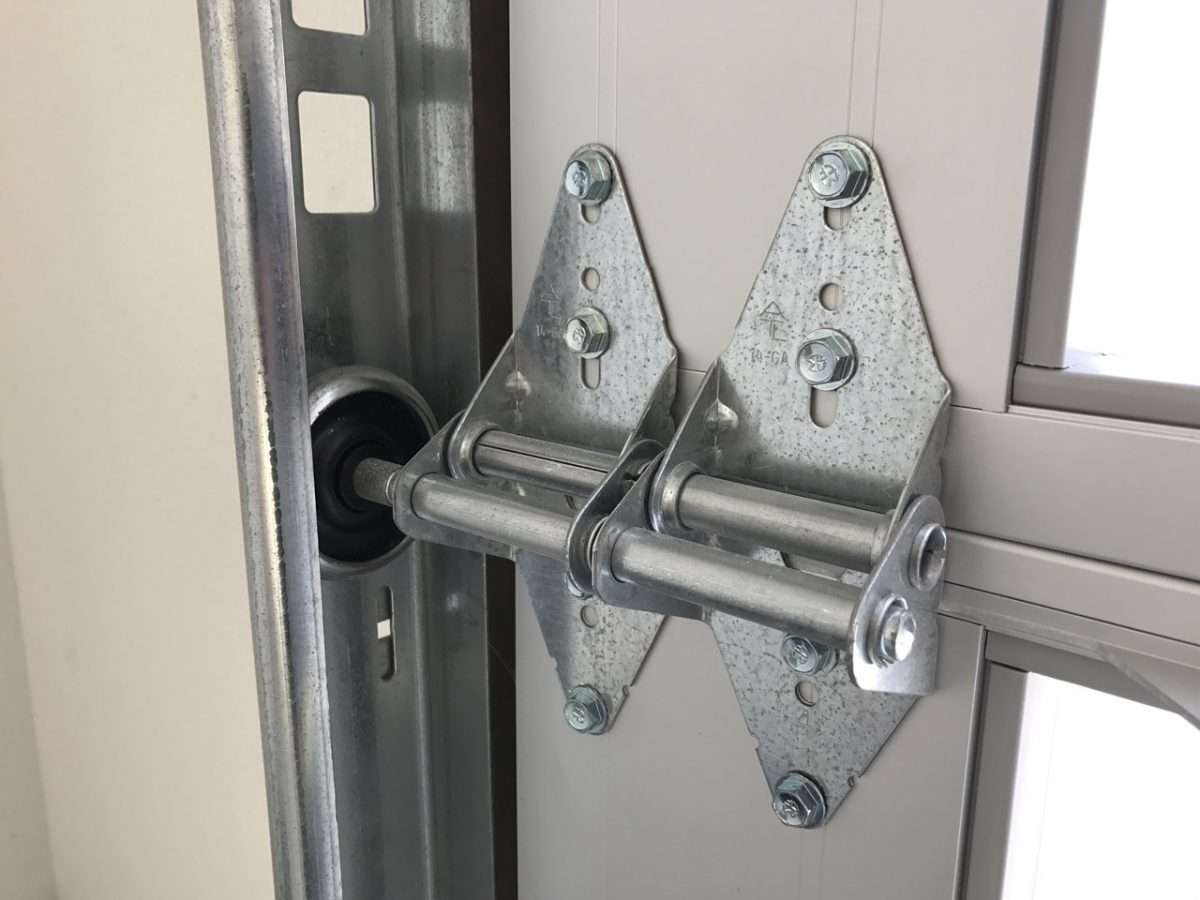
This is rarer, but if you have an oversized garage door that uses double end stiles and 7” stem rollers, you will need to remove the outside hinge to gain access to the inside hinge if it’s cracking.
Amarr Safeguard Hinge Repair
For years, Amarr Garage Doors promoted their Safeguard Pinch Free Hinges on their complete product lineup. Their unique hinges and roller carriers allowed their sections to slide over the next section in a pinch free design.
Traditional garage doors sections have always opened like a gator mouth, which can catch your finger if you're not careful. These pinch free flat hinges pivot inside the pocket on the door and can be replaced the same as a standard hinge by removing the four screws with the garage door in the down position.
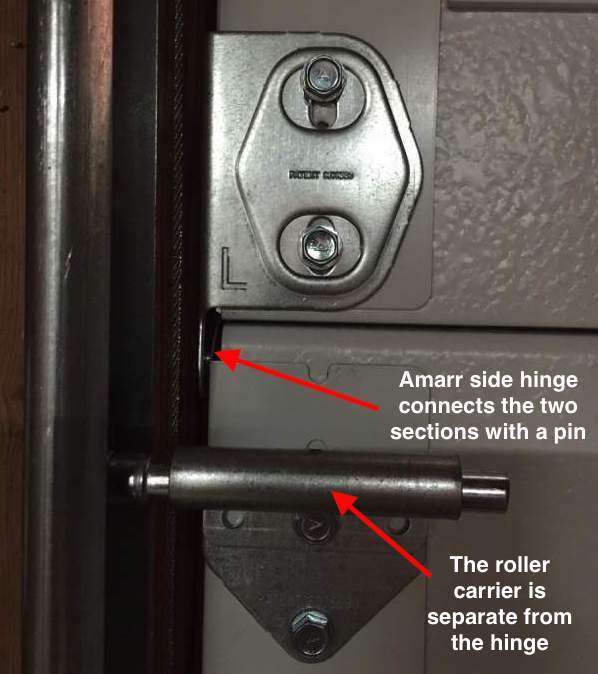
The Amarr Side Hinge is attached to the garage door section using two screws. It features a pin on the side that goes into a hole on the section beneath. This is what creates your “pivot point” as the garage door is in operation.
When I first saw this, my first thought was there is no way this is going to hold up over time. But, after installing hundreds of these garage doors, I can happily say we never had any issues with them.
The lower bracket in the photo is the roller carrier. This is held on with two screws as well and easily removes from the garage door for replacement or if you need to change out your rollers. Amarr roller carriers were made of very thick metal that always maintained its shape over time.
I can’t remember a time when we had to replace these parts due to cracking. Amarr has since changed this design, and they now use standard hinges on all their new garage doors.
Wayne Dalton 9100 Hinge Repair
This section of the article will be extensive since this has become one of the most installed garage doors recently by home builders.
One of the most popular garage doors installed by home builders is the Wayne Dalton 9100 series. This garage door is constructed of a polyurethane foamed-in-place insulation that uses very thin metal on the outside face and their ToughGuard interior finish, which resembles a heavy paper like material.
They also manufacturer the model 9605 which is essentially the same garage door with a steel back interior. These doors look pretty when brand new, but the first time they come in contact with anything, they crumble like a tin can.
You might be asking yourself why a home builder would install such a cheap garage door. Well, like everything else in life, it comes down to money. Wayne Dalton offers their 9100 series garage door on a “home builder program” that allows builders to have a new garage door and opener installed dirt cheap. Many times, the cost they pay is less than what other companies can purchase a new door and opener for.
Yes, you heard me right. The cost to have these garage doors and openers “installed” is less than what it cost a competing company to purchase a new garage door and opener. So, how could this be? Well, from what we have gathered over the years is the manufacturer makes their money selling replacement sections. If you damage a section and need a replacement, expect to pay their asking price because your only alternative is to replace the whole door.
The Wayne Dalton 9100 Interior
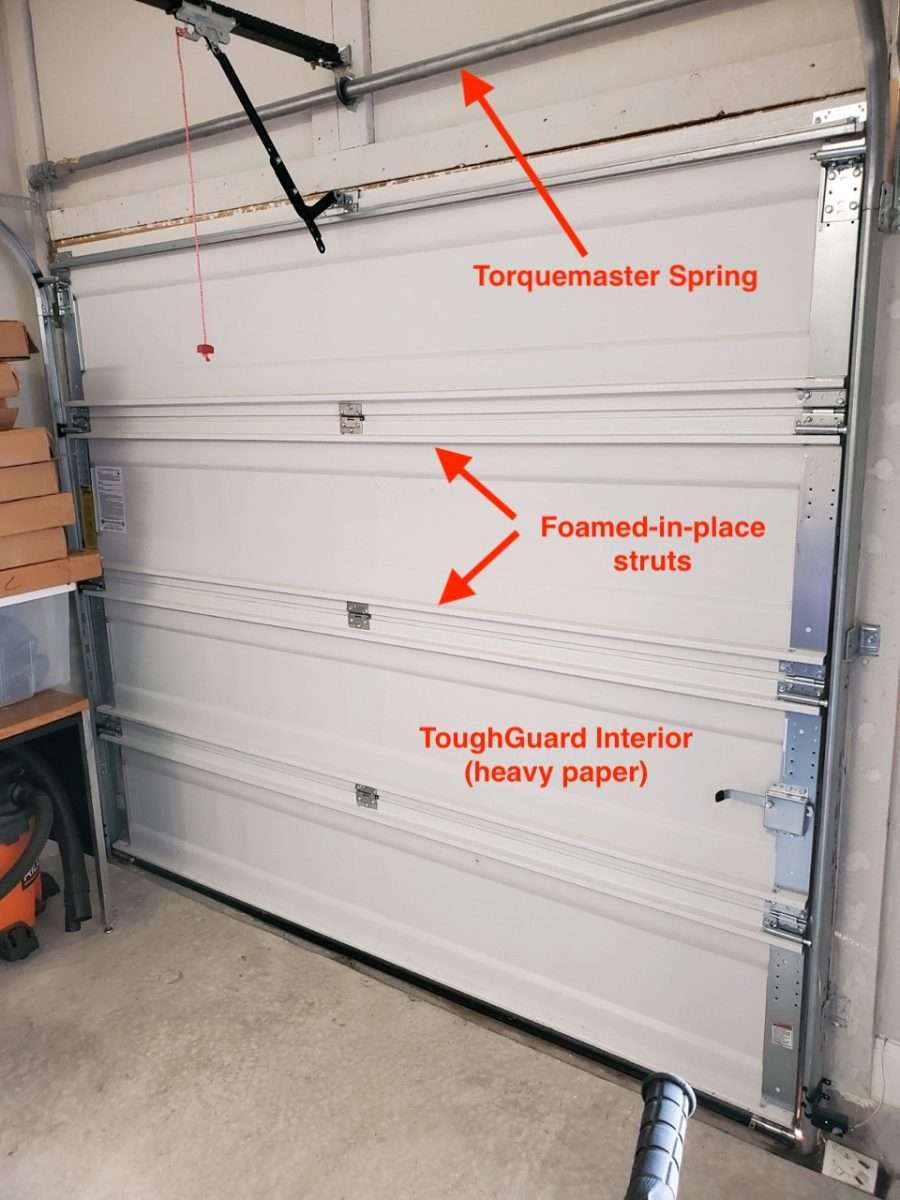
Just so we are on the same page, I am starting off by showing a photo of the interior of the Wayne Dalton 9100 garage door. A standard Wayne Dalton 9100 style garage door will have a Torquemaster Spring tube at the top, foamed-in-place struts on every section, and a heavy paper like interior called ToughGuard.
If you don’t have a Torquemaster tube at the top with the internal spring, your garage door may have already been converted over to a standard torsion spring. If that is the case, you will be able to see the spring above the door.
Foamed-In-Place Construction
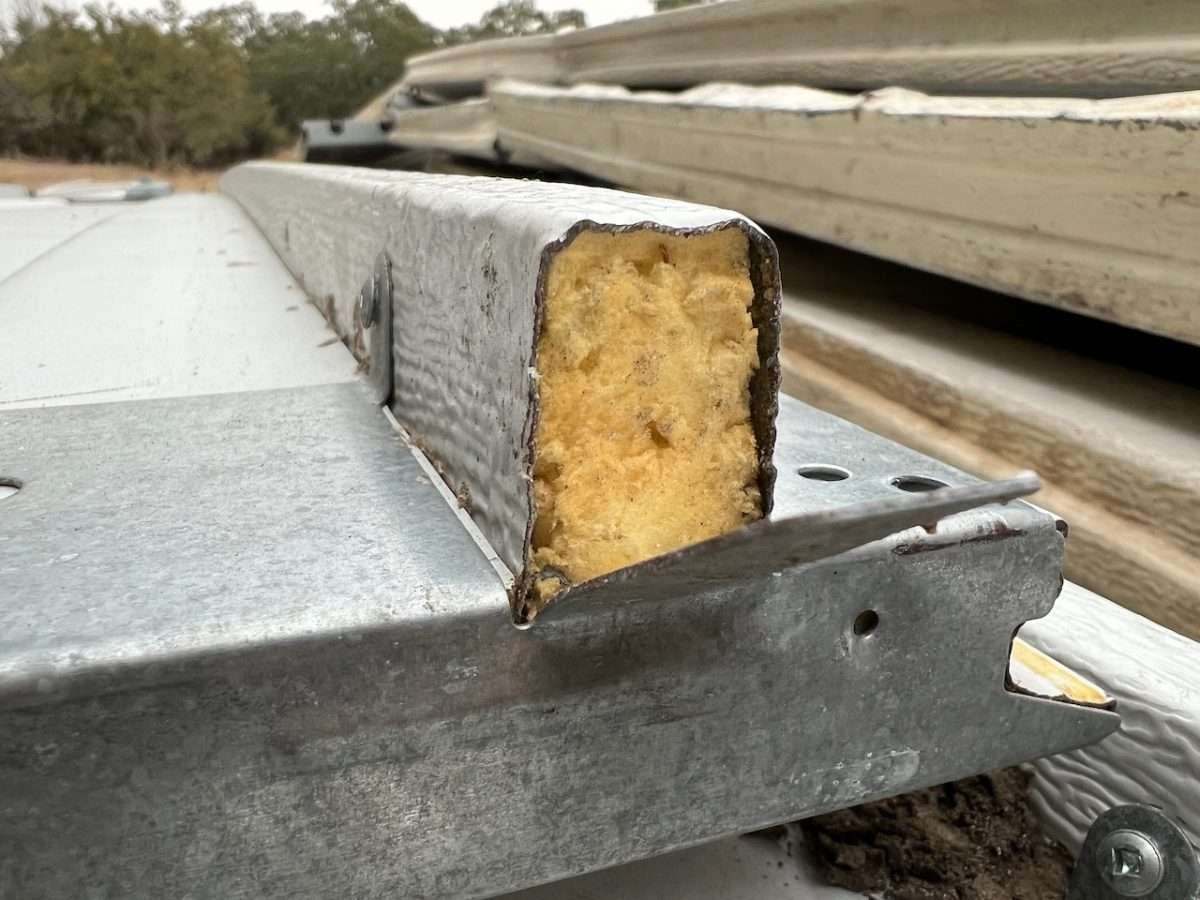
To help you understand what foamed-in-place means, here is a side view image of a Wayne Dalton 9100 section. What you’re looking at is the built-in struts that are incorporated into the sections and filled with foam. These struts are constructed with metal that is so thin, the manufacturer does not list any specs on their website or in their brochure regarding the gauge of the metal.
The standard for years on a garage door was a 20 gauge strut that is 2 1/4” tall. Now, most of the strength is coming from foam on these builder grade garage doors.
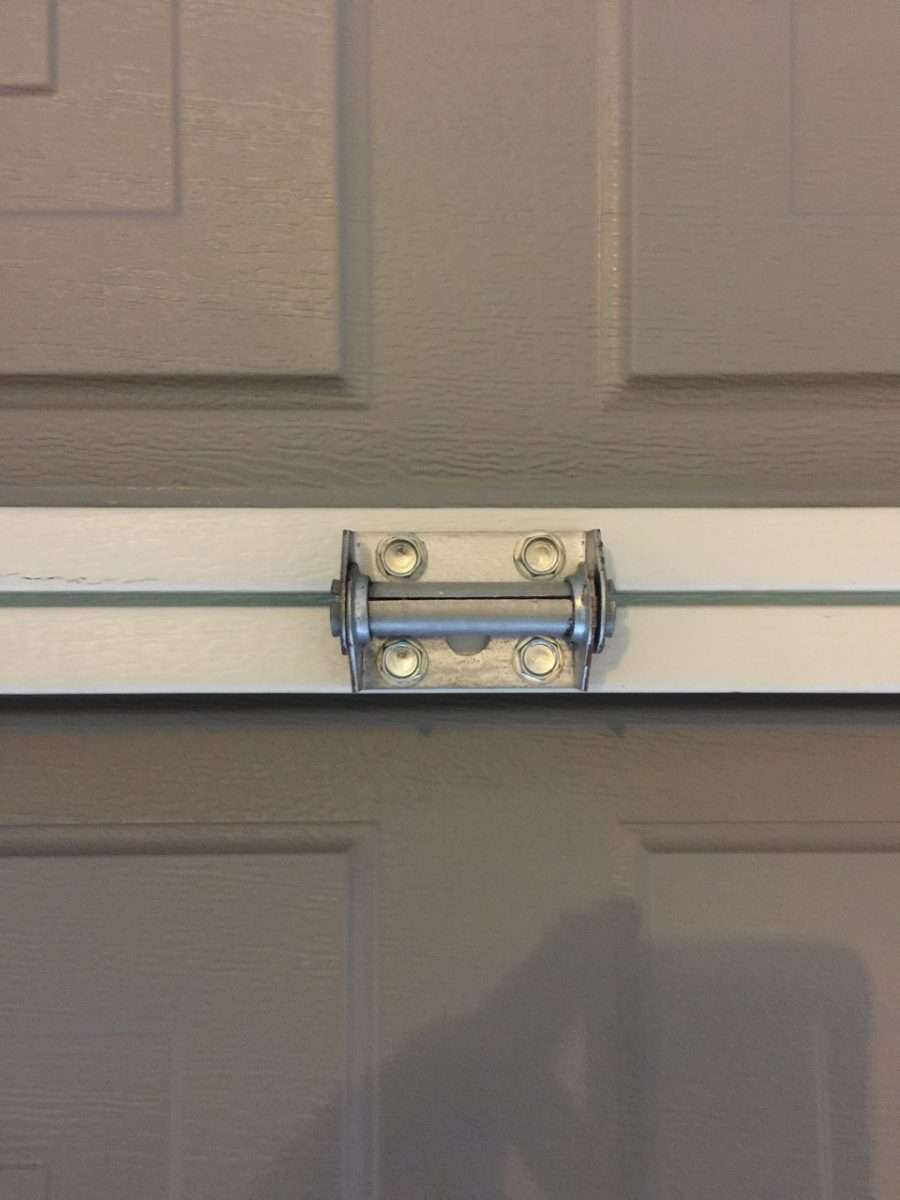
Wayne Dalton 9100 Hinge Issue
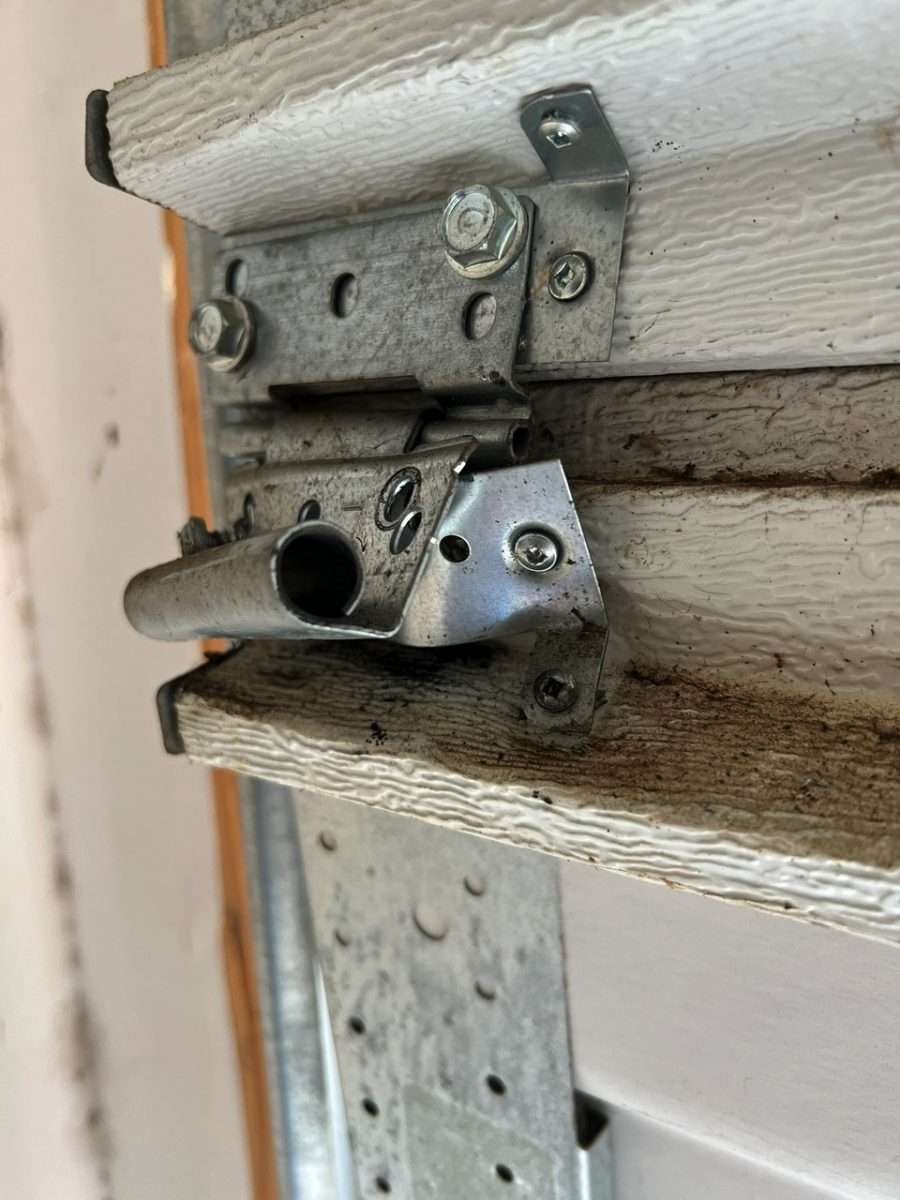
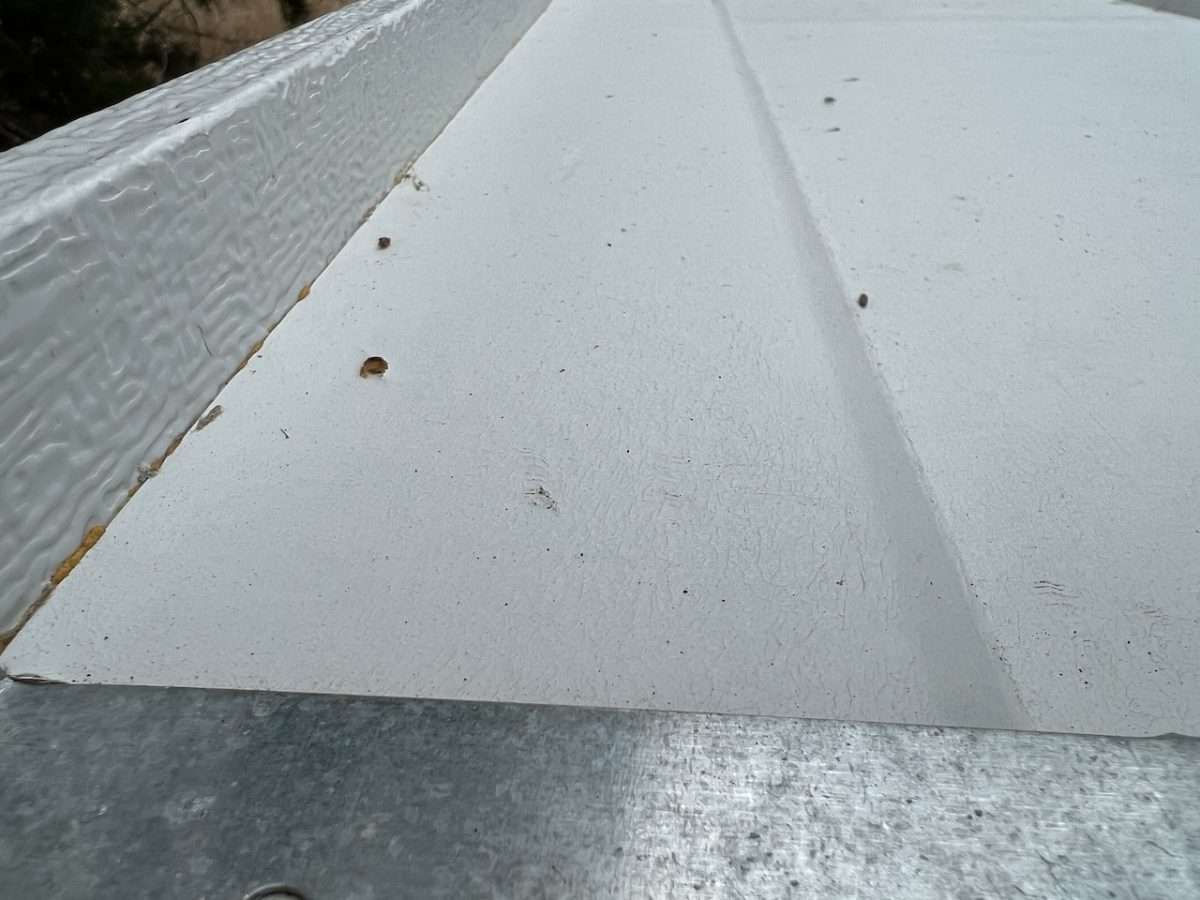
This is the end hinge of a Wayne Dalton 9100 garage door with a built-in roller carrier. The screws that attached the hinge to the section have stripped out because the metal is so thin, leaving you with no way of repairing the section. Because the struts are permanent and part of the door's construction, there is no way to repair with a reinforcement plate or longer hinge like you would on a standard garage door.
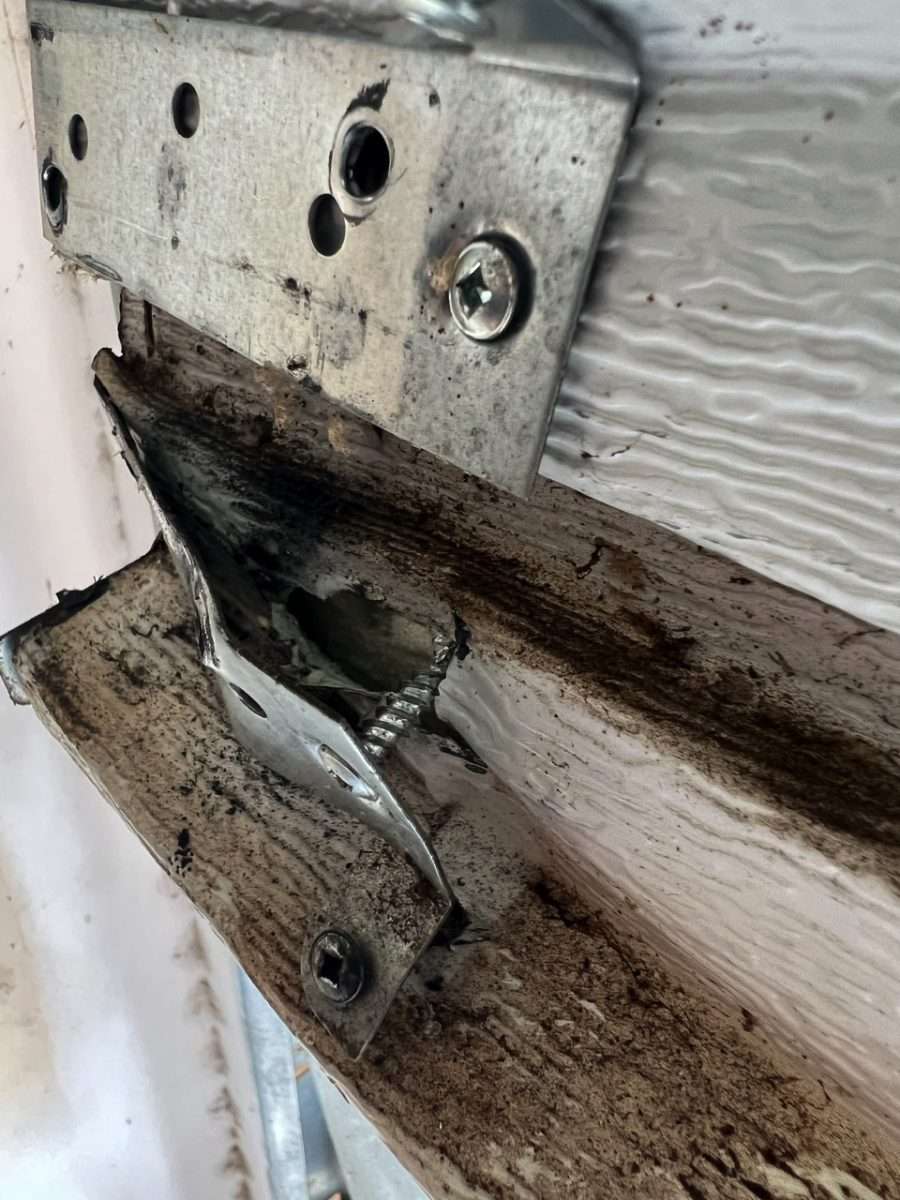
Here is a better view of the metal blown out on the end of the Wayne Dalton 9100 section. As you can see, there isn’t much you can do because the metal literally tears out when it fails. Because of this, we have had to come up with some new ways of repairing these sections, especially since replacement sections have been in short supply in the past few years.
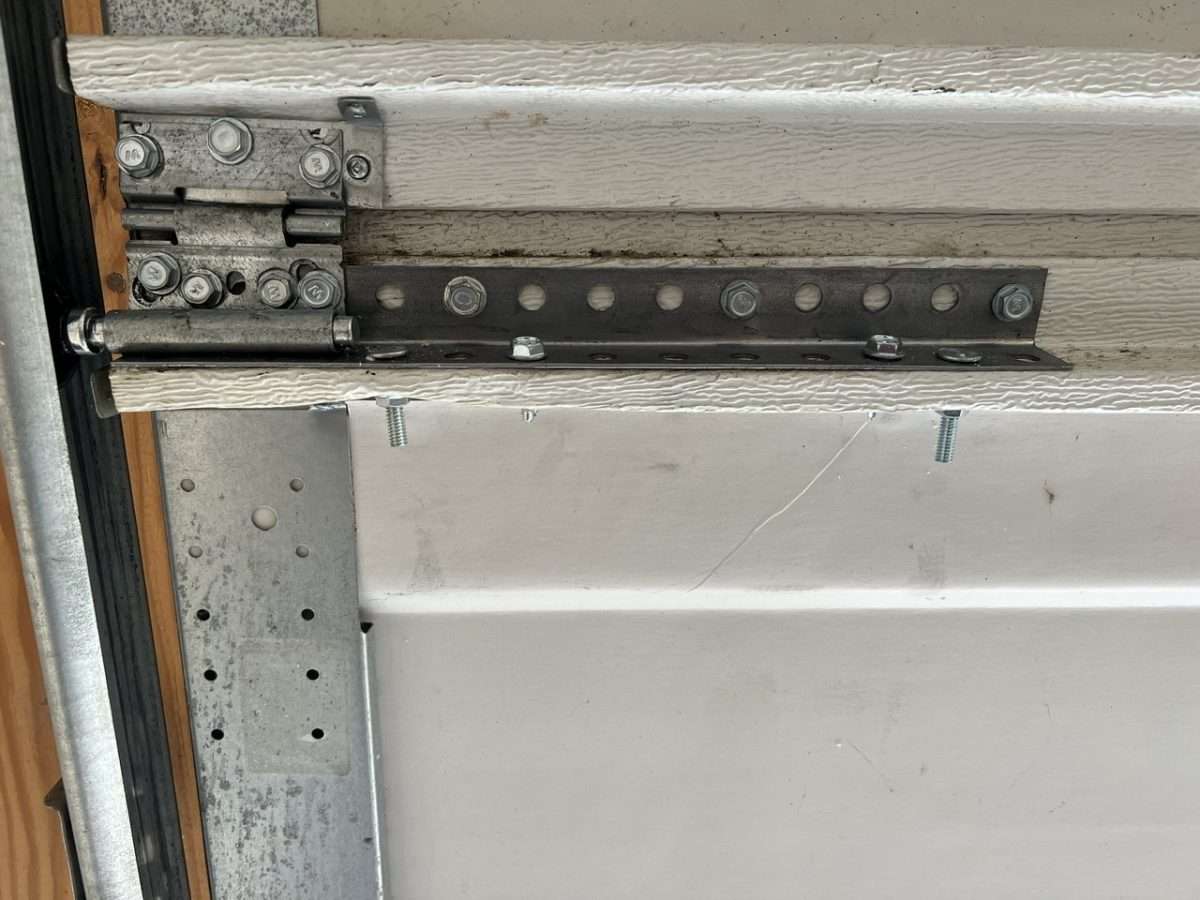
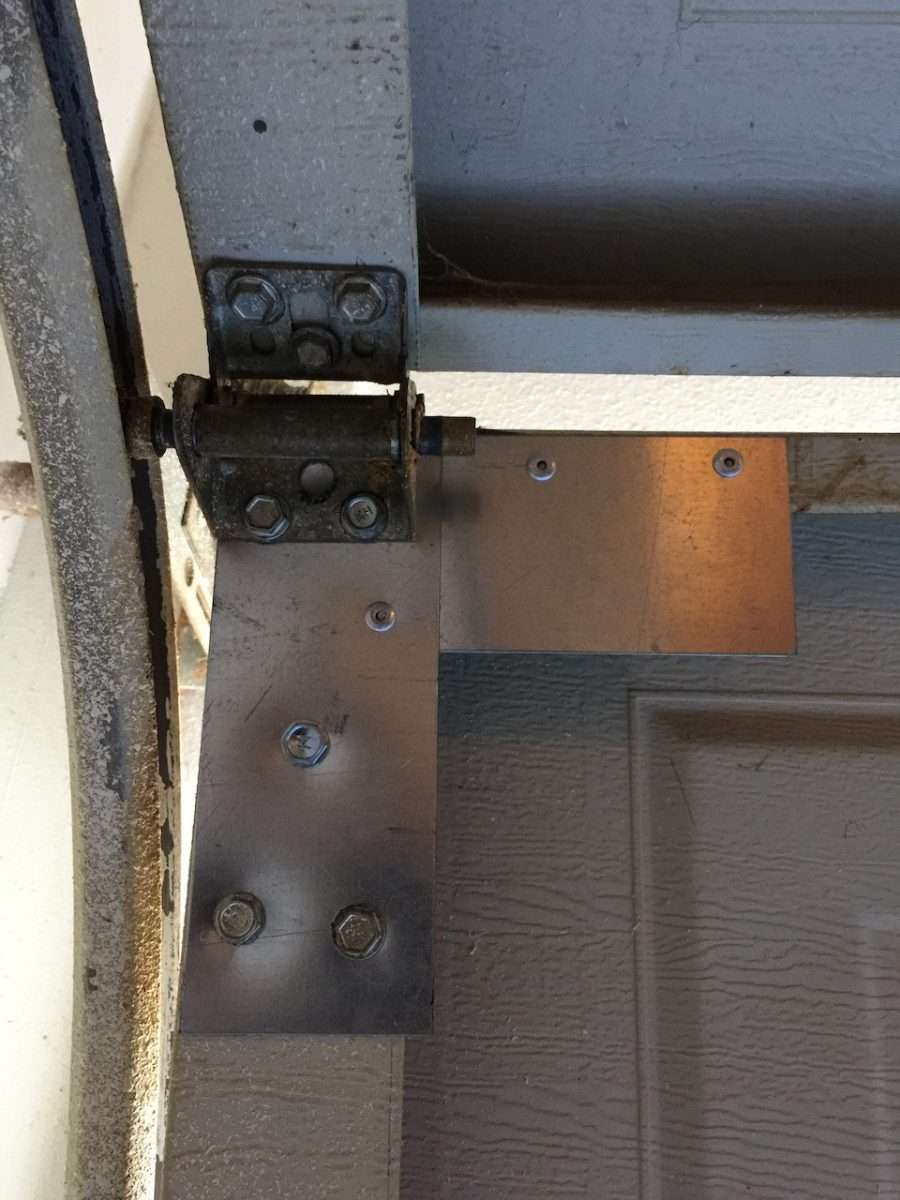
Repairing Wayne Dalton 9100 End Hinges
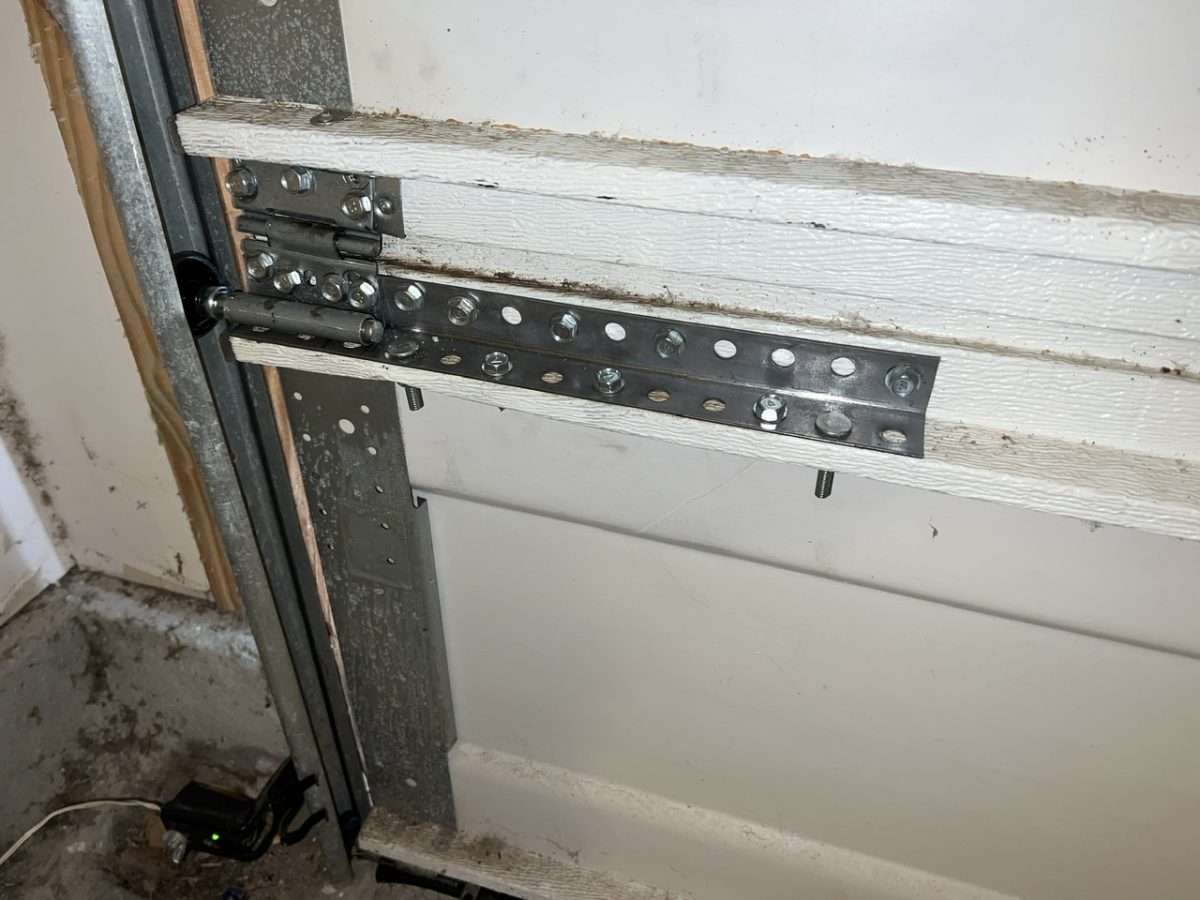
This is the best we have come up with for repairing hinges on the Wayne Dalton 9100 garage door. We installed a piece of 16 gauge angle across the section and bolted it to the built-in strut. We also attached a few screws into the section for additional reinforcement, but the metal is so thin I’m not certain how much good that will do. After installing the angle, you can go back with your hinge and attach it to the solid parts of the 16 gauge angle. That way, your self-tapping screws are grabbing thick 16 gauge metal for much better holding power.
Here is another view with the garage door in the up position of the repair we made with punched angle. You can see how the bolts come out of the built-in strut, and they have a backer nut on them. Everything about this garage door is thin and cheap, so there is no guarantee how long a repair like this will last.
Now, this is not a factory approved fix or approved by any engineer for that matter. This is something we do to get customers down the road. Especially when we can’t get replacement sections. When Wayne Dalton 9100 sections have these kinds of issues, I always recommend not putting any money into the garage door and replacing it. If you choose to do this repair, it will be at your own risk.
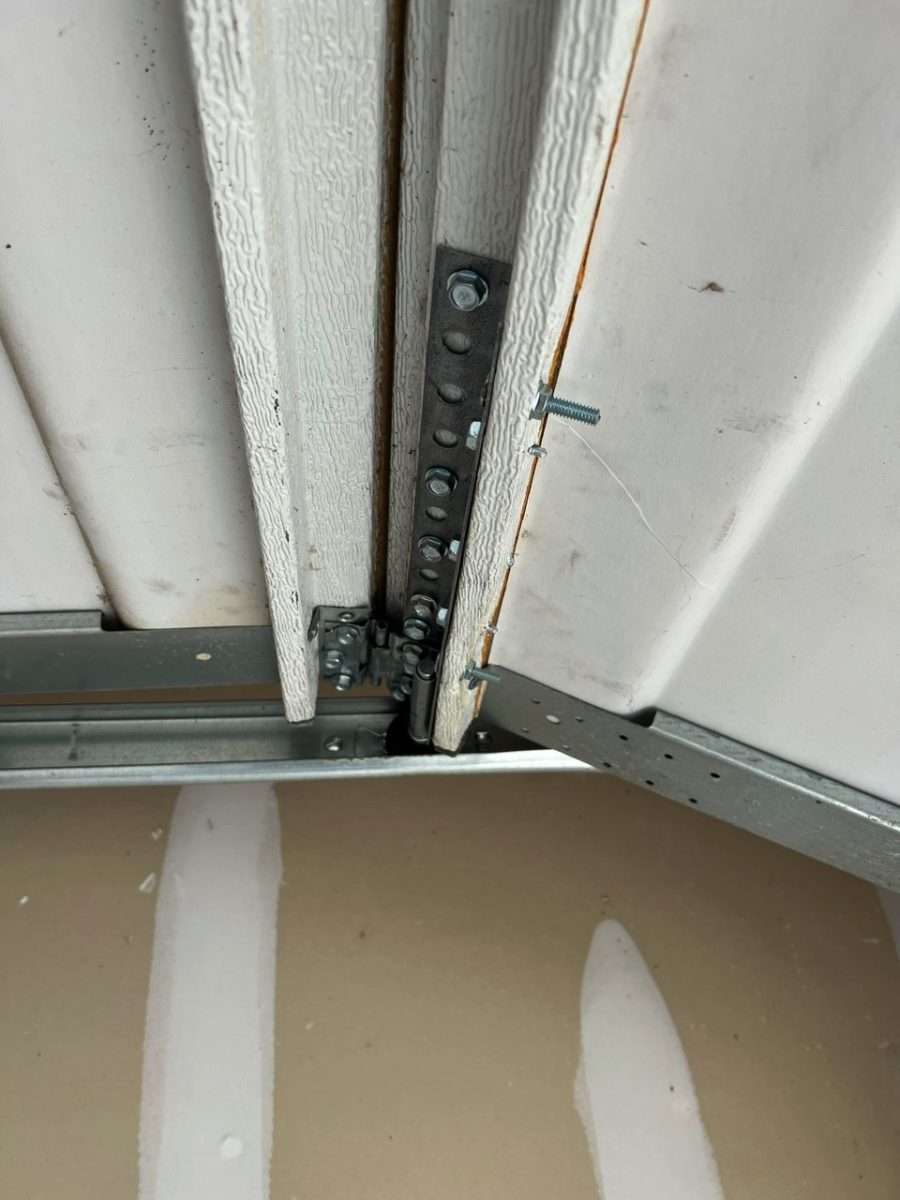
Wayne Dalton 9100 Center Hinges
If you have a center hinge that is blown out like pictured above, you can do the same repair by attaching a piece or regular or punched angle along the top of the built-in strut in the picture. This will give you a much thicker attachment point than what's already on the section. Hopefully, you don’t experience these issues too much, but if you do, this is about all you can do apart from replacing the whole section.
The only other thing you can do is drill straight through the section and push a carriage bolt through from the outside. The downside to this is you will see the head of the carriage bolt on the outside of the garage door section. To conceal it, you can paint the head to match the door color. Using angle to repair will prevent you from having to see bolt heads on the outside face of your garage door.
Wayne Dalton End Stile Detaching From Section
Another common issue we find with the Wayne Dalton 9100 style of garage door is the end stiles will start to become detached from the section. The reason for this is a poor design combined with thin, cheap materials. The metal on the ends will start to pull away from the section, causing the roller to lean. There isn’t much of a fix for this other than trying to use an adhesive.
We Recommend Replacing Wayne Dalton Garage Doors
My recommendation is to remove a Wayne Dalton foamed-in-place garage door at the first opportunity you get. Because a Wayne Dalton 9100 series garage door is so poorly constructed, I don’t like seeing homeowners throw good money after bad. But, if you can’t afford to do that, then the repair we demonstrated in this article should push the can down the road.
Learn Garage Doors & More makes no guarantee this will work, and I must mention one more time that this is not a factory approved repair. This fix is not “recommended” or “endorsed” by the Wayne Dalton company. They would definitely rather you spend the money on a whole new section.
Overhead Door 311 Snappy Hinge Repair
Overhead Door Company manufactured a builder garage door that used hinges comprised of plastic and metal. We called this a “snappy hinge” door because installers would stack the sections and push down, which essentially snapped the upper metal part of the hinge down into the plastic receiver. Much to my surprise, of all the builder grade garage doors manufactured in the past ten years, this design actually held up much longer than I thought it would.
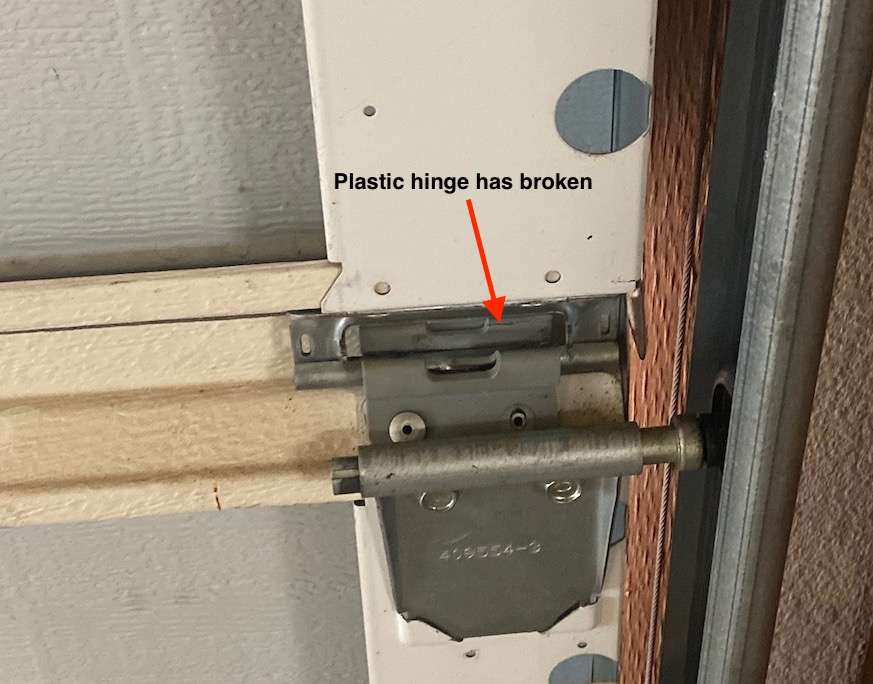
Using plastic parts on a garage door is never a good idea. I’m sure you can guess which parts breaks first on this hinge if you do have a problem. Because this model of garage door is no longer manufactured, replacement hinges are becoming harder and harder to find. Most people have to fully replace their garage door once the plastic hinges start breaking. If the door used standard hinges, all you would replace is a $10 part.
Overhead Door 281 Hinge Repair
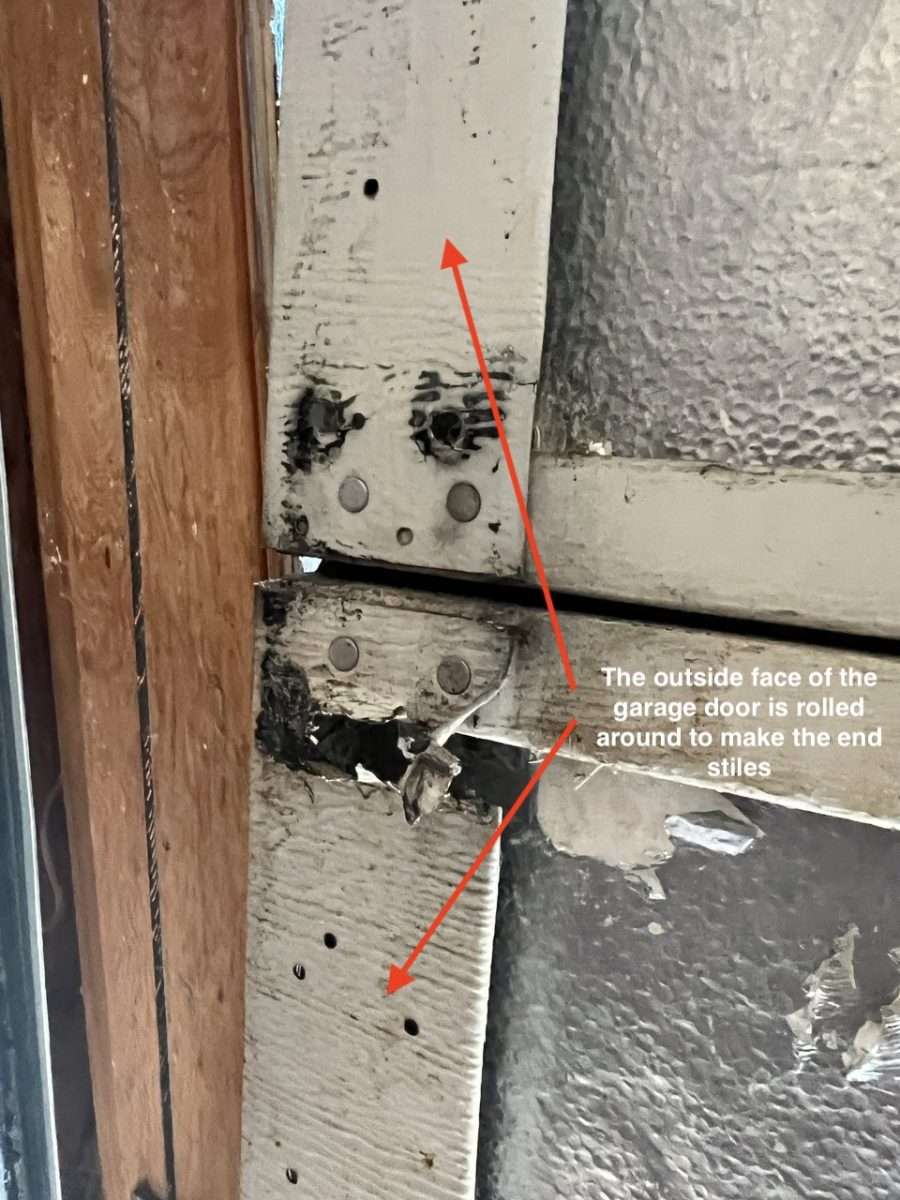
Oh, the infamous Overhead Door Model 281 garage door. This is probably one of the most famous garage doors in our area, and not for good reason. Because of the fierce competition with builders, companies are constantly looking for a way to lower manufacturing costs. In this model of garage door, Overhead Door chose to completely remove the 20 gauge end stiles.
Garage door sections are manufactured using large rolls of raw material. Instead of attaching heavier gauge end stiles to their Model 281 garage door, they decided to wrap the outside face around to form a stile on the end of the section.
This left the garage door section with an end stile that is five sizes thinner than a standard end stile. Because the end is what carries the load of a garage door in the horizontal tracks, the metal failed way sooner than it should have.
The Overhead Door 281 garage door used smaller piano hinges instead of the larger standard hinges shaped like a triangle. These smaller hinges grabbed less metal on the vertical stile, which in turn caused a stress point right along the edge of the hinge. These stress points would cause the thin end stiles to completely tear, leaving no strength at the end of the garage door section.
Most garage door companies would remove the piano hinge on this model of garage door and go back with a standard heavy-duty commercial style hinge. This would work great for a while, but since nothing really changed on the end stile itself, they would eventually fail as well.
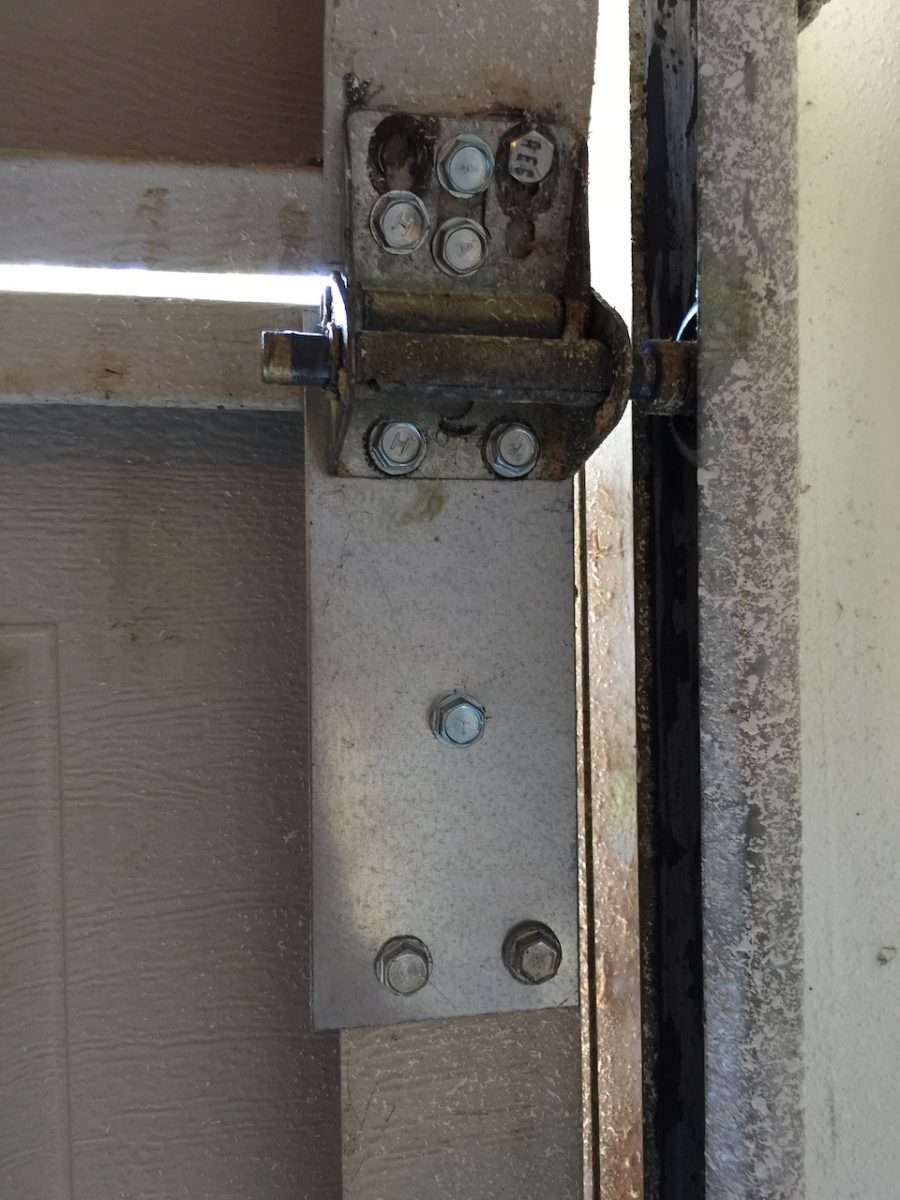
We were one of the last companies I knew of that still repaired this model of garage door. Before pricing got too high, we had a local metal fabricator make us some plain 20 gauge “hinge plates” which were essentially riveted to the garage door section under the hinge.
The hinge plate was about 6-8 inches long and would grab a large portion of the stile with self-tapping screws. This allowed for a much stronger attachment point to securely attach the hinge. Believe it or not, this worked really well and would usually get the customer several years down the road, so they could save up for a new garage door.
Here is a repair where we attached two hinge plates due to the metal on the section being fatigued. This 90-degree design actually held up really well in prolonging the life of this garage door, as replacement sections were no longer available.
Fast-forward to today, if you have one of these garage doors installed in your home, it is our recommendation to replace it. You will not be able to find replacement sections, and finding a company to make this kind of repair will be next to impossible.
Windsor Garage Door Piano Hinges
Windsor Garage Doors is another manufacturer that installs primarily for builders in our area. Lately, they have cheapened their garage doors so much, I don’t understand how they are approved to be installed in a residential dwelling. Every time I come across one of their double car width single stile garage doors, I am amazed the garage door doesn’t collapse when in the up position.
As you can see if the photo, Windsor has completely removed the stiles from the garage door and installed small piano hinges to help the sections line up as the garage door closes. Removing the stiles from the garage door essentially removes the spine of the door and makes for louder than normal operation due to the panels flexing.
Well, just when you thought the build quality of this garage door couldn’t get any worse, Windsor Garage Doors has now removed the piano hinges to save even more money. What you're left with is a 8ft span from the end of the garage door to the center, with no stiles or hinges to provide strength. If you have one of these garage doors, and it is having issues, my best recommendation is to get a new garage door.
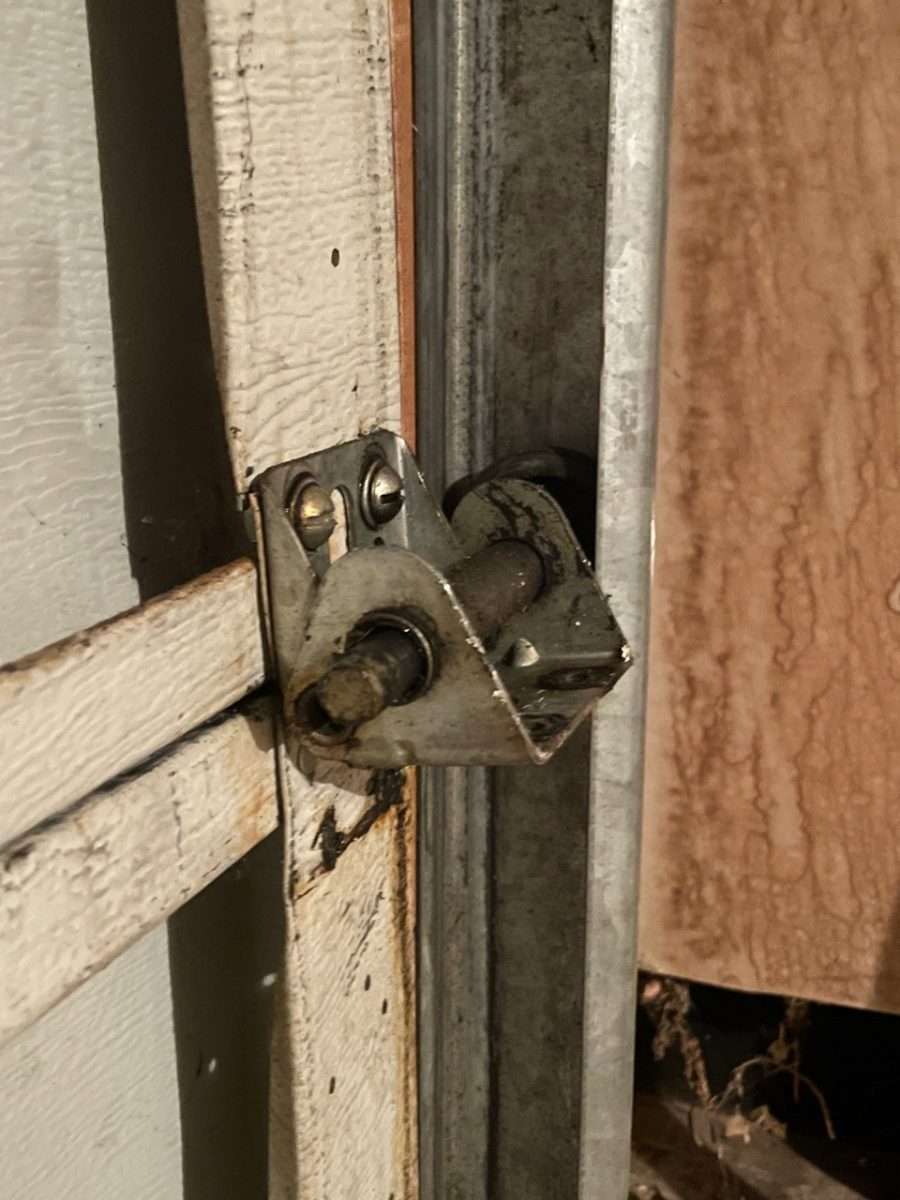
Top Roller Bracket Repair
If your top roller bracket is bent or damaged, you can easily remove it with the garage door in the down position and install a new bracket. You want to make sure to pay attention to the orientation of the bracket. Some installers will attach these brackets with the roller carrier on top, while others will put the roller carrier facing down.
Top roller brackets always have an adjustment that allows you to snug the top section up against the header. Make sure not to leave it too tight, as the top section will rub and cause issues. There should be a little play to account for any movement in the home over time.
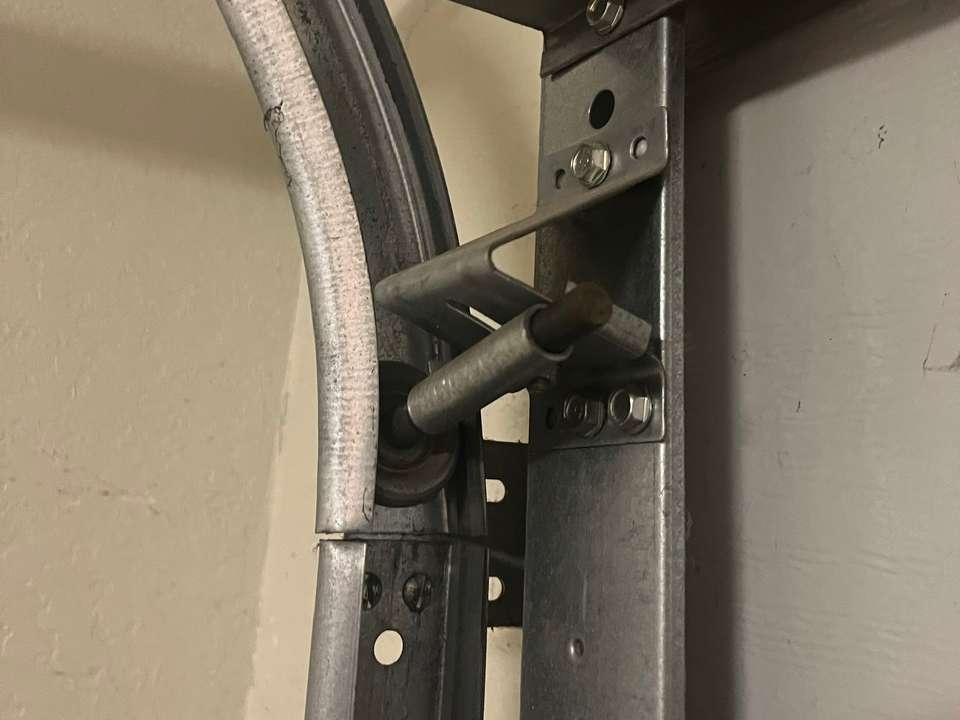
Bottom Bracket Repair
BOTTOMS BRACKETS ON A GARAGE DOOR SHOULD ALWAYS BE REPLACED BY A PROFESSIONAL DUE TO THE EXTREME PULLING FORCE OF THE SPRING
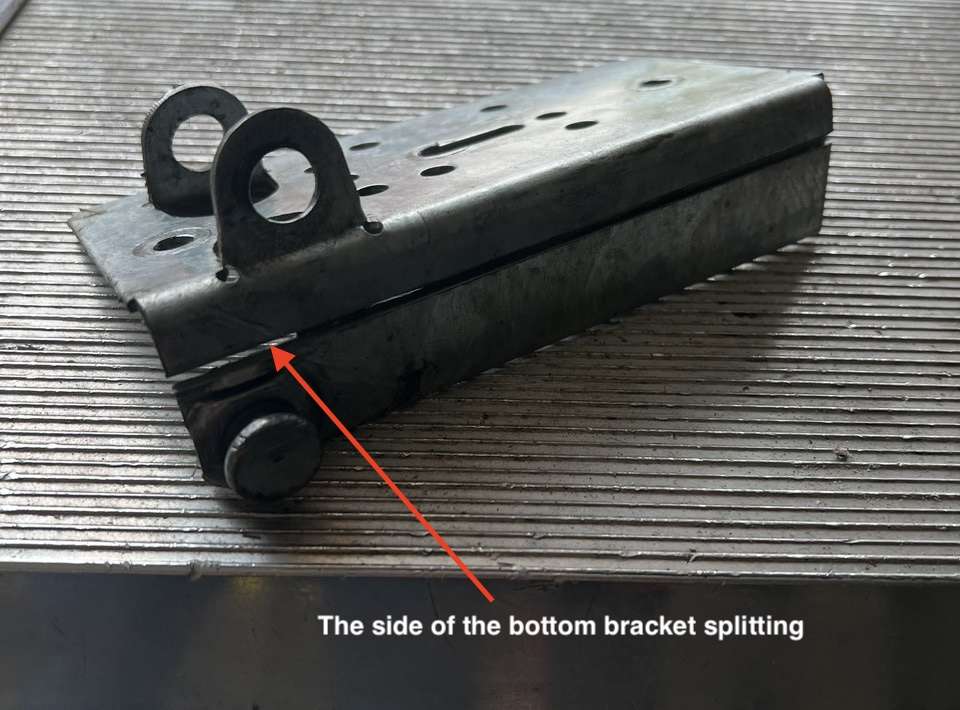
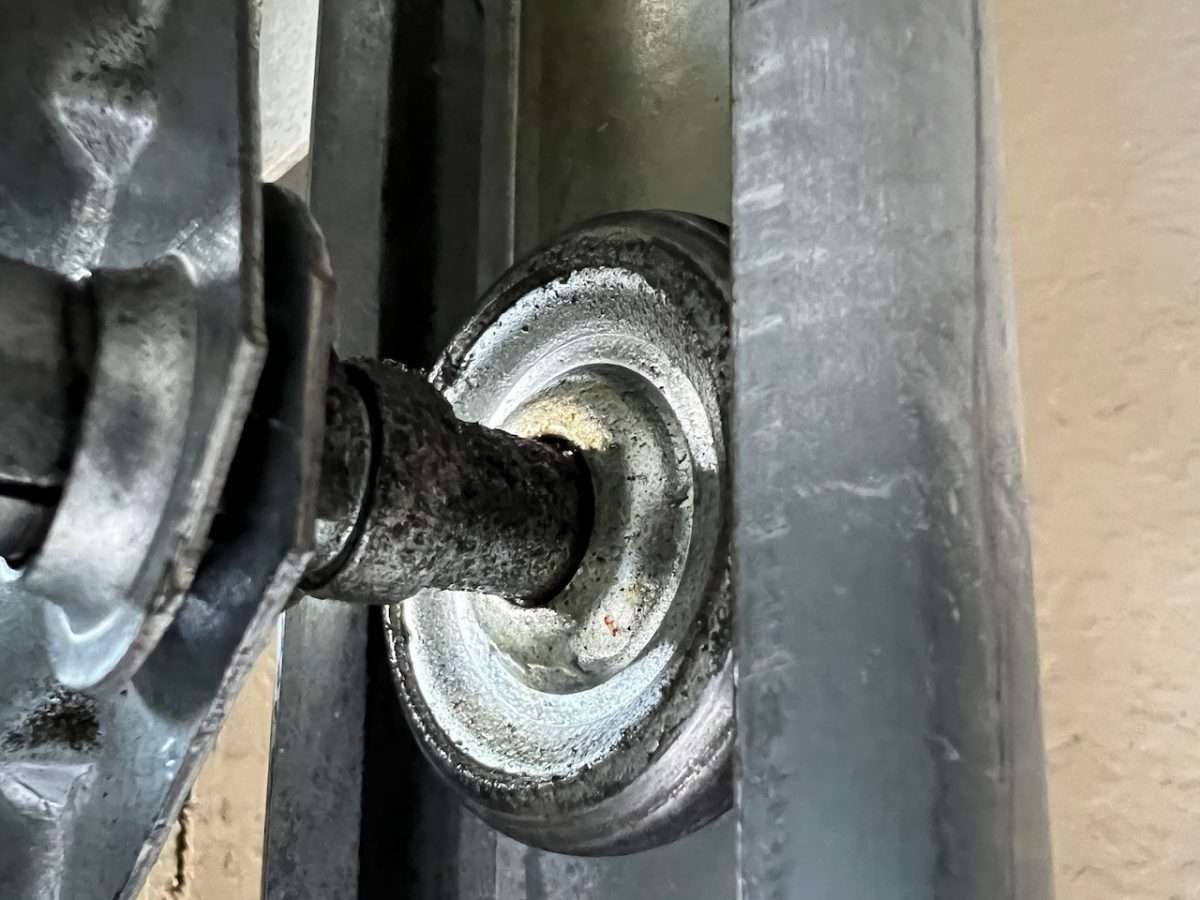
No matter the make and model of a garage door, most have similar bottom brackets. The most common issue we see with bottom brackets is the side starts to tear away over time if it rubs on the vertical tracks. Because the bottom bracket is where the cable is attached and all the force from the spring is pulling up, the metal will begin to tear back similar to opening an aluminum can.
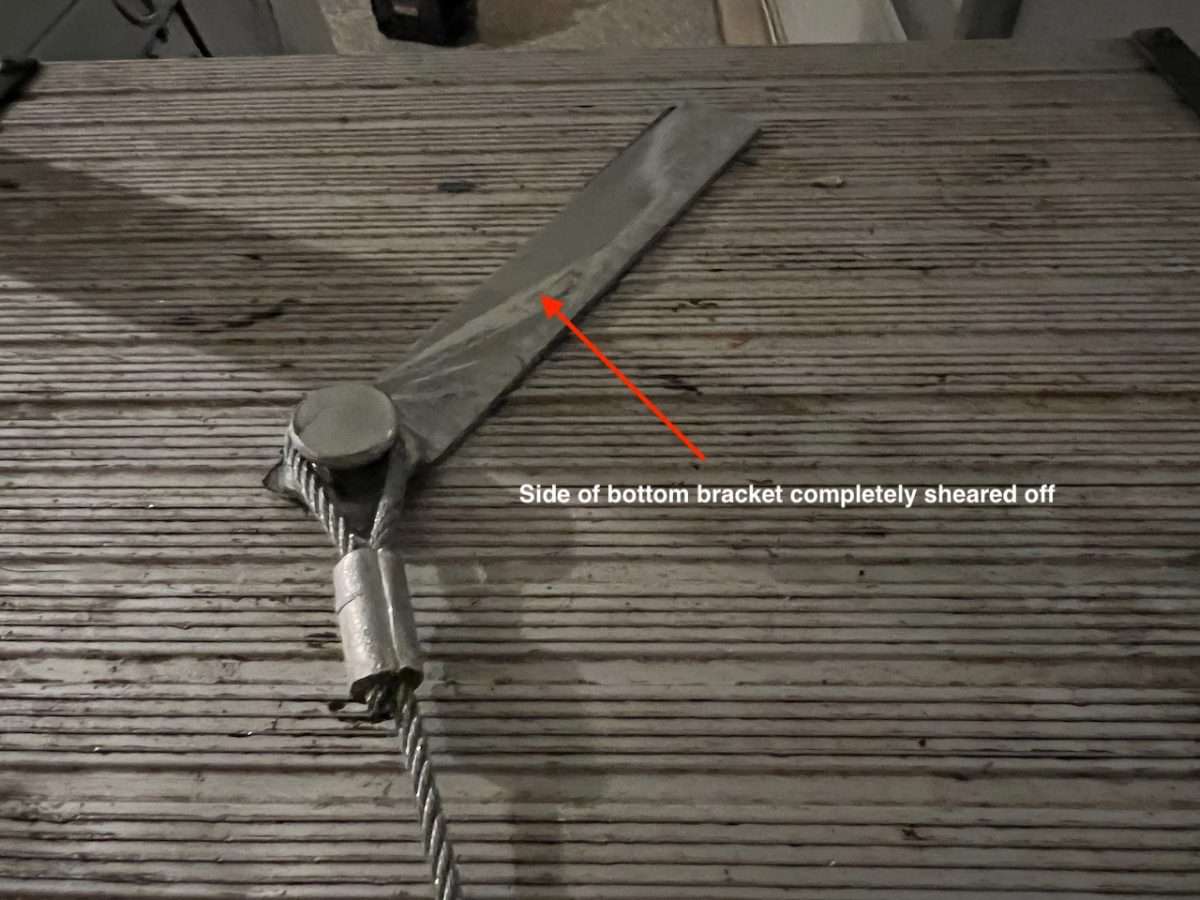
Here is a photo we took of the side of the bottom bracket completely sheared off with the cable still attached. The force of the spring will rip the side off if the vertical track cuts too deep into the bracket. It’s always good to inspect the bottom brackets for any rubbing, tearing, or leaning since they are the main attachment point for the cables which are essentially doing all the heavy lifting.
You will find some videos online showing you how to replace the bottom bracket on your garage door. The problem with this is it can be very dangerous and if you attempt it with the garage door in the up position, the cable on the drum will most likely come off. I would caution against trying to replace the bottom bracket on your garage door and hire a professional to prevent any further damage or possible injury.
Replacing Rollers With Hinge Replacement
If you are taking the time to remove the hinges from your garage door, it might not be a bad time to replace the rollers as well. The hinge is what holds the roller on most standard garage doors, and if the roller has some wobble or excessive noise, a new nylon ball bearing roller will quiet that down. This will be a considerable upgrade from any builder grade garage door rollers.
Conclusion
Replacing garage door parts is not for everyone. There are some things a homeowner should attempt and others that should be left to a garage door professional. If done properly, replacing standard hinges and top brackets on a garage door can be done by one person relatively quickly.
Hopefully, this article educated you on the different types of hinge repair, so you can make a better informed decision on whether to repair or replace your garage door.