Garage Door Sagging in the Middle? Here’s Why
A sagging garage door is hard to close and can lead to costly section replacement if the issue is not addressed in a timely manner.
The operation of a garage door is all about geometry and engineering. Every part, stamp, and indention plays an important role in the strength and engineering of the door, so it operates properly.
There are many reasons why your garage door is sagging in the middle when you open and close it every day. First, let’s start by addressing why a garage door could be sagging, so we can prevent it from happening again.
In this article, we take a look at some examples of metal and wood garage doors and go into further detail about why your door is sagging, how to prevent it from happening again, and how to repair the problem.
Top Section Bent on Garage Door
Top section damage is more common than other sections on a garage door because this is where the automatic opener pickup arm is attached. While this is most common on single car width garage doors, it does happen on double car width doors as well. In this section, we go into greater detail as to why the top section of your garage door is cracked, sagging, or bending.
Top Section Bent on Single Car Garage Door

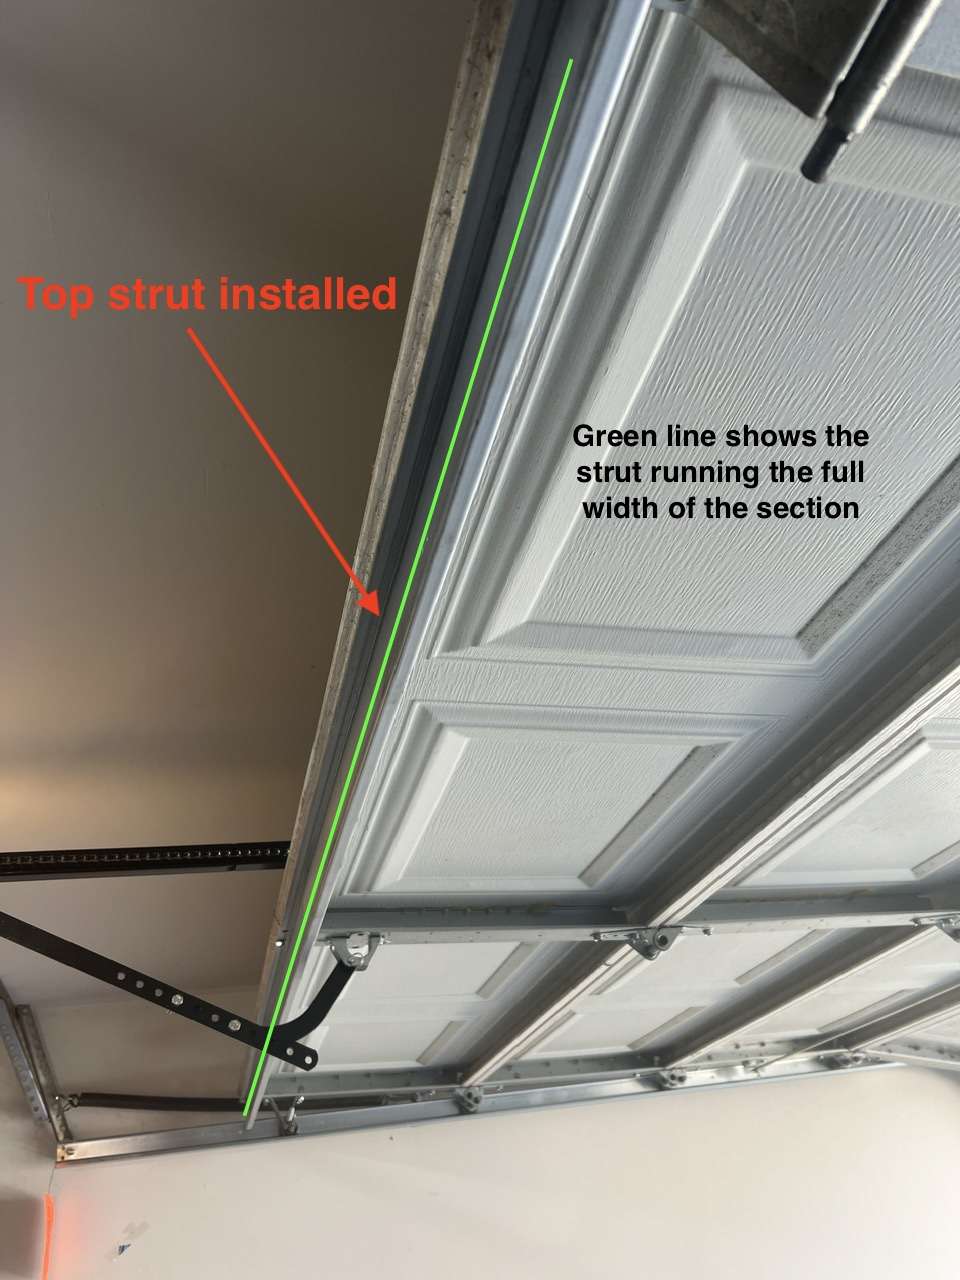
The most common reason the top section is bent on your single car garage door is because a reinforcement strut was never installed. When new homes are built, many home builders will have single car garage doors installed without top struts if the home will not have an automatic opener installed. The reason for this is to save money.
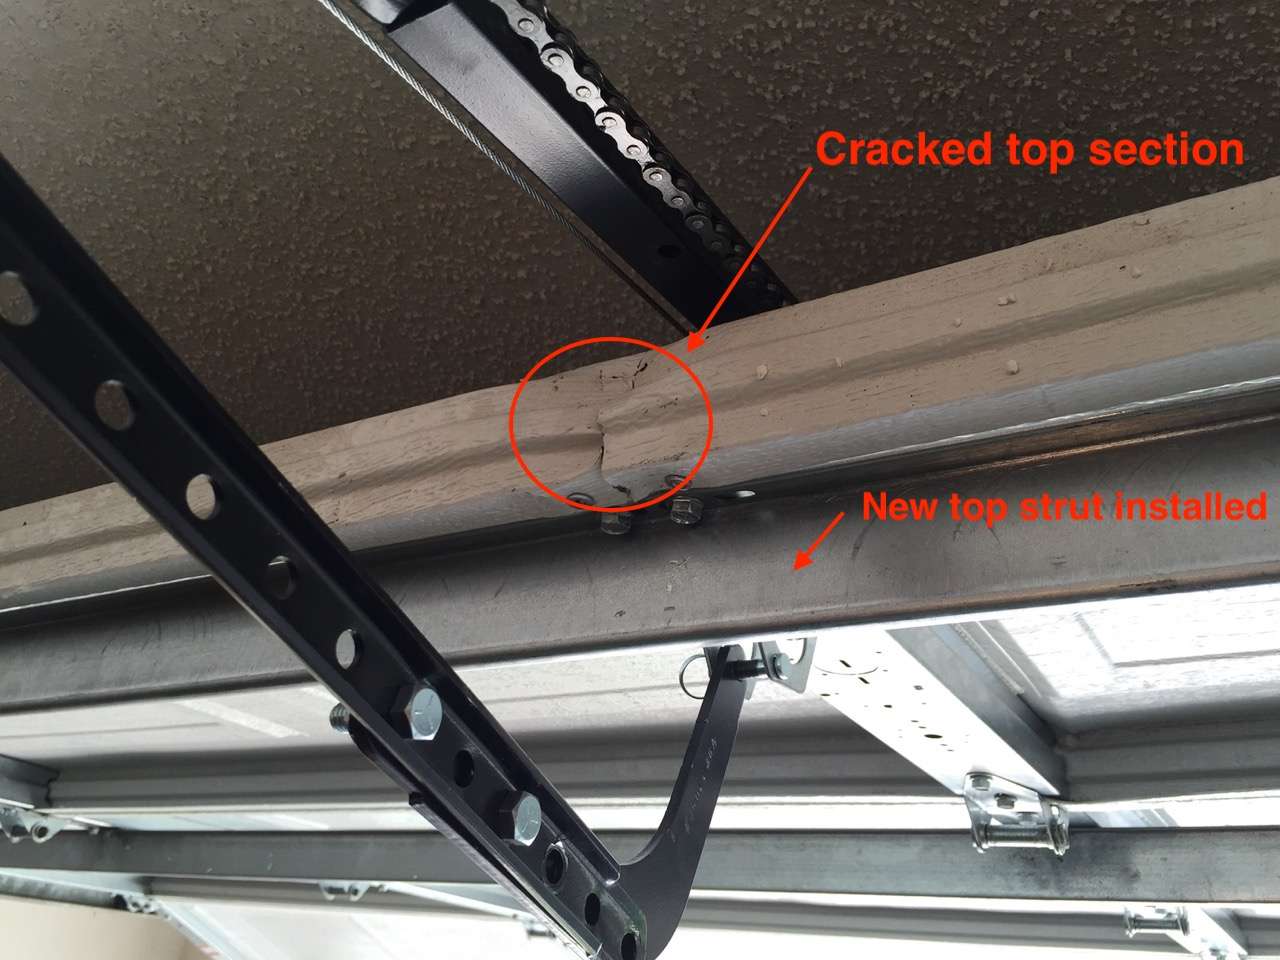
The first thing any homeowner does when they move in to a new home is install an automatic opener or have one installed. A single car garage door needs a top reinforcement strut installed if you intend to have an automatic garage door opener installed. If you do have a crack in your section like pictured above, installing a reinforcement strut will straighten a single car width section and prevent the crack from spreading.
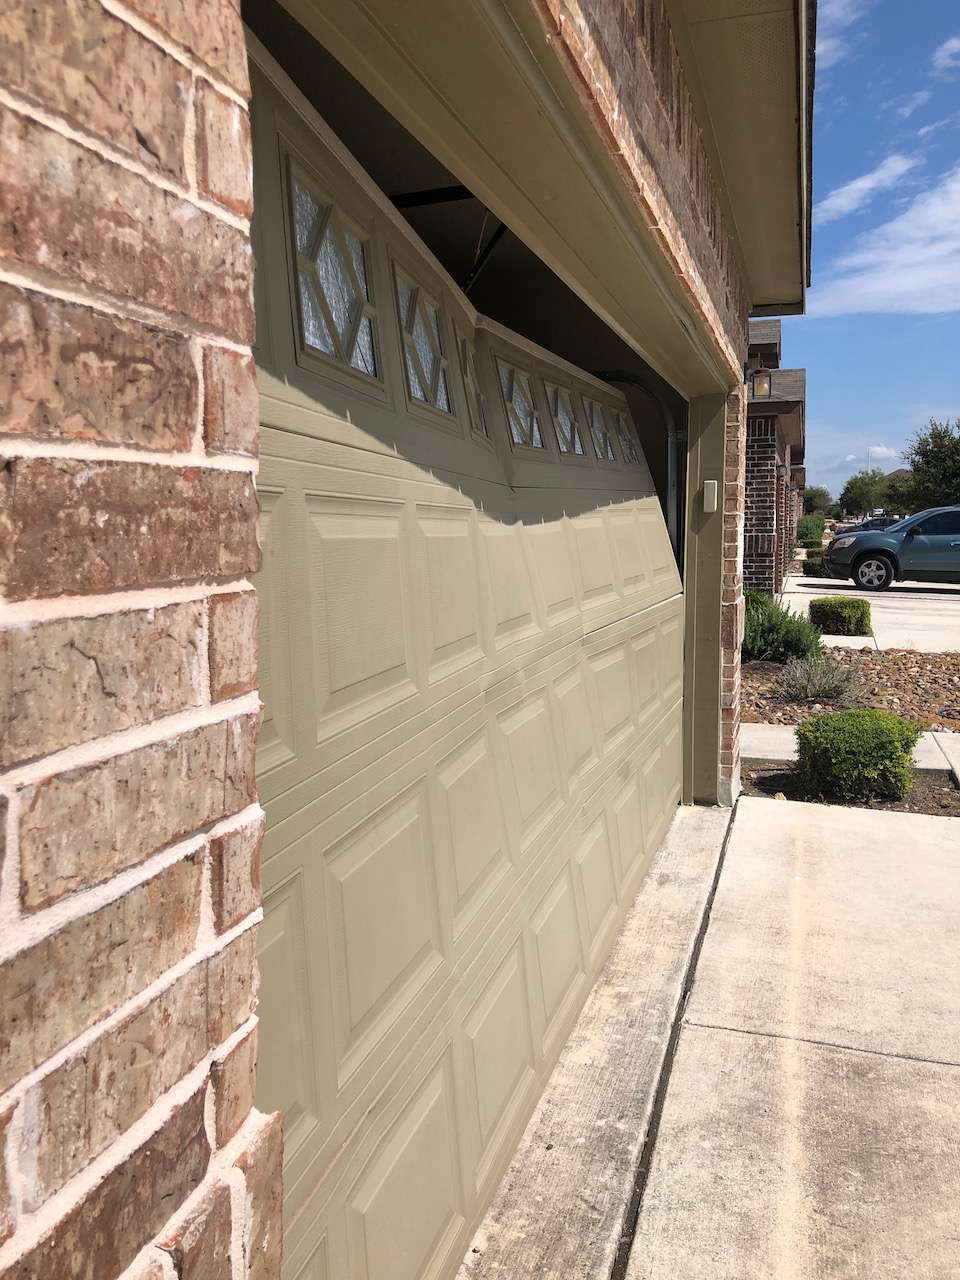
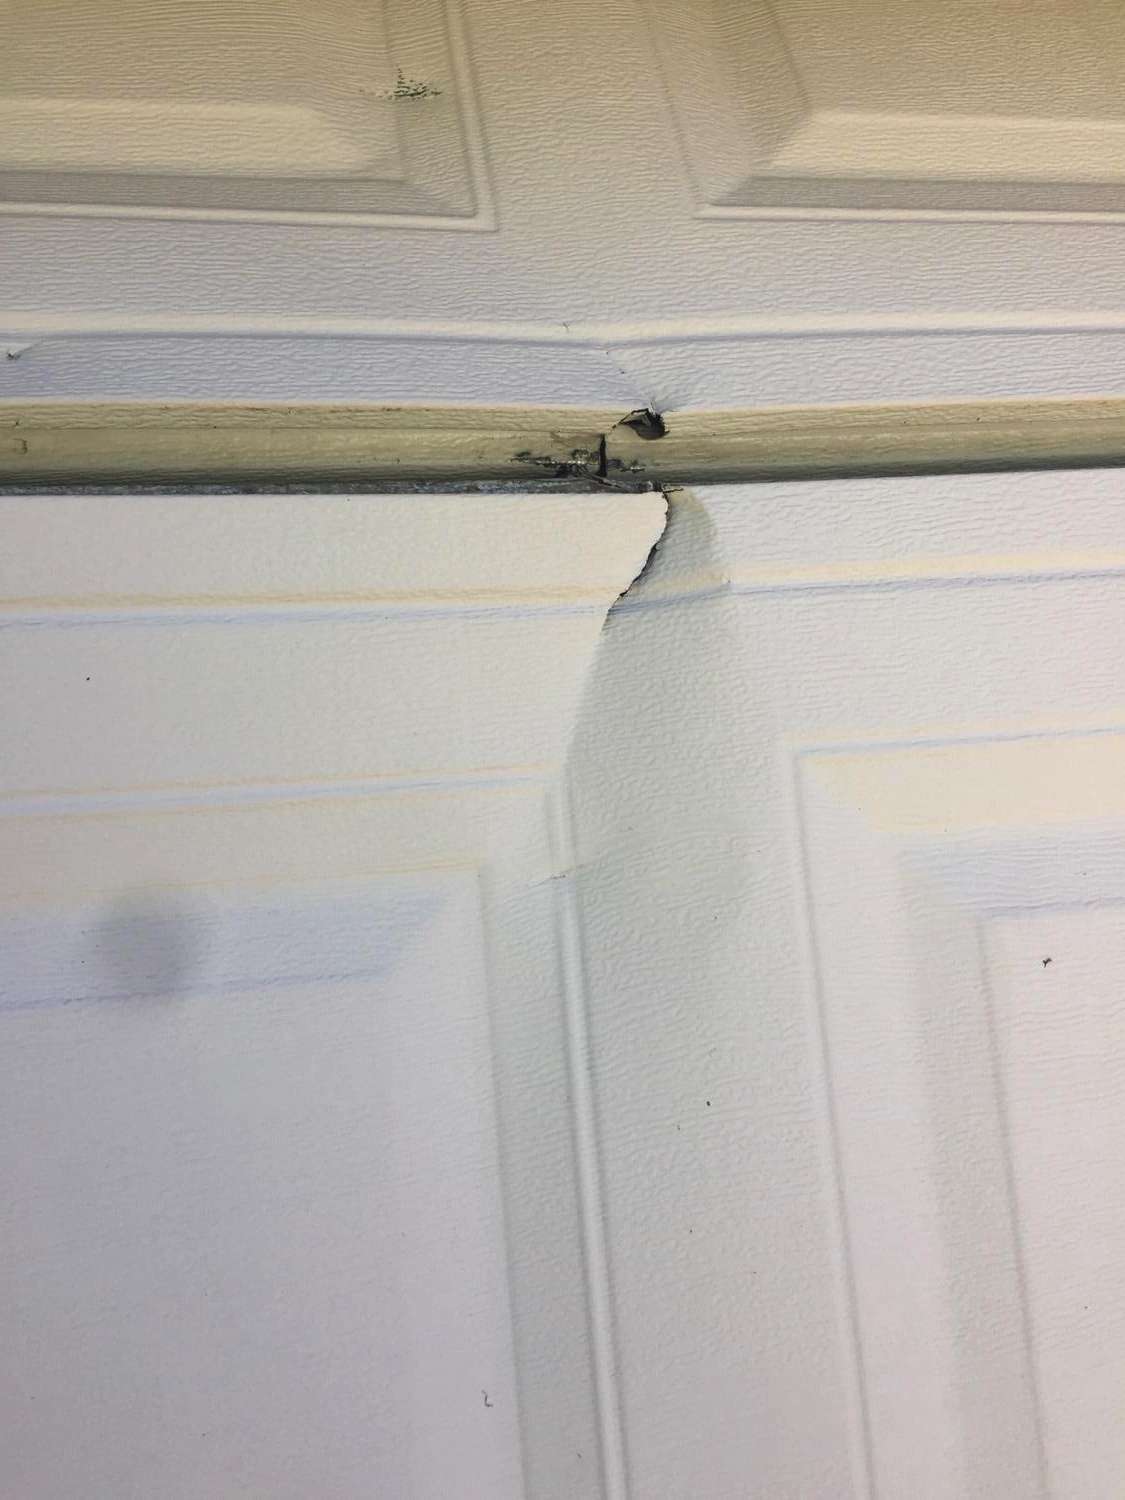
Gap at Header on Double Car Garage Door
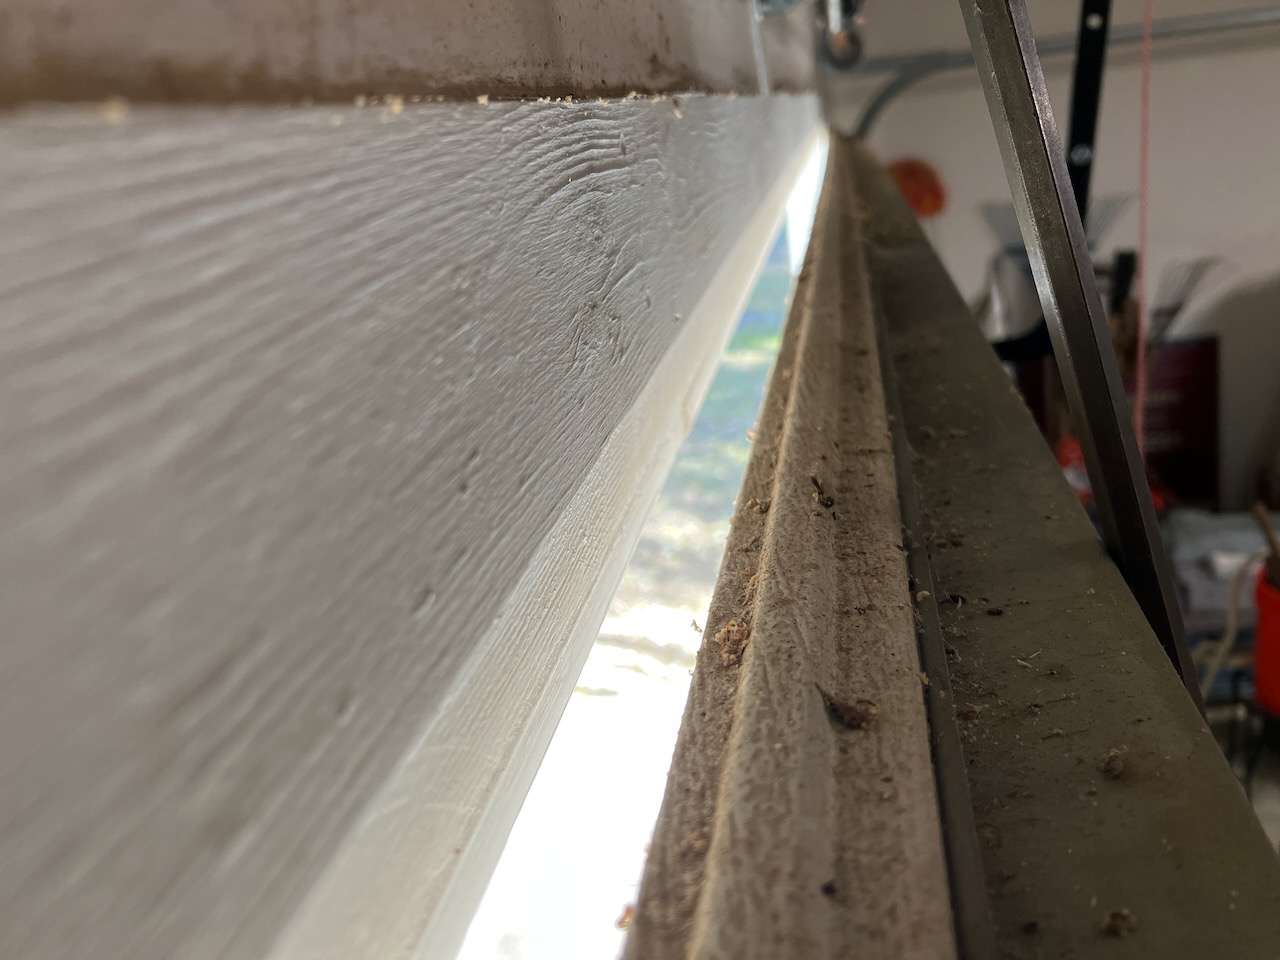
If the top section on your double car width garage door is bent or bowed, it could leave you with a gap between the header and the top section. This is very common on double car garage doors installed recently because manufacturers have started using thinner struts. Years ago, the standard gauge of metal for a 16ft strut was 20 gauge. Today, the new standard seems to be 22 gauge, while builder grade garage doors are using 24 gauge and thinner. The lower the number, the thicker the metal.
Garage Door Opened with a Broken Spring
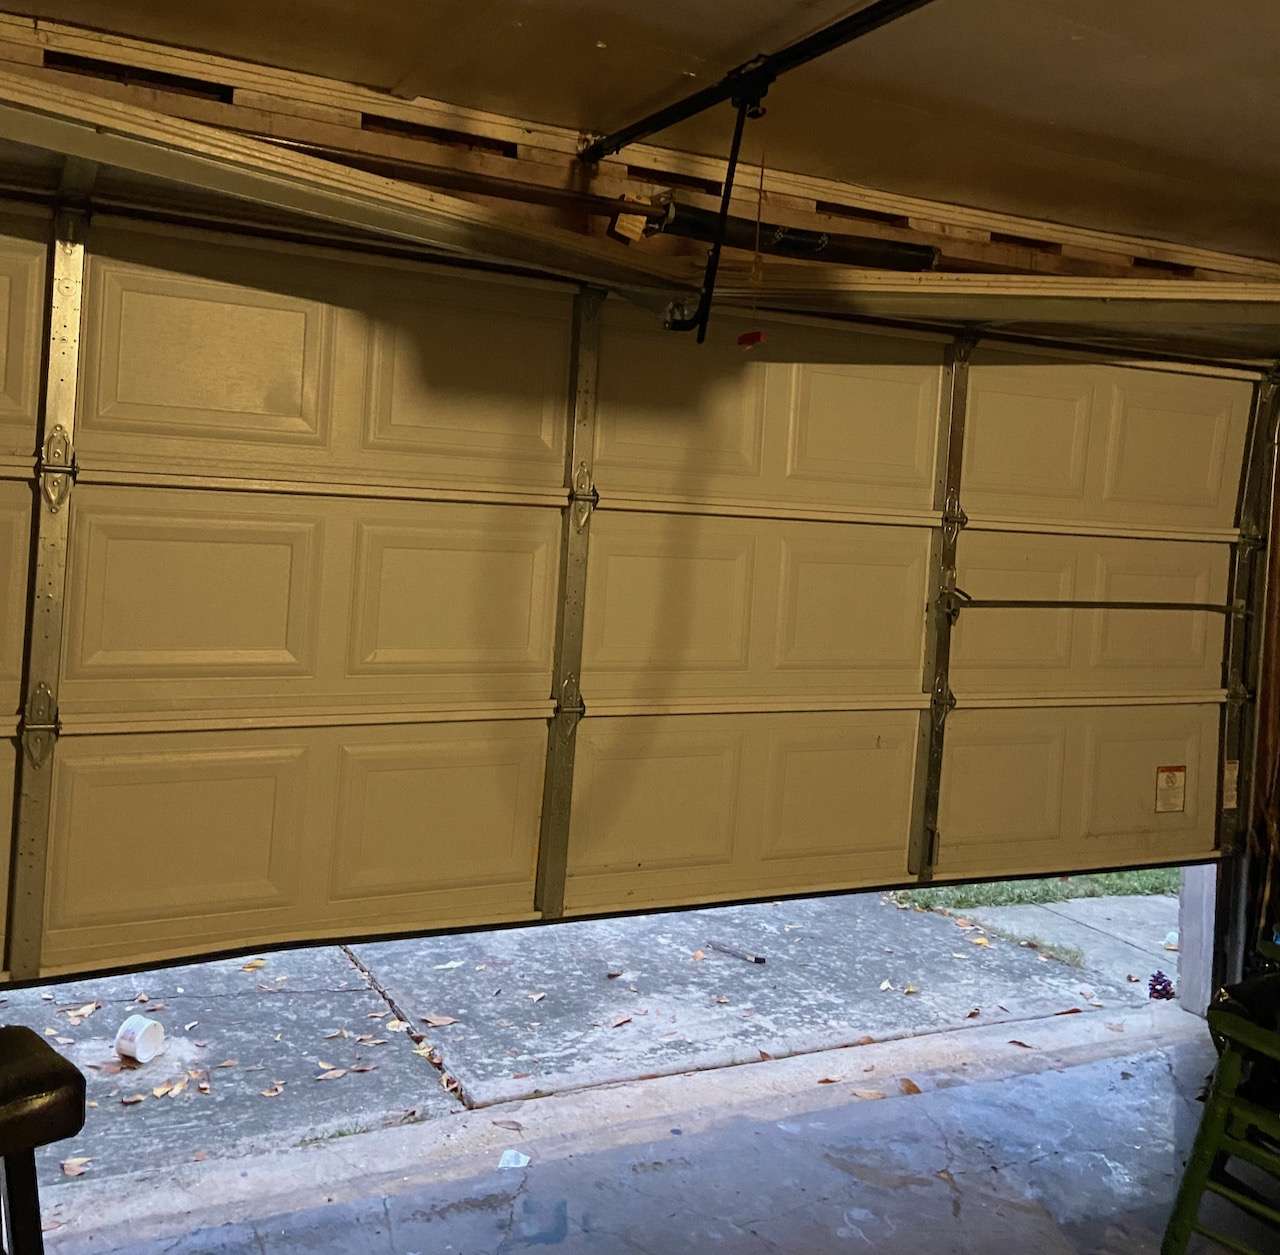
Because many newer builder grade garage doors are being installed by home builders, we are starting to see full garage door replacement when a door is opened with a broken spring. And this is a tragedy.
The reason this happens is the metal used in the outside face of the garage door, stiles, and hinges is thinner than ever, causing issues like pictured above. This is more common on double car width garage doors with a single row of stiles.
I remember the first time I saw a garage door cave in like pictured above from a simple broken spring. I was flabbergasted. To think a homeowner would have to pay for a full garage door replacement because the spring broke is crazy.
But, then again, it's 2022, and nothing seems to surprise me anymore. We go into more detail on builder grade garage doors later in this article.
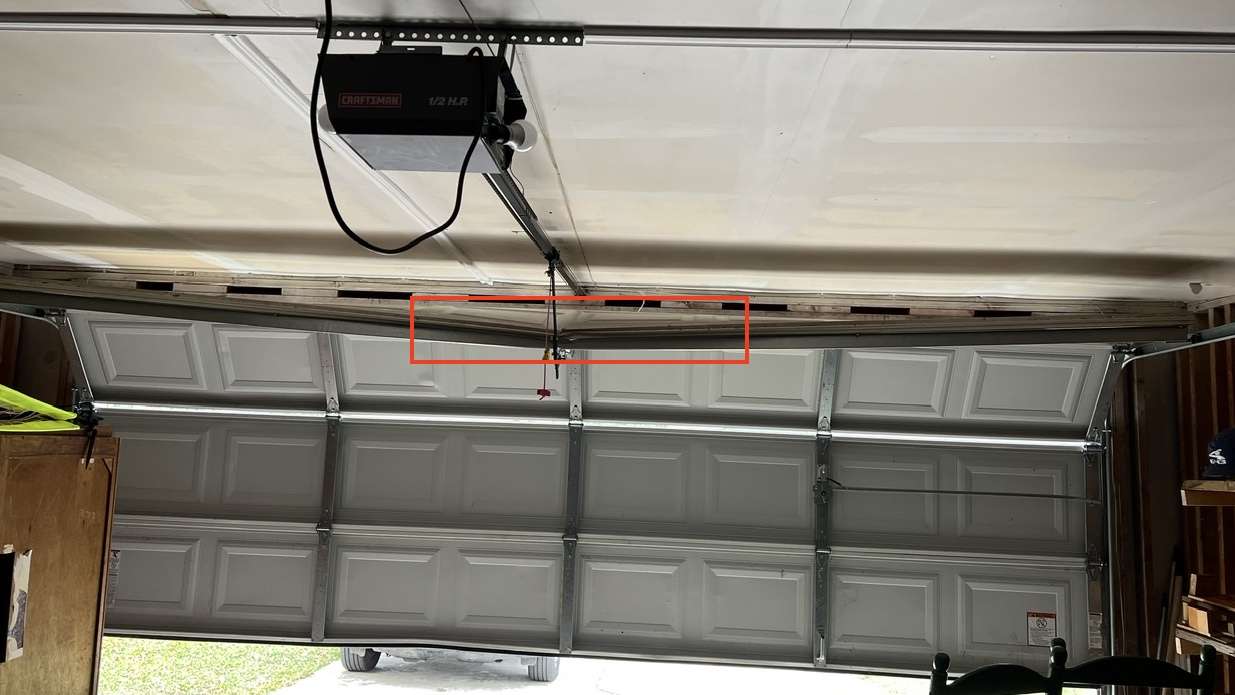
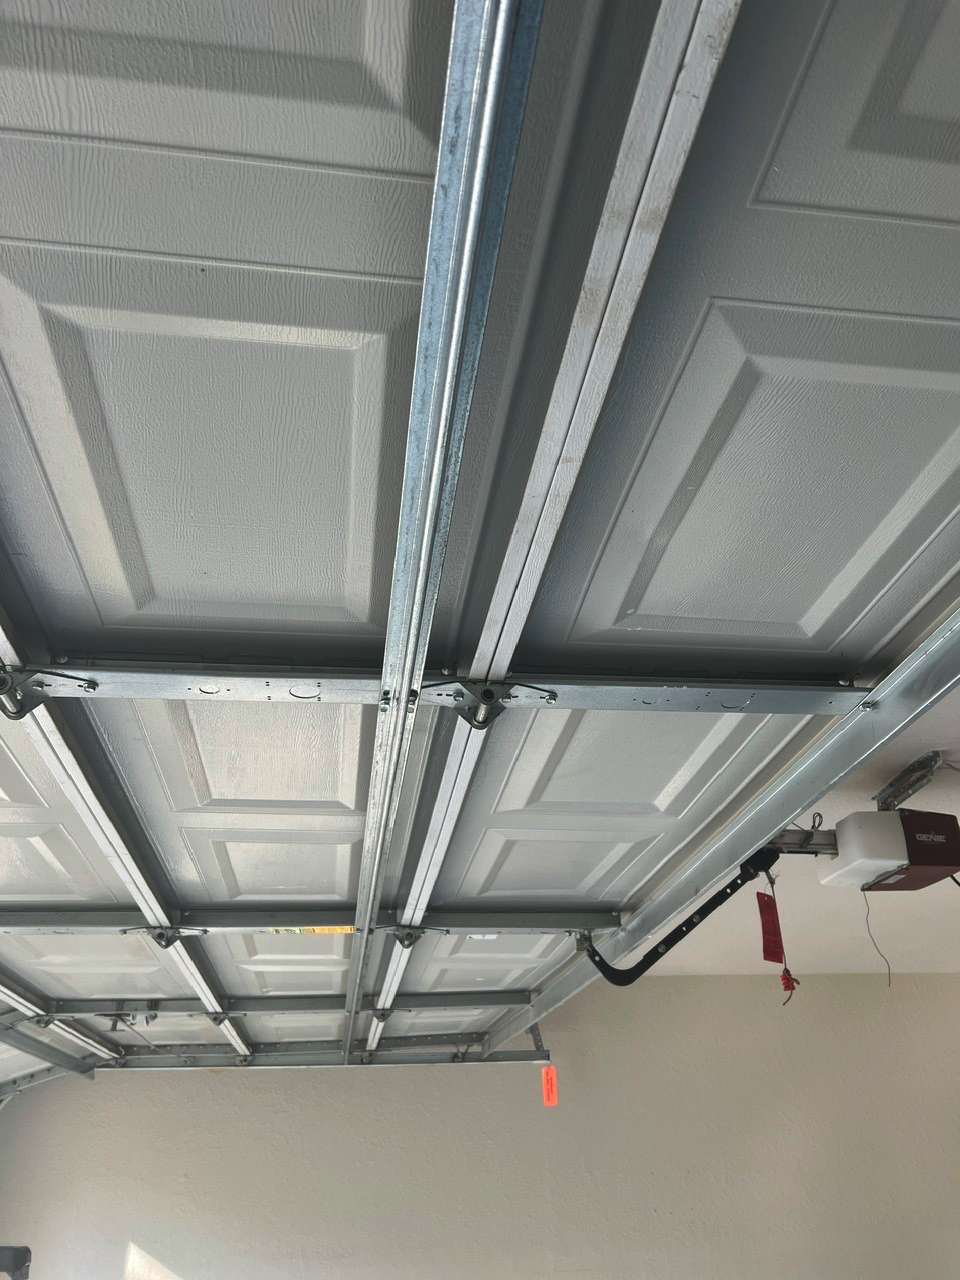
Opener is Mounted Too High Above Garage Door
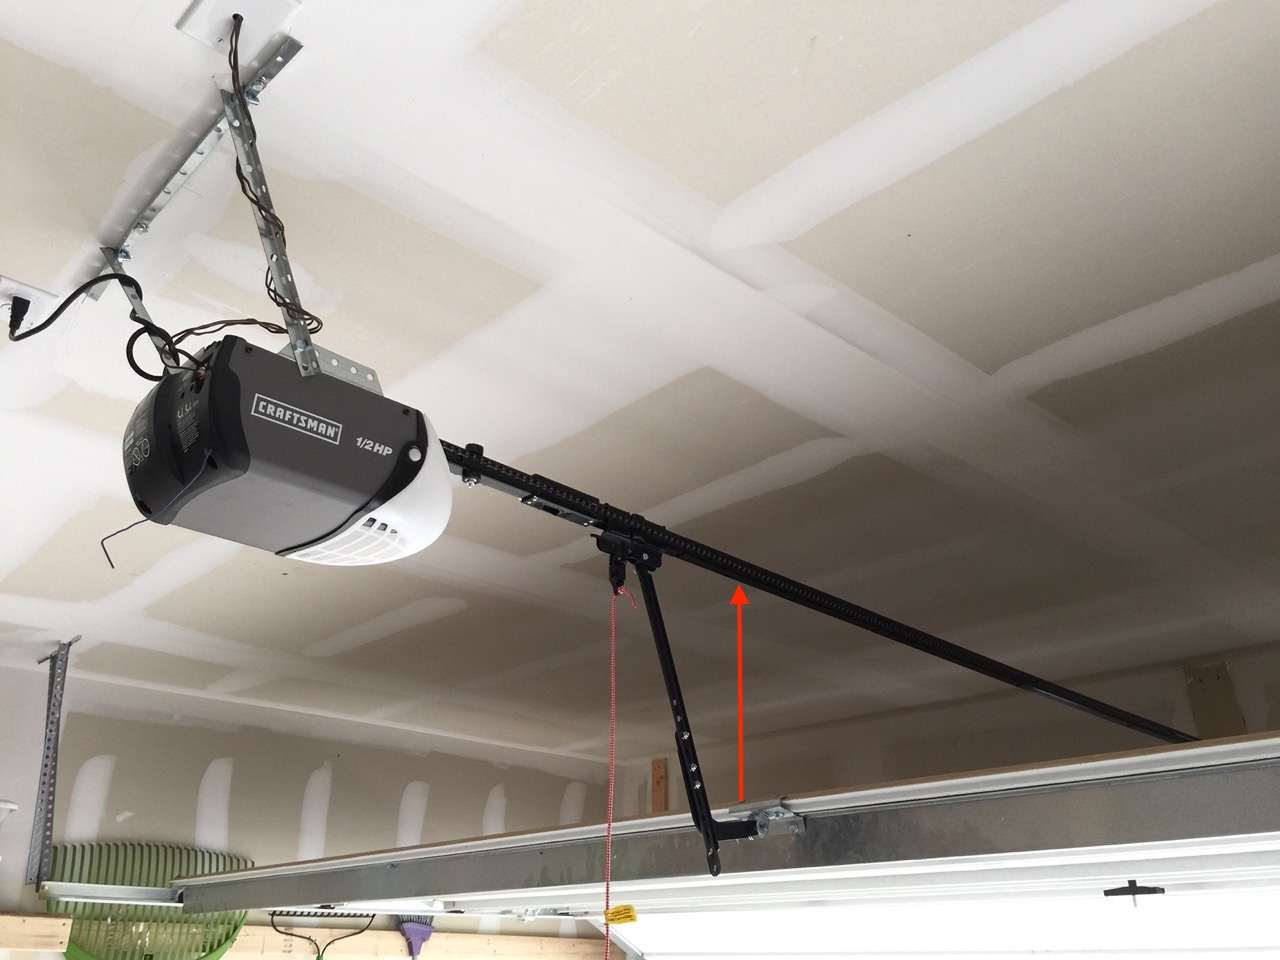
The pickup arm on your garage door opener should be laying back closer to horizontal than vertical when the garage door is in the up position. If not, there is a greater chance of the automatic opener damaging the top section of your garage door due to an improperly installed opener.
Another issue you will have is the force or sensitivity adjustments will not respond properly if the garage door hits something because the angle of the pickup arm is incorrect. Like we have mentioned before, garage doors and openers are all about geometry. A trolley opener should be installed, so the opener rail is no more than a couple of inches above the garage door in the open position.
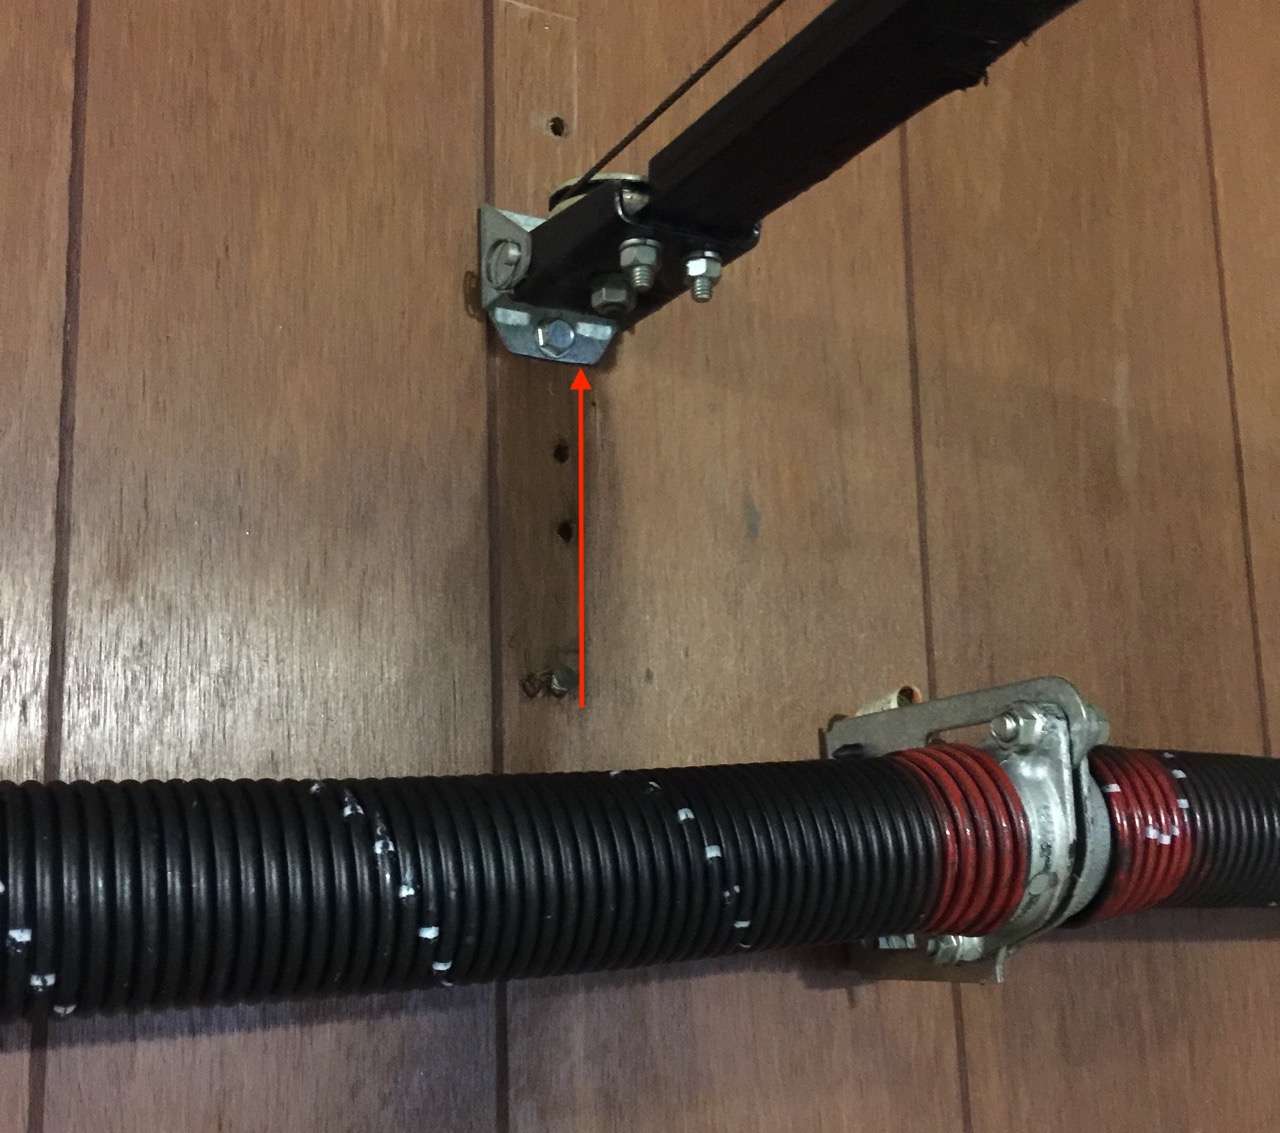
The opener header bracket should be mounted about two inches above the spring mounting pad. If you mount this bracket too high, the opener pickup arm will be at the wrong angle, causing it to pull the top section back versus lifting it over the radius. This is another common issue we find when top sections are damaged on garage doors.
Consulting the owner's manual for your automatic garage door opener will offer instructions on the proper installation practices.
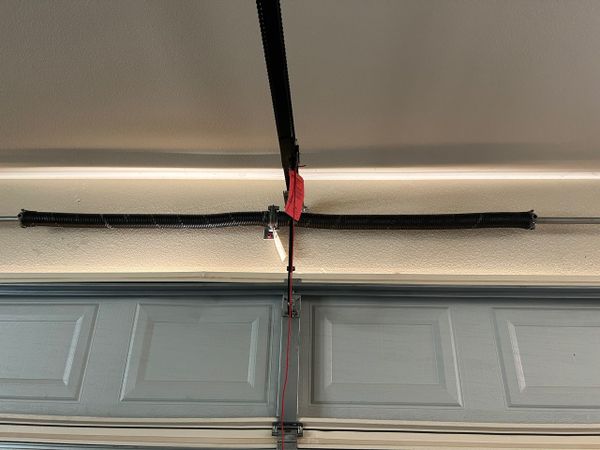
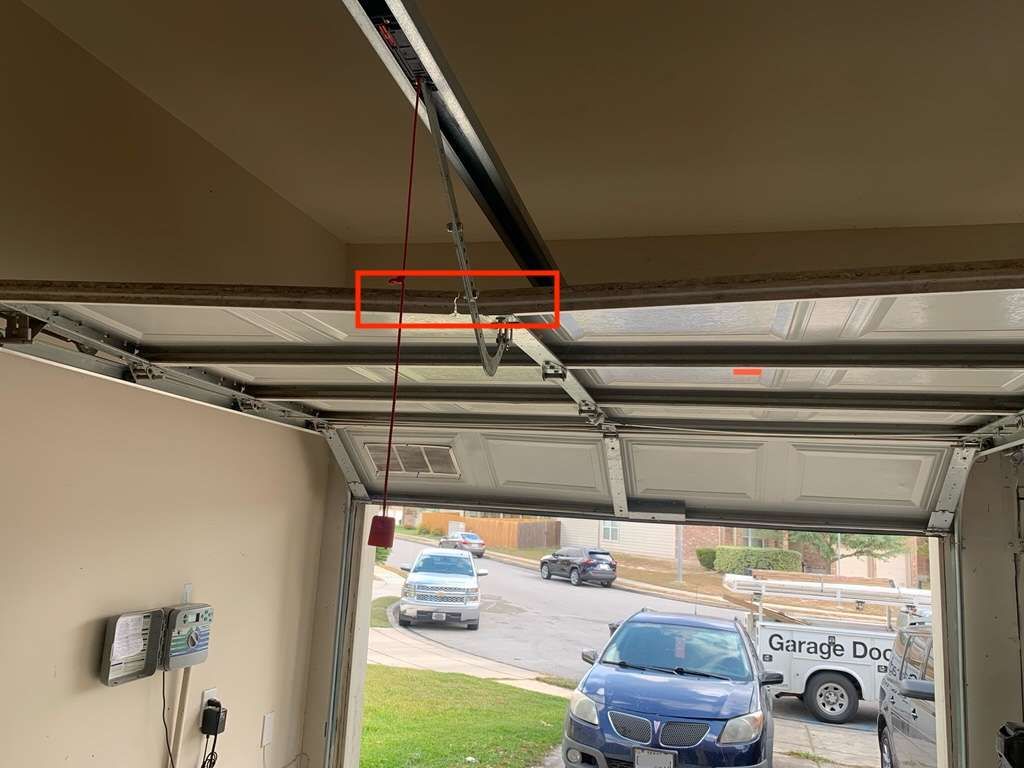
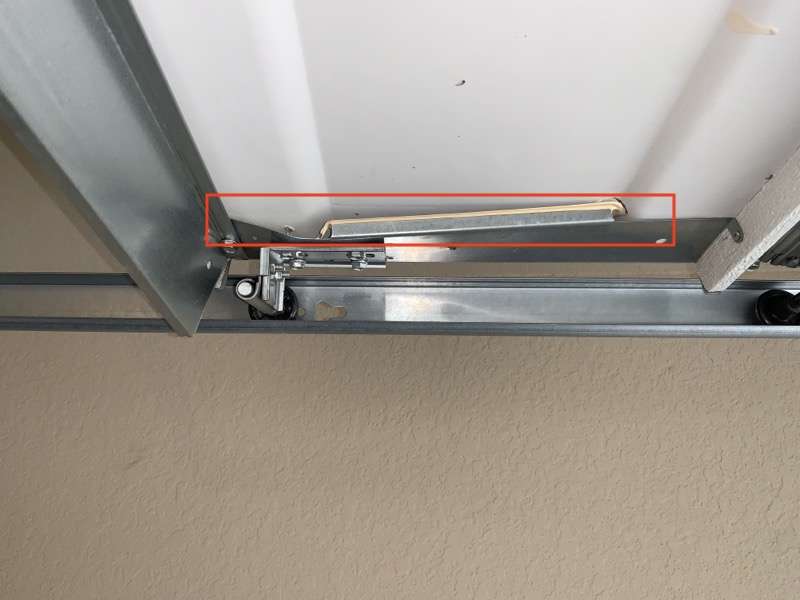
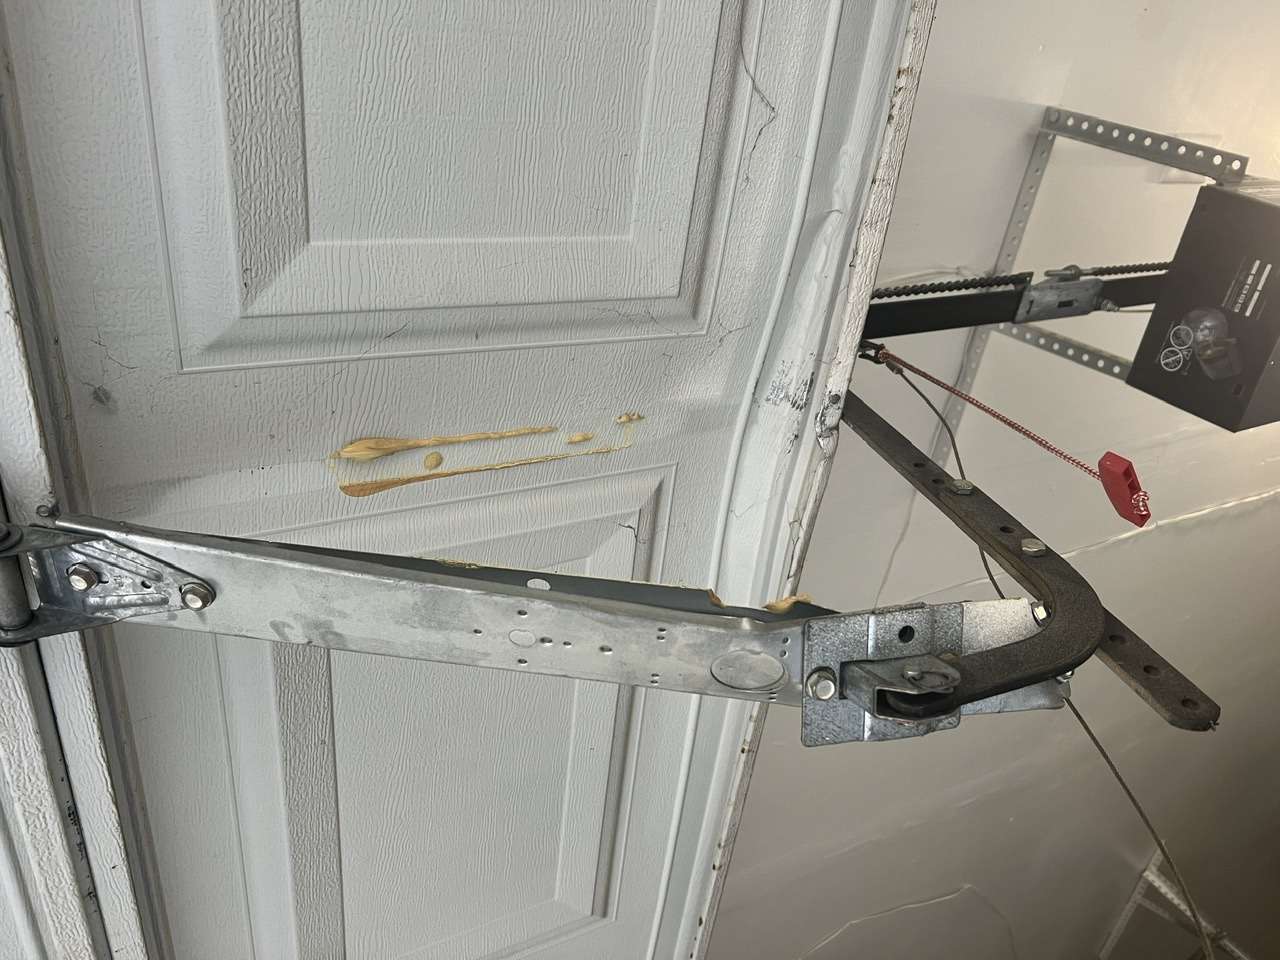
Opener Pickup Arm at Wrong Angle
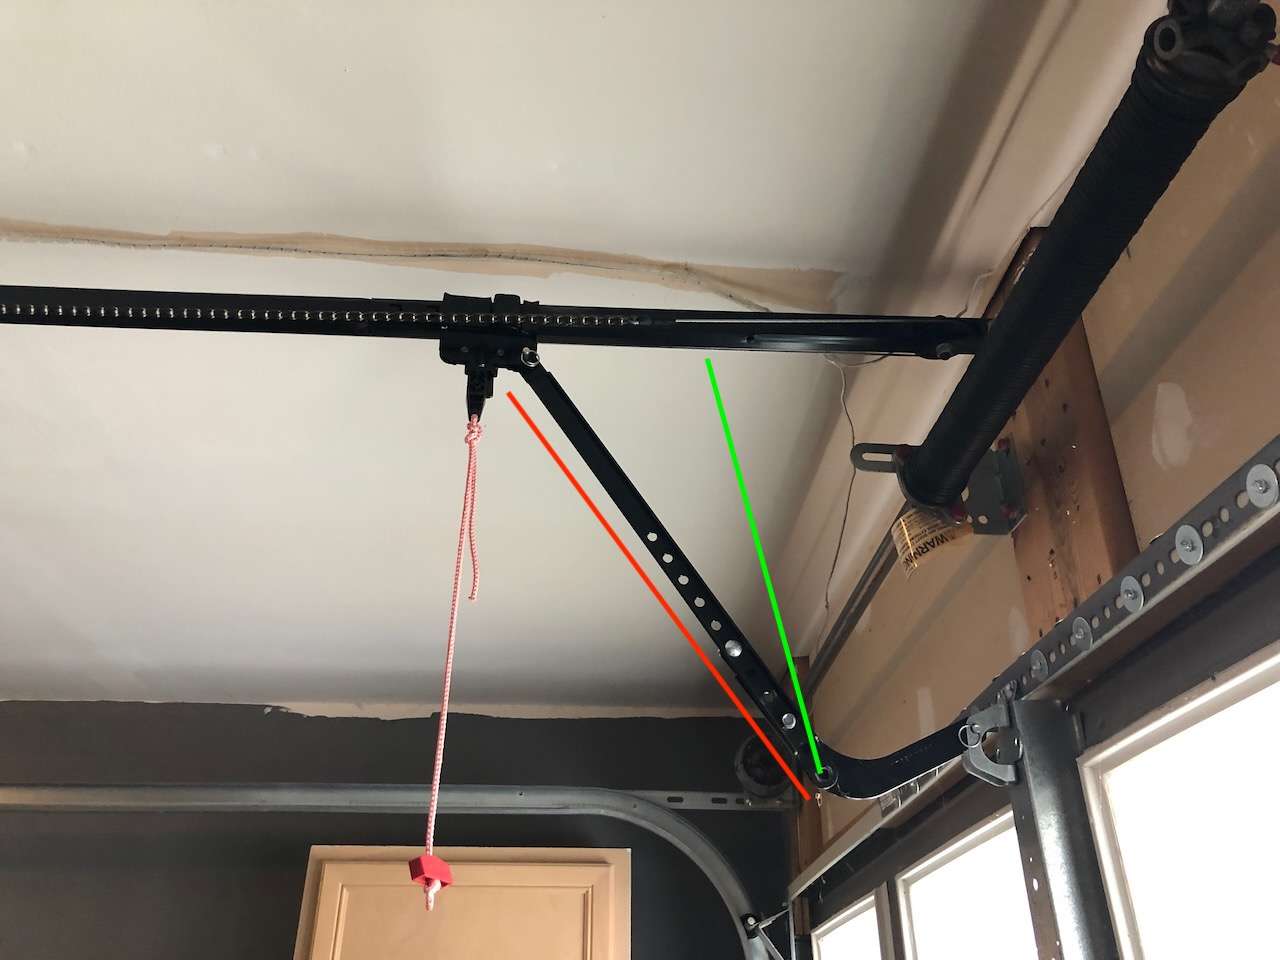
It’s important when installing your garage door opener to get the pickup arm at the correct angle. Like we have said many times, garage doors and openers are all about geometry.
In the picture above, the red line indicates the wrong angle and the green line shows the correct angle for the pickup arm. The top section of this garage door would have ultimately needed repair since it did not have a strut, but the wrong angle of the pickup arm accelerated the damage.
Garage Door Closed Down on Something
If you close your garage door down on a stool, trash can, or box in your garage, there is a good chance you will damage the top section of the garage door. Many times the cause of this is the automatic opener was installed too high above the garage door, but that’s not always the case.
Even a properly running automatic opener that passes force and sensitivity tests can continue to push a top section down if the door hits something at a particular height. A properly installed automatic opener is critical, and a good professional should know how to install the pickup arm and rail correctly to reduce issues like these. We always advise homeowners to keep stuff away from their garage door, which will save them money in the long run.
Why is My Garage Door Sagging?
If your garage door sections are sagging or bending, you will want to have it repaired as soon as possible. Replacing sections on your garage door can be expensive, especially if they are no longer available, which can lead to a full replacement. A simple repair to the garage door will stop most sagging and bending of garage door sections, as long as the panels are not too damaged.
Your garage door could be sagging in the middle due to various reasons and circumstances. Let’s take a closer look at some of the more popular scenarios.
Cheap Builder Grade Garage Door
Many home builders today build homes using the cheapest materials they can source. The garage is no exception. With the fierce competition, we are seeing in home building, new garage doors are being installed in homes that would never pass muster in the old days. Manufacturers have removed parts off the garage door, started using thinner stiles and hinges, and opted for metals so thin the manufacturers will not list the gauge thickness on their websites.
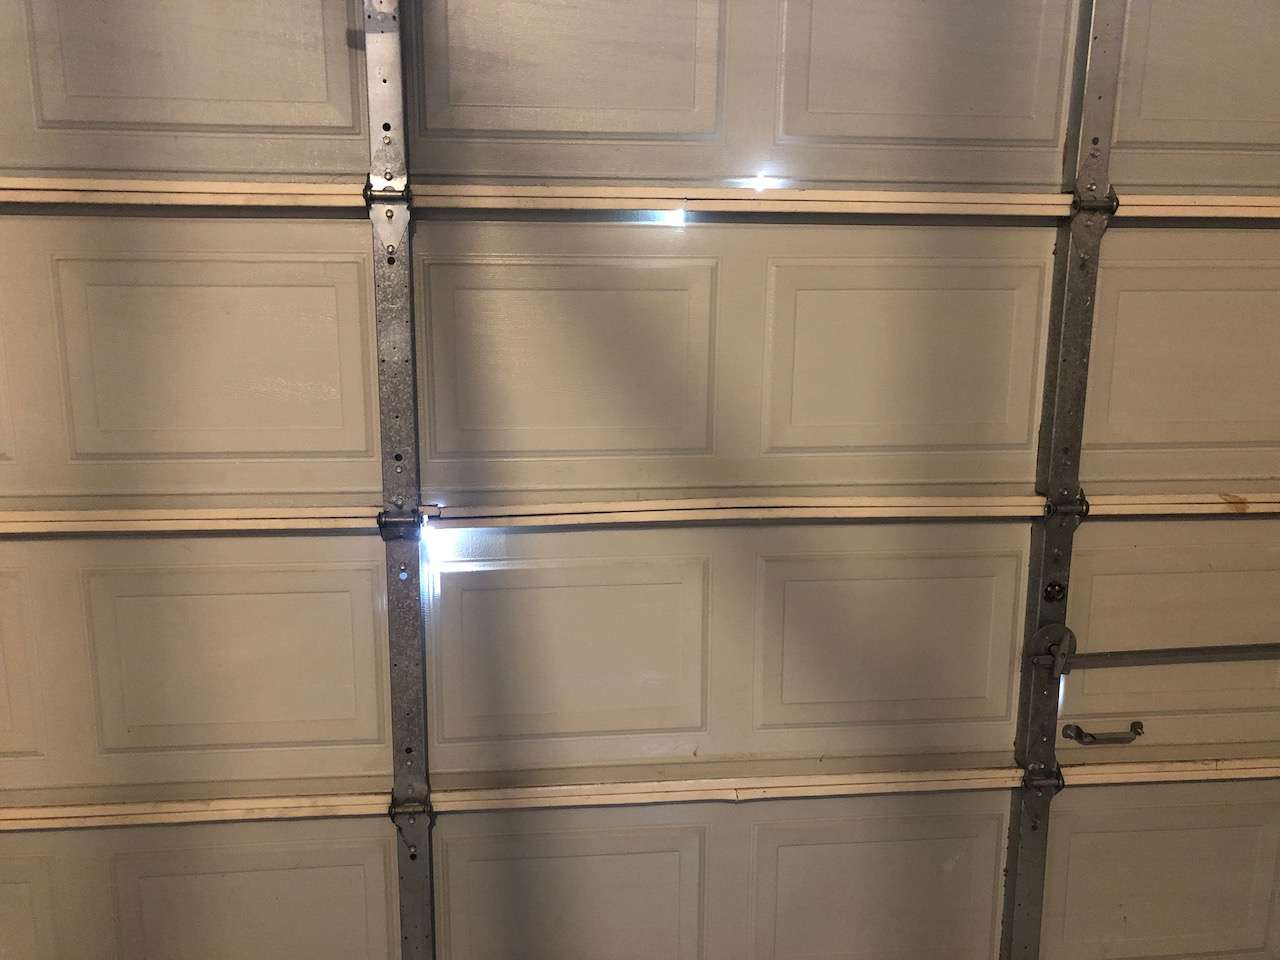
Single Stile Windsor Builder Garage Door
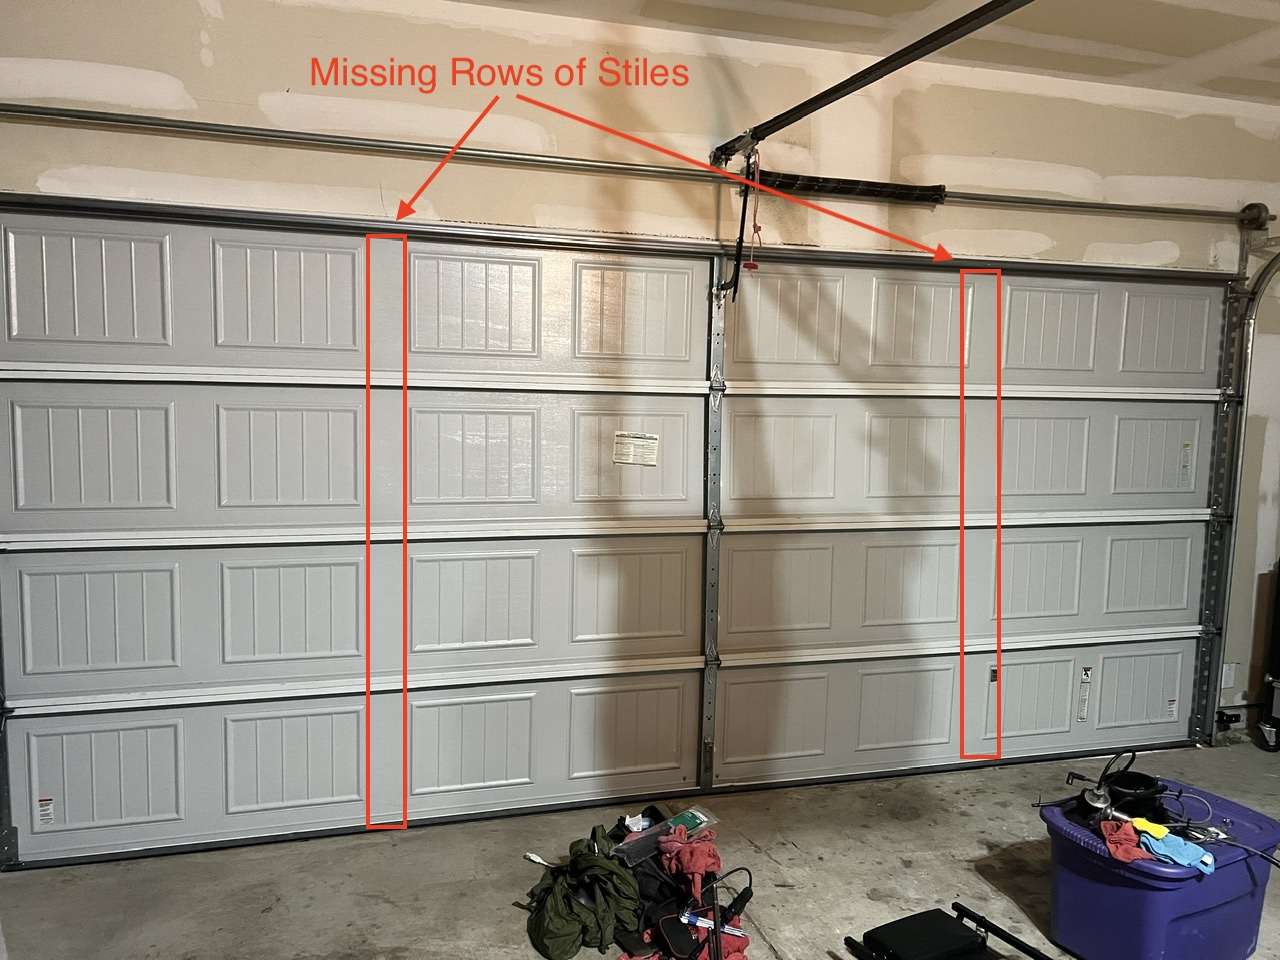
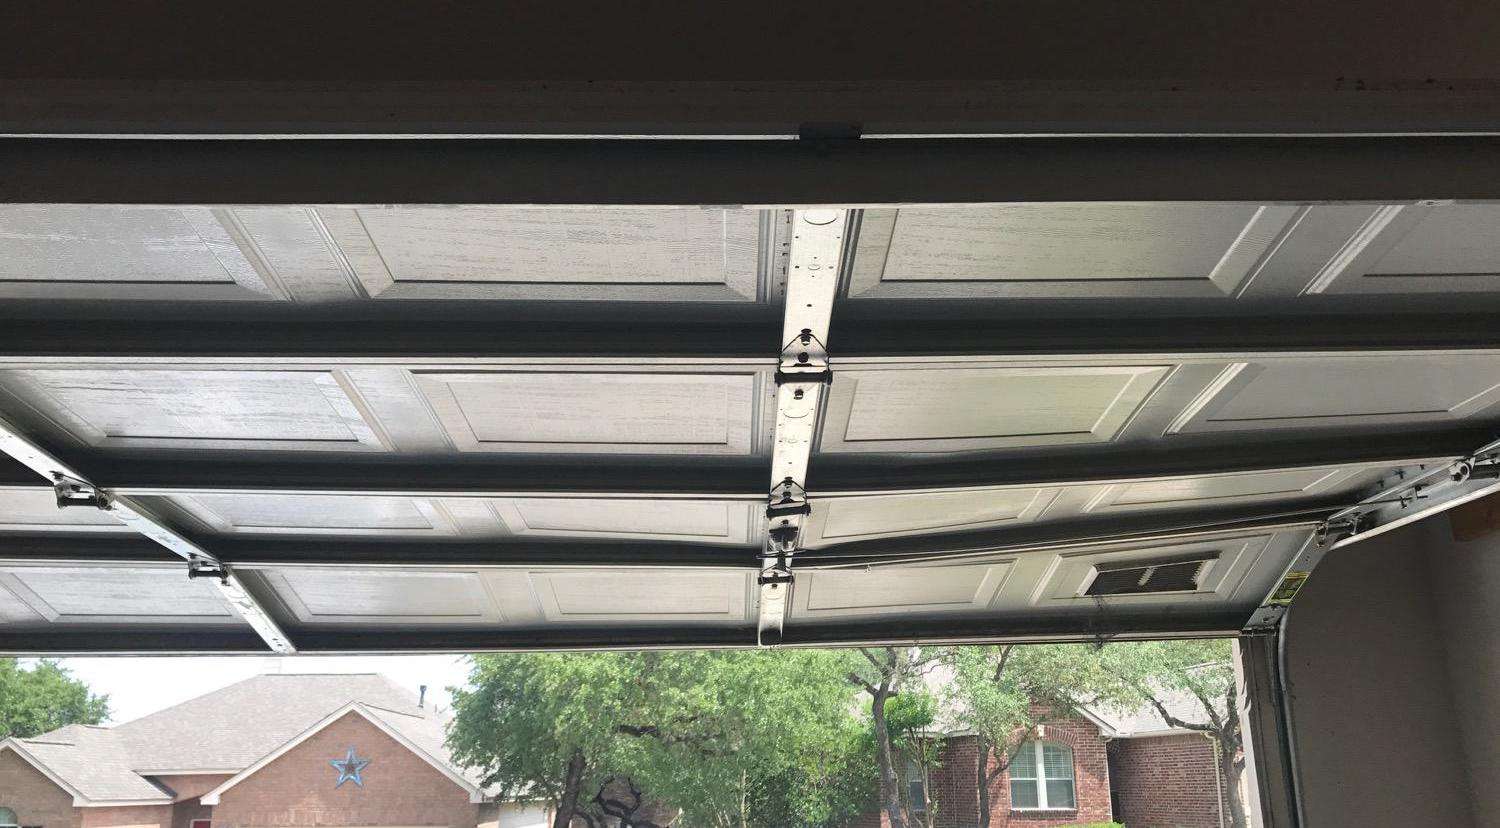
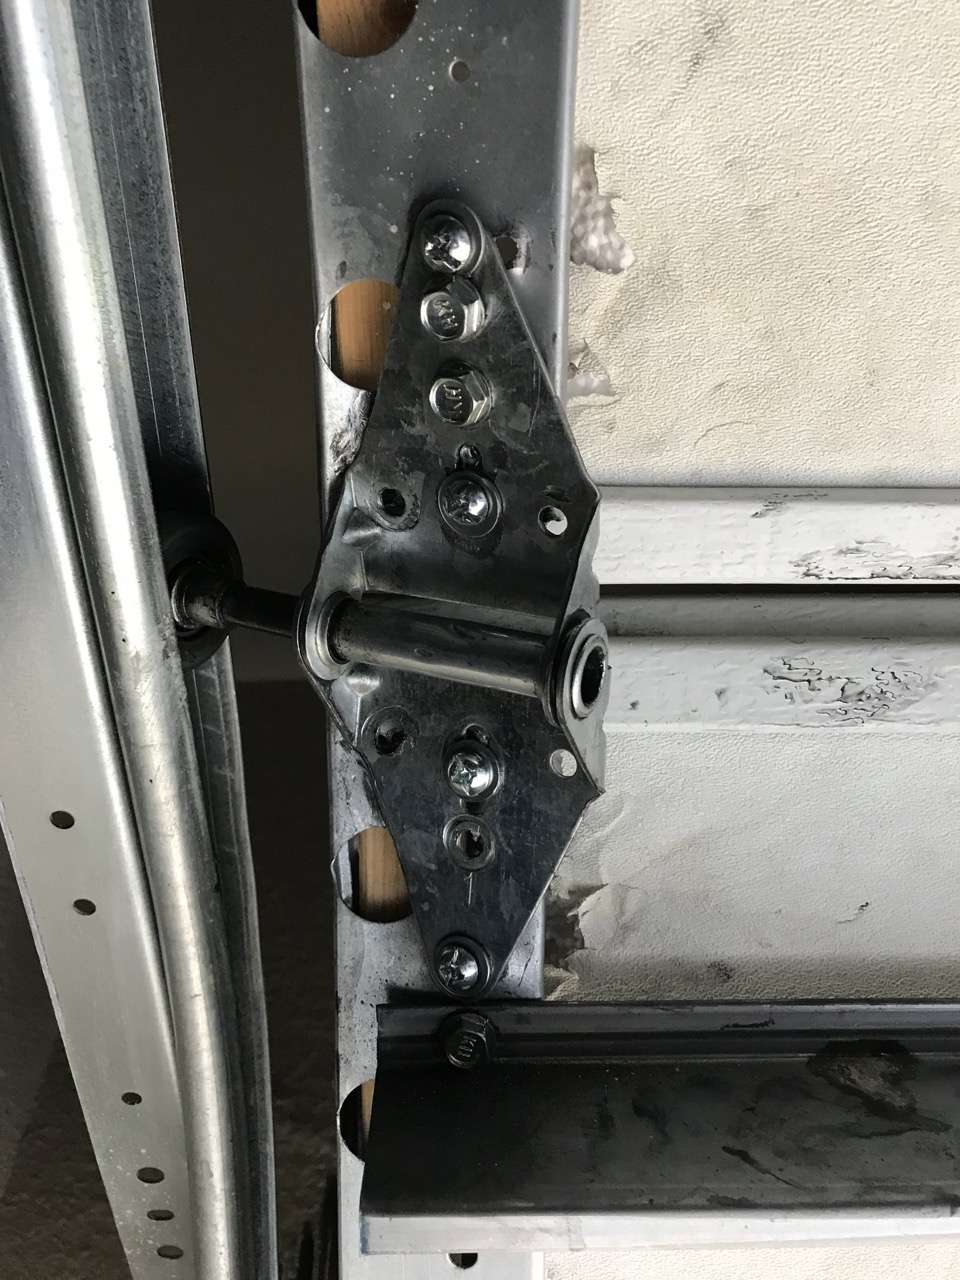
A standard garage door should have three rows of stiles running vertical on a double car garage door. Measuring from the end of the door, they should be spaced every four feet for a standard 16ft wide door. As illustrated in the photo above, this Windsor builder grade garage door only has a center row of stiles. The row of stiles 4ft to the left of center and 4ft right have been removed to save money.
These rows of stiles are essentially the spine of a garage door and also where hinges are attached to help align the door when opening and closing. A quality hinge and stile on a garage door provide much needed support when a garage door is in the up position.
Removing these stiles and hinges from a door leaves you with popping and flexing on the sections when opening and closing the door. Not to mention, this door has a hard time holding up its weight longer than 3-5 years based on what we have seen in the field.
Wayne Dalton 9100 Builder Garage Door

Wayne Dalton foam in place model 9100 garage doors were designed specifically for new home builders. They were designed to be installed quickly with little consideration for longevity and performance. Most of these doors will be installed with the Torquemaster spring system, which is a small spring inside a tube.
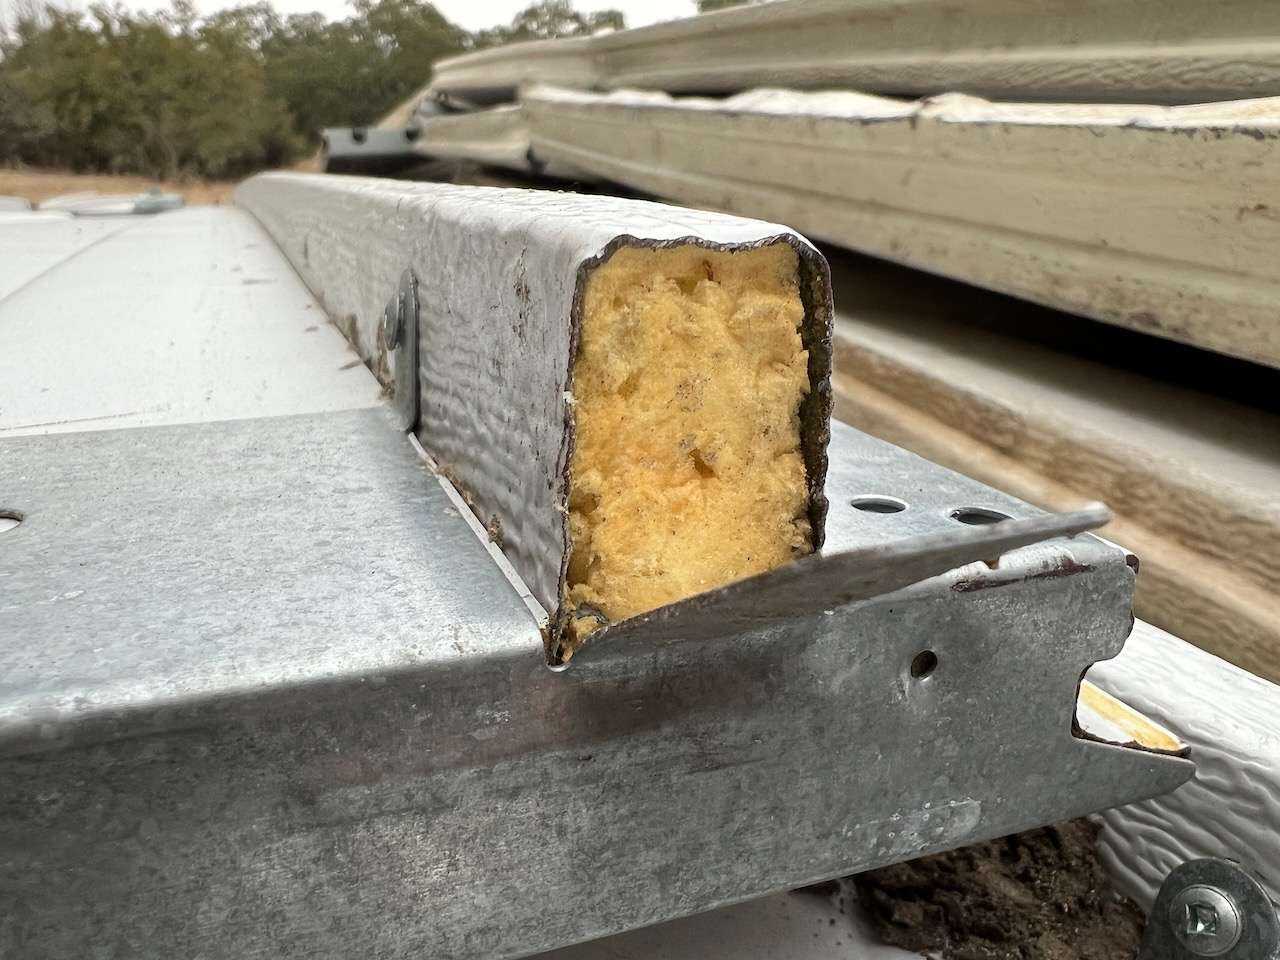
The sections on the garage door get most of their strength from polyurethane foam, including the built-in struts. The metal on these garage doors is so thin it is not listed anywhere on the manufacturer website. We have never been able to verify the gauge of metal with manufacturer’s reps or brochures.
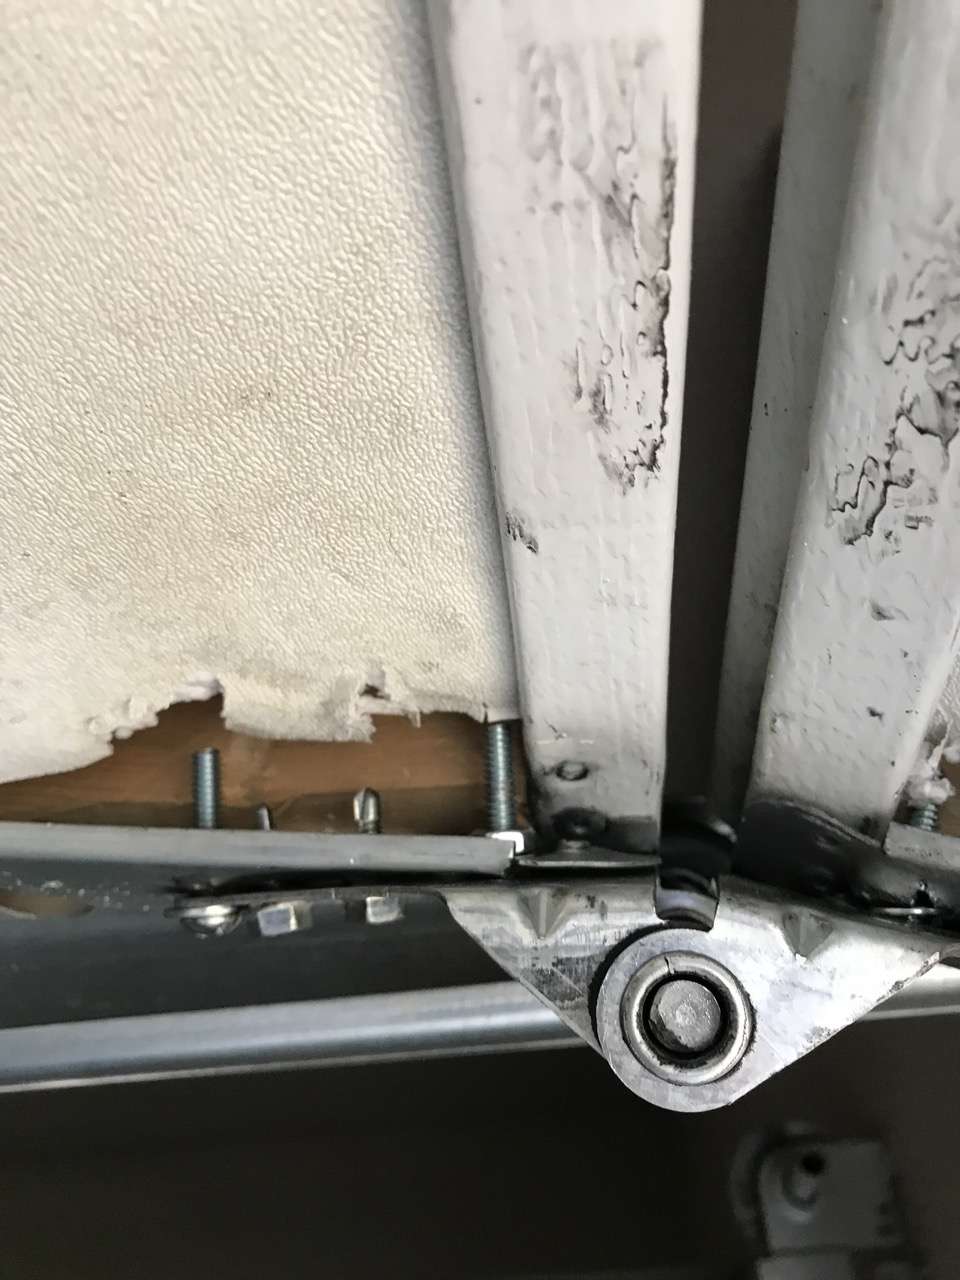
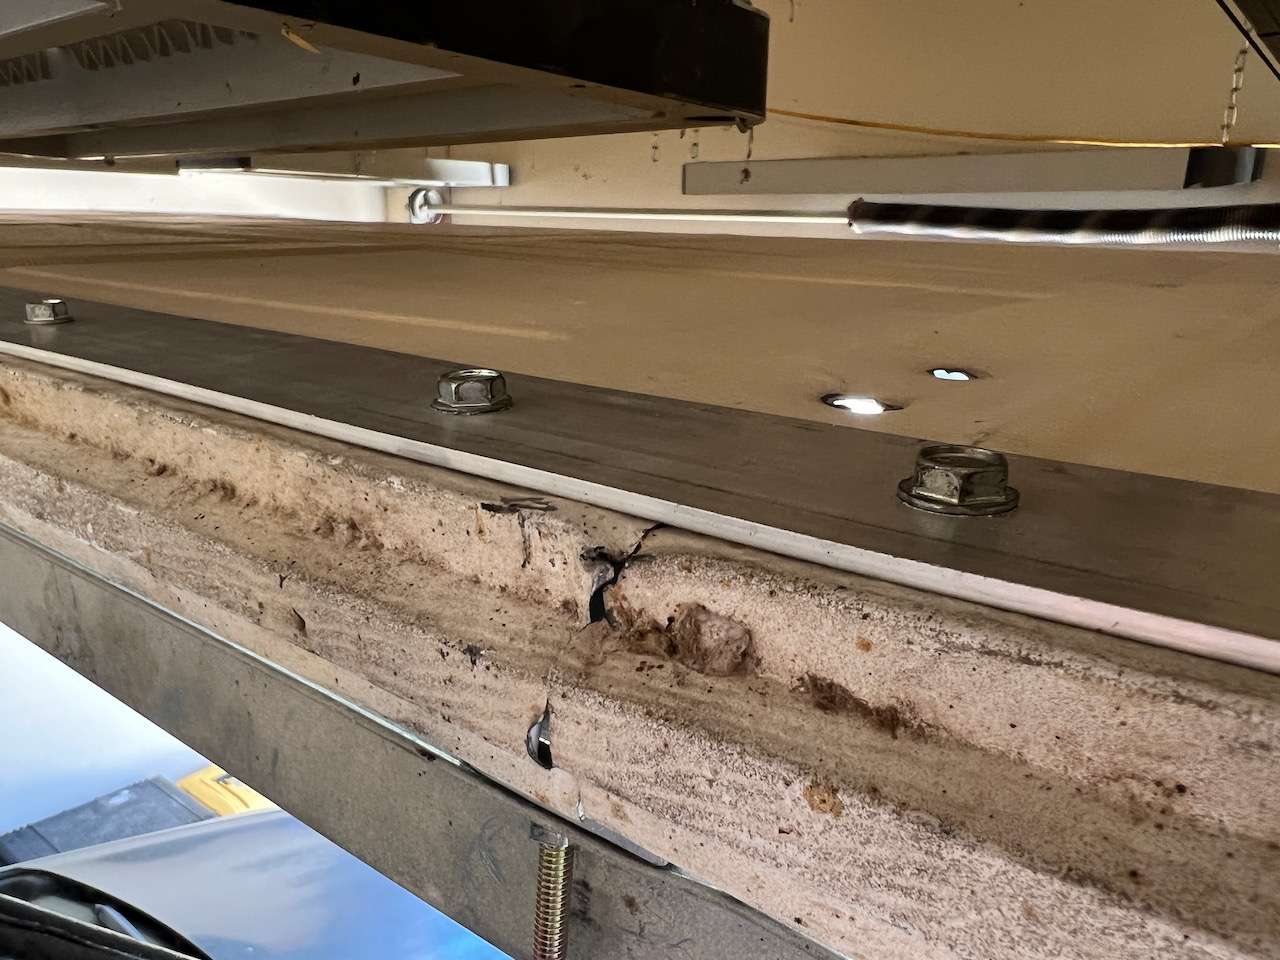
One of the more common issues we see with the Wayne Dalton 9100 garage door is the end stiles will start detaching from the section. This is very common for this model of garage on double car width sizes and is a cause for concern for most homeowners. The reason for this is plain and simple… poor engineering and the metal is too thin. There is not much you can do for this issue because the sections don’t have substantial metal for reinforcement.

The struts in the picture above are preformed into the section with foam injected into the strut. The slightest hit from something in the garage can cause cracks to start to form, which eventually will lead to the section sagging. These sections are not easily repairable with standard reinforcement struts like on a standard garage door because they have an entirely different design and the metal is very thin.
Cheap Wood Overlay Builder Garage Door
To properly build a true wood overlay garage door, there is a lot to be considered by the manufacturer, so the garage door sections can support the extra weight. In our area, we started seeing these wood builder grade overlay garage doors popping up in various neighborhoods, and they were literally falling out of the tracks. Someone had installed wood overlay over cheap, builder grade metal doors that were not designed to support the weight that was added.
When these wood overlay garage doors were in the up position, the hinges and stiles were bending to the point they were coming detached from the garage door sections. These are garage doors that were less than five years old, and they were not hit by a vehicle. The wear on these doors was from too much weight being added to a thin metal door.
Many times when you build a quality overlay garage door, the face of the door will be 24 or 25 gauge. Commercial 24 gauge sections may be used. The stiles are usually 20 gauge, the end stiles may be doubled up with seven inch stem rollers, and the rollers may even be the larger 3” roller to help with the additional weight.
These garage doors were so dangerous we had to inform homeowners we could not work on them. On one particular job, the bottom bracket pulled off the bottom section and hit our technician in the shin.
After a discussion with some homeowners who had these garage doors on their home, they were not surprised at all. It turned out many of them were in lawsuits with the builder. If you want a real overlay garage door, make sure it is built correctly, or you will end up with an expensive nightmare on your hands.
Garage Door Could Have Been Hit
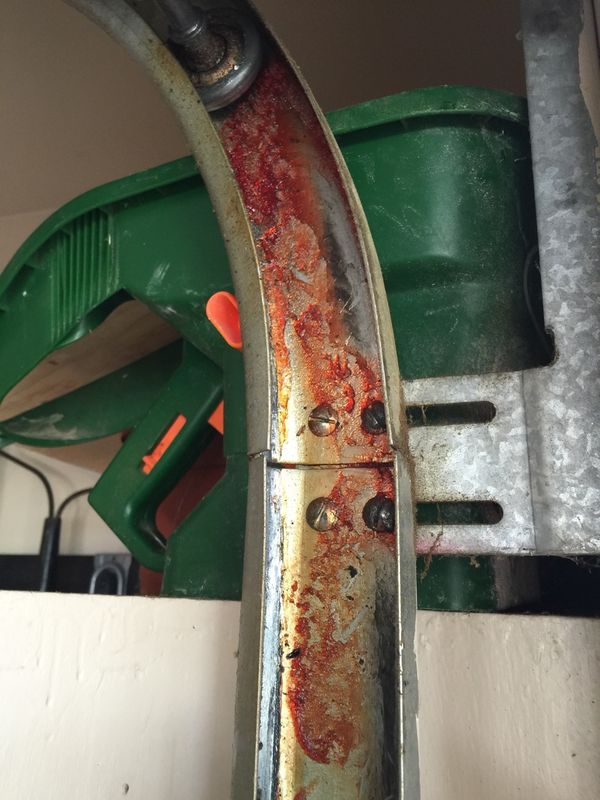
When a garage door is hit, many people think it can be repaired easily. That is not the case. Many times, the metal on a garage door is stretched when a dent occurs, therefore causing it to lose its integrity. It may or may not reveal a crack when the accident happens, but over time the stretched metal will generate a small crack which eventually starts to spread as the door is opened and closed.
As this crack gets bigger, the door will sag a little in the beginning. Over time, the little sag will turn into bending and sagging so bad the garage door section will not be able to make it around the radius of the tracks. If you catch the problem soon, you can have your garage door repaired with a reinforcement strut, so the crack does not spread.
Age of Garage Door
Like anything else, garage doors wear out over time from normal use. The metal used in the garage door will start to become stressed, causing cracks in sections and stiles. Because so many garage doors installed by builders today are made with thinner metals and cheaper parts, we are starting to see many garage doors needing full replacement in under ten years. In the good ole days, it was not uncommon for a well-built metal garage door to last thirty years.
How to Fix a Sagging Garage Door
Repair your sagging garage door with a reinforcement strut
To fix a sagging or bending garage door section that has cracks in it, you need to install a reinforcement strut. Your garage door most likely already has one installed on the top section, you just never noticed it. A reinforcement strut is normally around two inches tall, and its shape is specifically engineered to carry a load out to the end stiles of a garage door, where the rollers are.
If you are calling around looking for a strut, try to find one with a metal thickness of 20 gauge. Especially if you are sourcing a strut for a double car width garage door. If you can’t find 20 gauge then 22 gauge will do, but try to stay away from struts that are 24 gauge and thinner. They will fail much sooner.
Where Do I Install the Strut?
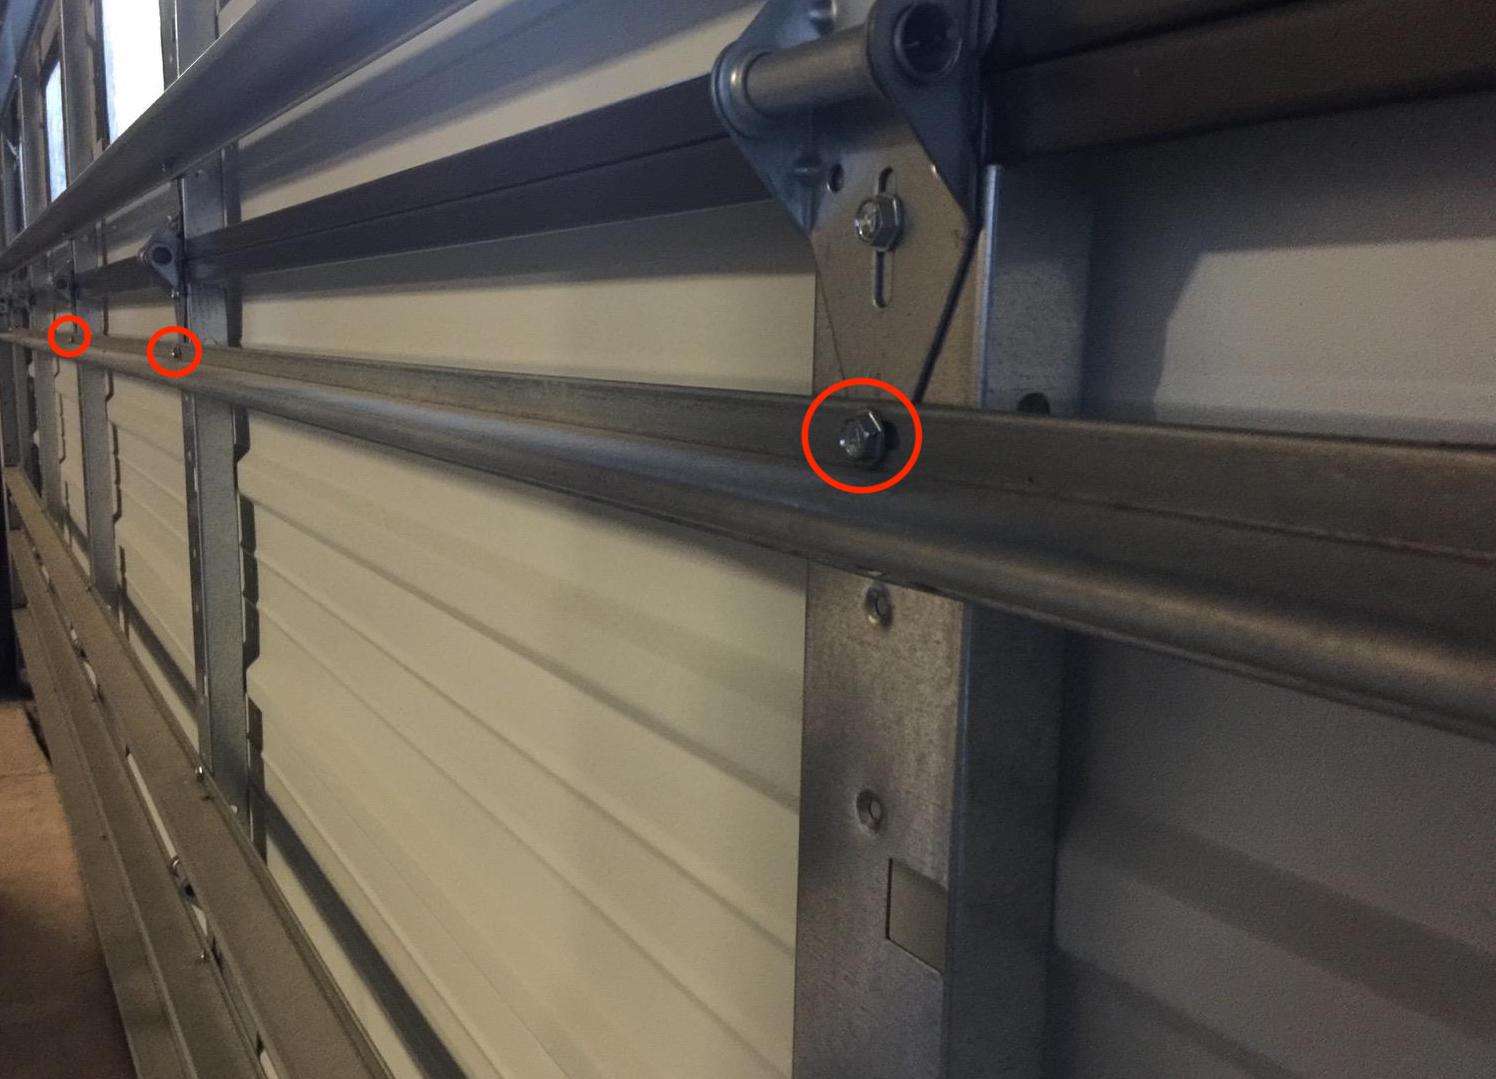
A reinforcement strut on a garage door requires two self-tapping screws per stile for attachment. A standard double car width garage door is 16ft wide and has five vertical rows of stiles, including the end stiles. Like we discussed earlier in this article, you could have a builder door with only three or four vertical rows of stiles.
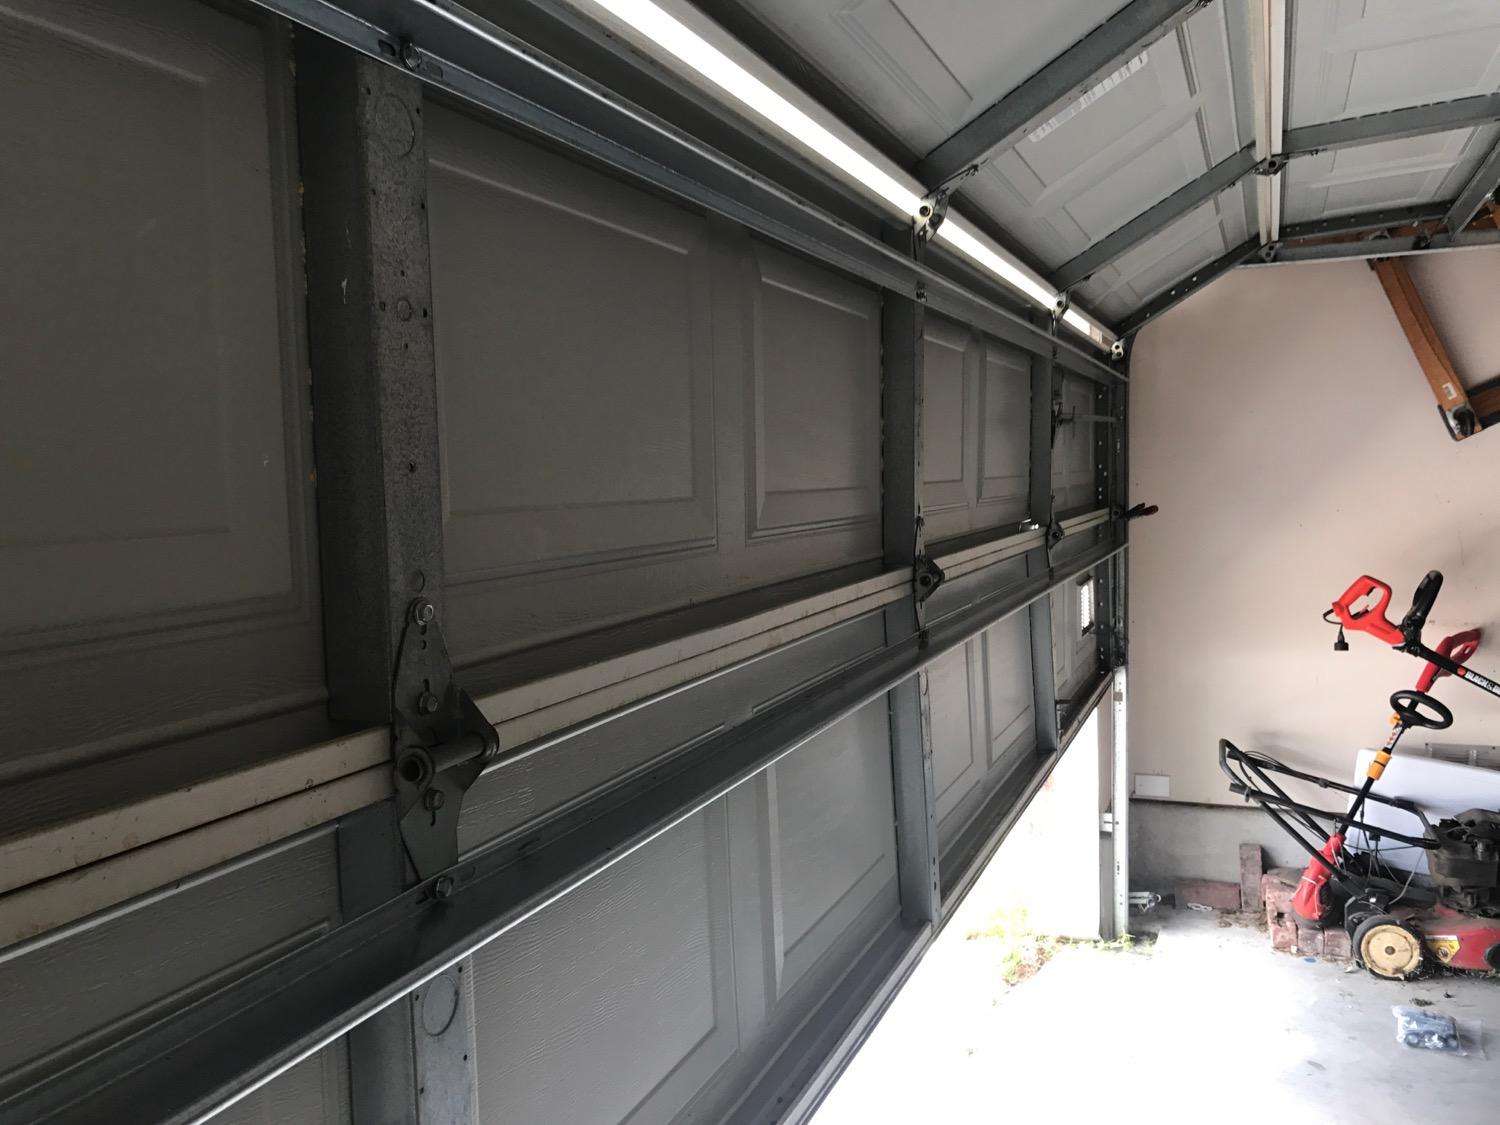
Usually, you will want to install the garage door strut at the top of the section, as close as you can get to the rollers. The rollers are what carry the load of the garage door in the horizontal tracks. By installing the strut close to the rollers, you are transferring the load from the center of the garage door out to the end stiles where the roller stems are inserted in the hinges.
It’s important to install the properly engineered strut that runs the full width of the garage door, so attachment can be made on all inner and end stiles. If not, you are just adding dead weight to the center of your garage door section, which will eventually make your sagging issue much worse.
How Many Struts Can I Install?
Installing one extra strut on a double car width garage door is usually a non-issue. Many times you don’t even have to adjust the spring. Installing two struts on a double car width garage door will almost always require a spring adjustment by a garage door professional.
Please keep in mind. Any extra weight you add to your garage door will affect your automatic opener in some way. Garage doors are ordered from the factory to have a spring that is designed to lift the exact weight of the garage door. This includes any upgraded hinges, struts, windows, or insulation. Any time you add weight to a garage door, it can become unbalanced.
Here is a Strut Install Guide:
Single Car Garage Door (8ft or 9ft wide)
- Must have a strut on the top section with automatic opener
- Additional struts can be added to sagging sections with spring adjustment
- Full struts may require upgrading springs
Double Car Garage Door (16ft or 18ft wide)
- All double car width garage doors should have top strut
- 1 or 2 extra struts can be added with spring adjustment on 16ft wide garage doors
- In my professional opinion, all garage doors over 16ft wide should have full struts (one reinforcement strut installed on every section)
Installing Strut on Top Garage Door Section
We discussed single car width garage doors earlier, but wanted to reiterate in this section how to install a top strut properly. This will be one of the more common scenarios since many single car width garage doors are installed without top struts by home builders.
Installing Punched Angle on Single Car Garage Doors
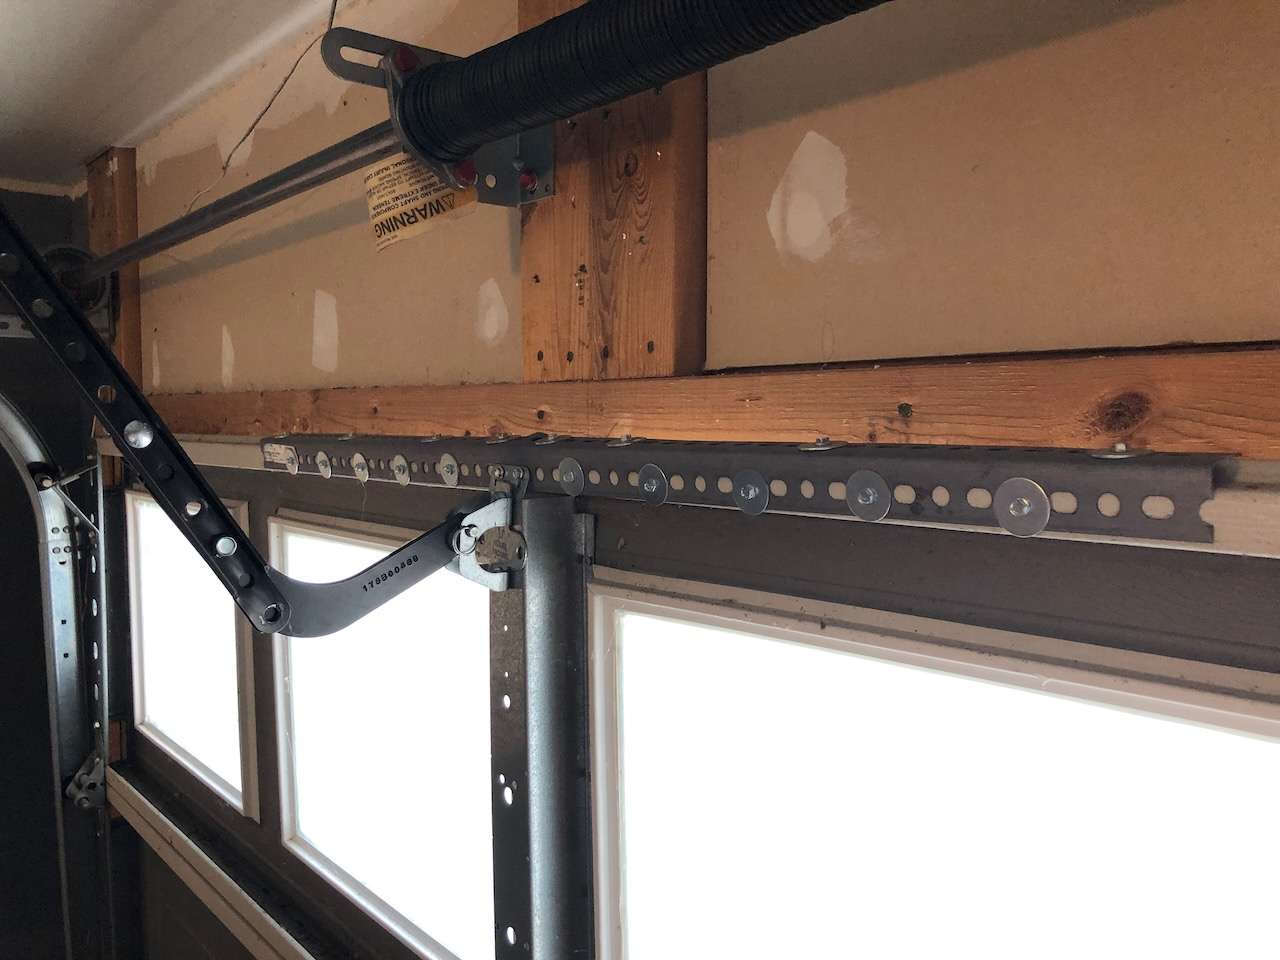
If you have a single car width garage door, and you can’t locate a reinforcement strut, you can install a piece of punched angle along the top section of your garage door. It’s important to make sure the angle runs the FULL WIDTH of the top section and is attached to the end stiles. Try to find a piece that is 12 or 14 gauge, so it will be strong enough to hold up to the daily pushing and pulling by your automatic opener.
Top Section Center Stile is Loose
It is very common for the top center stile to come loose from the garage door section when it fails. If this happens, you will need to rivet the stile back to the garage door section before installing the strut.
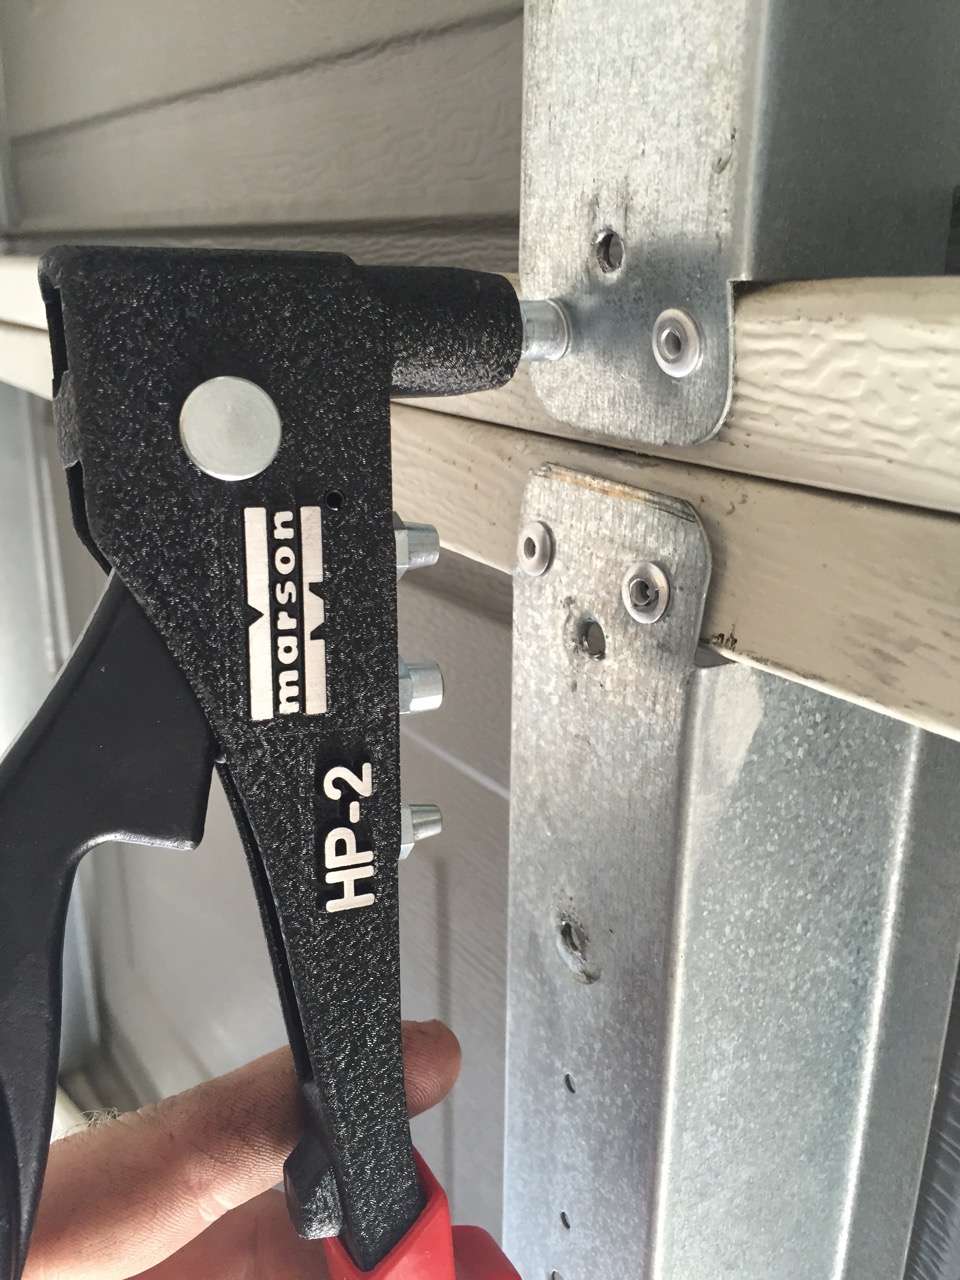
When reattaching stiles to garage door sections, aluminum rivets are best. They will provide secure attachment so hinges, struts, and pickup arm brackets can be reinstalled to a garage door section.
Heavy-Duty Opener Bracket on Center Stile Top Section
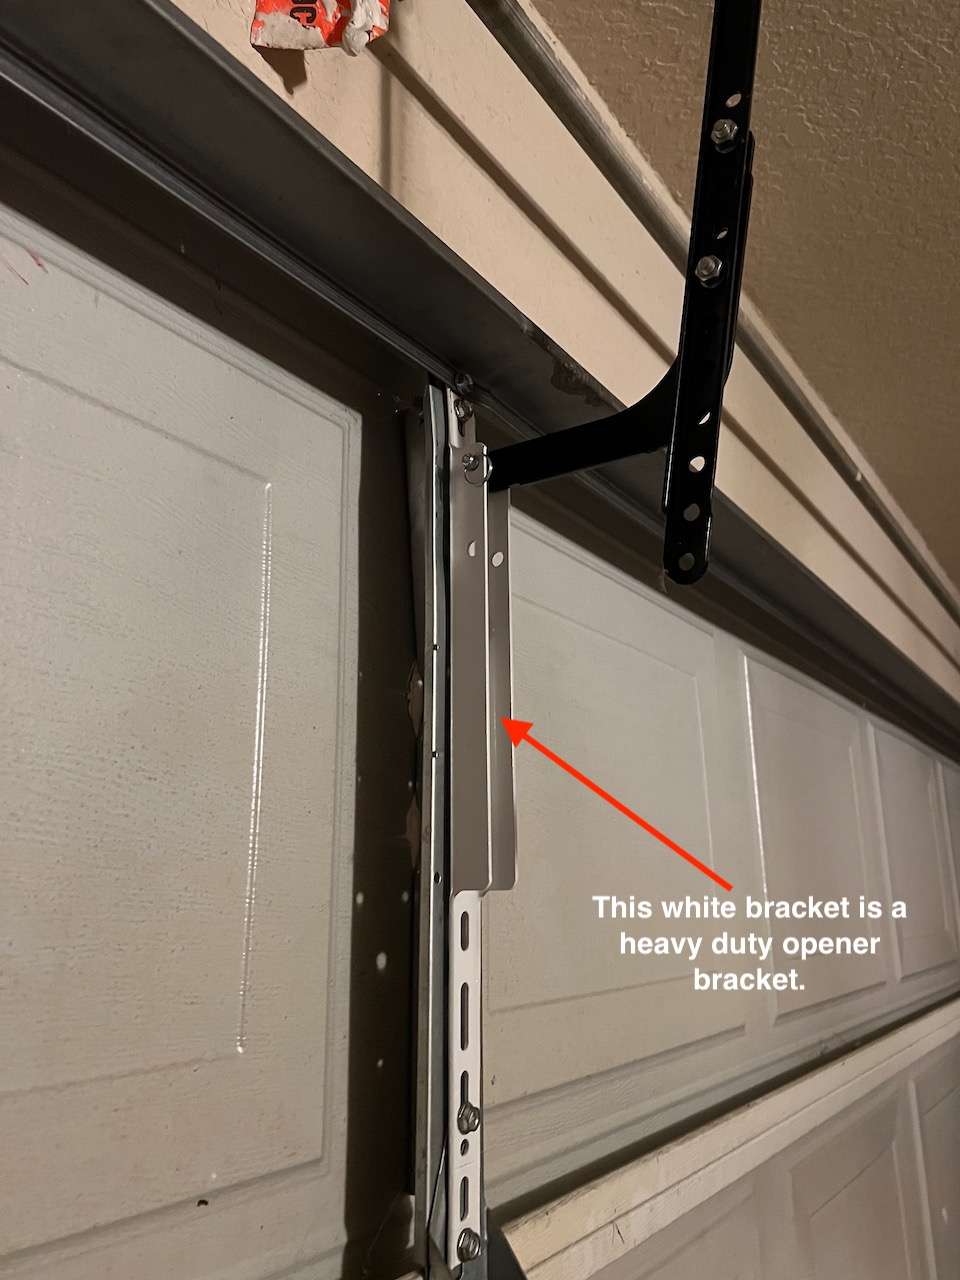
If your center stile is damaged or cracked to the points it’s losing its integrity, installing a heavy-duty opener bracket will many times resolve this issue. Opener brackets were originally designed to be installed on steel back insulated garage doors, but they work great at repairing and reinforcing non-insulated garage doors. Because the bracket spans the full height of the section, it attaches to the hinge at the bottom and behind the strut at the top, providing the ultimate attachment point to the top section.
Before/After Video of Strut Repair on Sagging Section
We made a short before and after video demonstrating how to repair a sagging double car width garage door with a strut. The door featured here was sagging pretty good, causing an abrupt popping of the garage door section while closing. By installing a good 16ft strut across the full width of the third section, we were able to eliminate the issue entirely for very little cost. This is more important than ever considering we are seeing record price increases on garage doors.
Garage Door Section Crack Repair
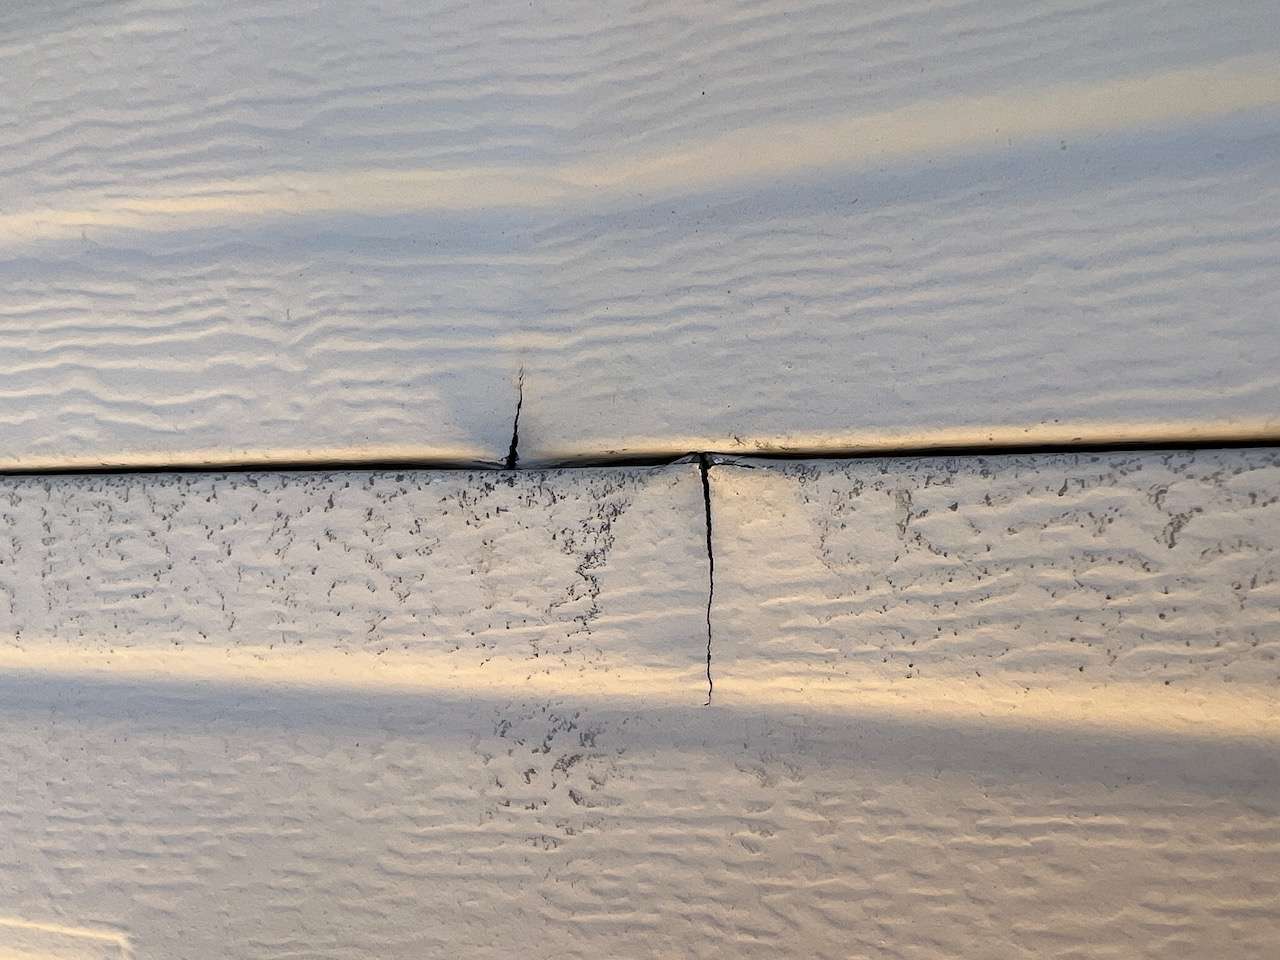
If you have a crack in your garage door that is visible from the outside, you can cover this up with some paintable caulking. After repairing the sagging in your garage door, pick up some paintable exterior latex caulking at your local home store. Cut the tip of the caulking tube a little wider than the crack. Shoot some caulking on the door just enough to cover the crack.
The worst thing you can due when caulking anything is apply too much. Make sure to only put enough on the garage door to cover the crack. After that, you can smooth is down with a tool or soapy water on the tip of your finger will help you slick it down and blend it in with the face of the garage door.
Let the caulking dry for a few days, and then you can apply some touch up paint. The crack in your garage door will disappear.
How Much to Repair My Sagging Garage Door?
Installing struts on garage door sections is a simple fix for a garage door service company. You can expect to pay for a service call, which could be anywhere from $60-$90 plus the cost of the strut. Reinforcement struts for double car width garage doors can be hard for homeowners to go pick up and bring home because of their length, so hiring a company is usually a better idea.
At the time of writing this article, garage door struts were going for anywhere from $4-$6 per foot installed on your door. That includes the self-tapping screws needed to attach the strut to the stiles. To have one 16ft strut installed on your double car garage door would average around $150 total with parts, labor, and service call.
This pricing will give you a reasonable starting point for having a sagging garage door repaired. Of course, we are only talking about having a strut installed on the door. If you need repair on stiles, heavy-duty opener brackets, and new hinges, all those parts would be in addition to what we discussed.
How NOT To Fix a Sagging Garage Door
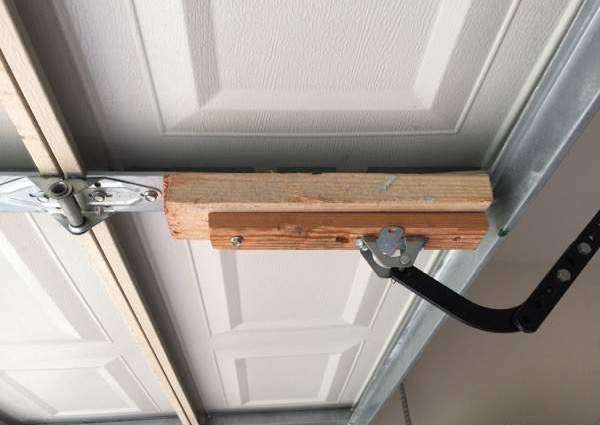
If your garage door is sagging, the last thing you want to do is add extra weight to the center. Using short pieces of wood, metal, punched angle or any other scraps you have lying around the garage to repair your door will only make the sagging and cracking worse over time. The heavy-duty opener bracket we discussed in the previous section is a much better fix than using heavy wood.
When repairing a garage door section, you really don’t want anything showing from the outside. This will negatively impact the look of the garage door, and it can interfere with the opening and closing of the door if something were to get caught on the opening.
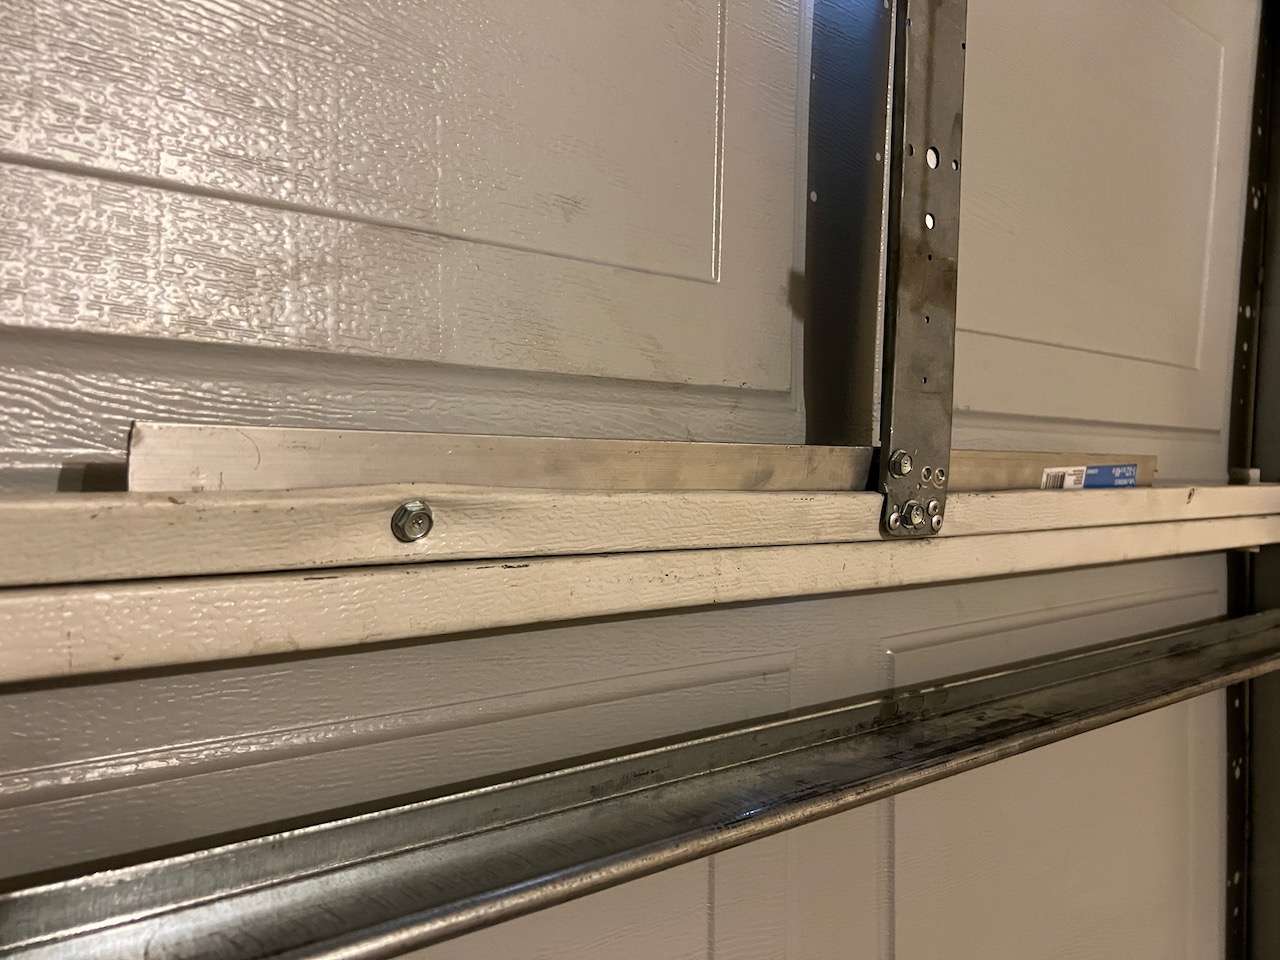
Most of the time when we see reinforcements like pictured above, they are on the cheap builder grade garage doors we discussed earlier in the article. The manufacturers of these doors have removed so much of the structure of the garage door, homeowners are left with no choice but to add metal back to the door for reinforcement. The problem is, if you add too much dead weight to the center, the sagging issues will only get worse with time.
Sagging Wood Garage Door
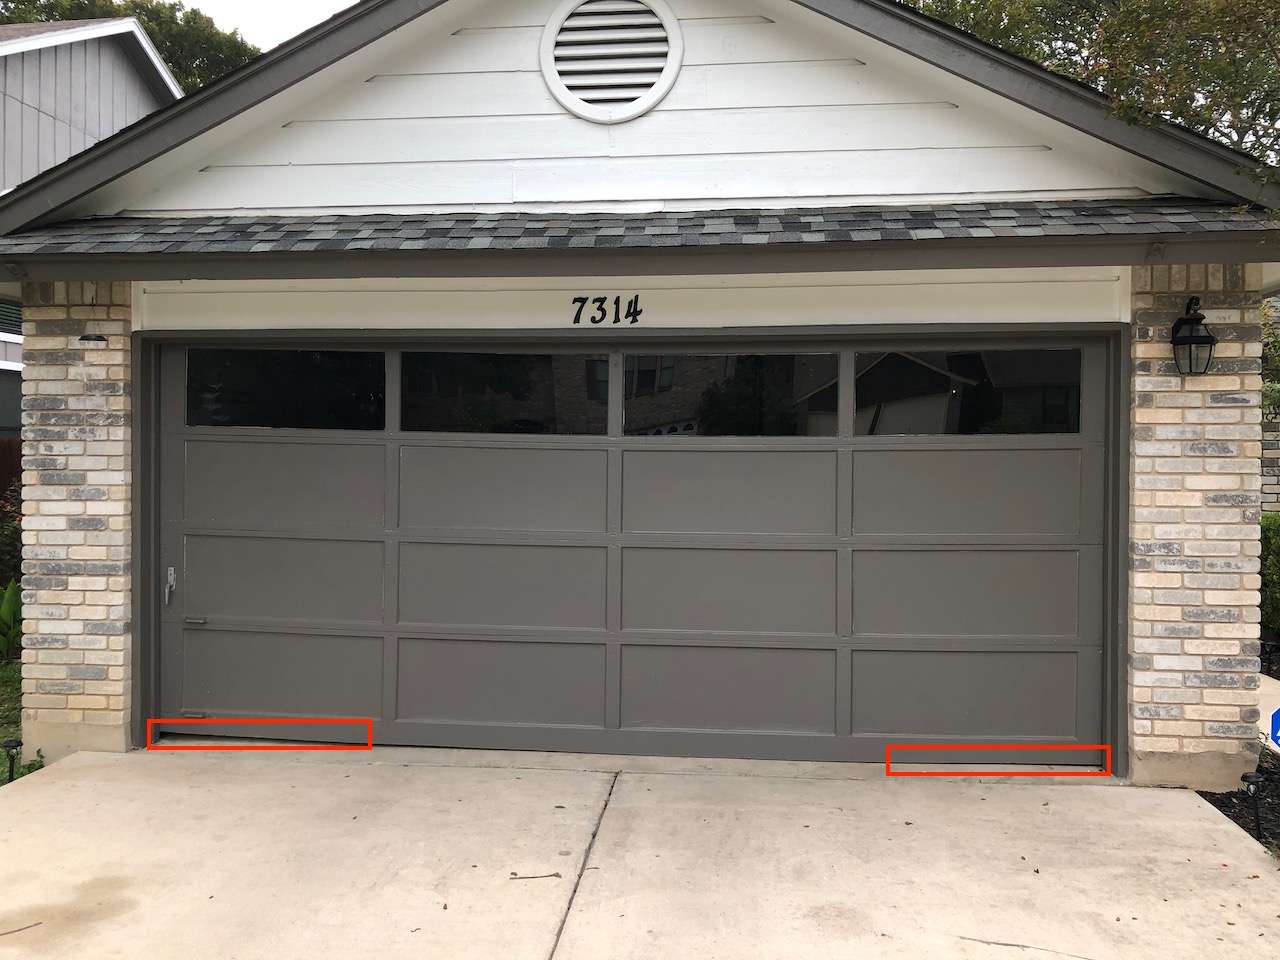
Most double car width wood garage doors will sag in the middle over time. This is because the section finger joints will start to come apart. The spring on the garage door is pulling the door up with extreme force on the very ends of the bottom section. As the door ages, you will start to see the bottom section “smile” as we call it.
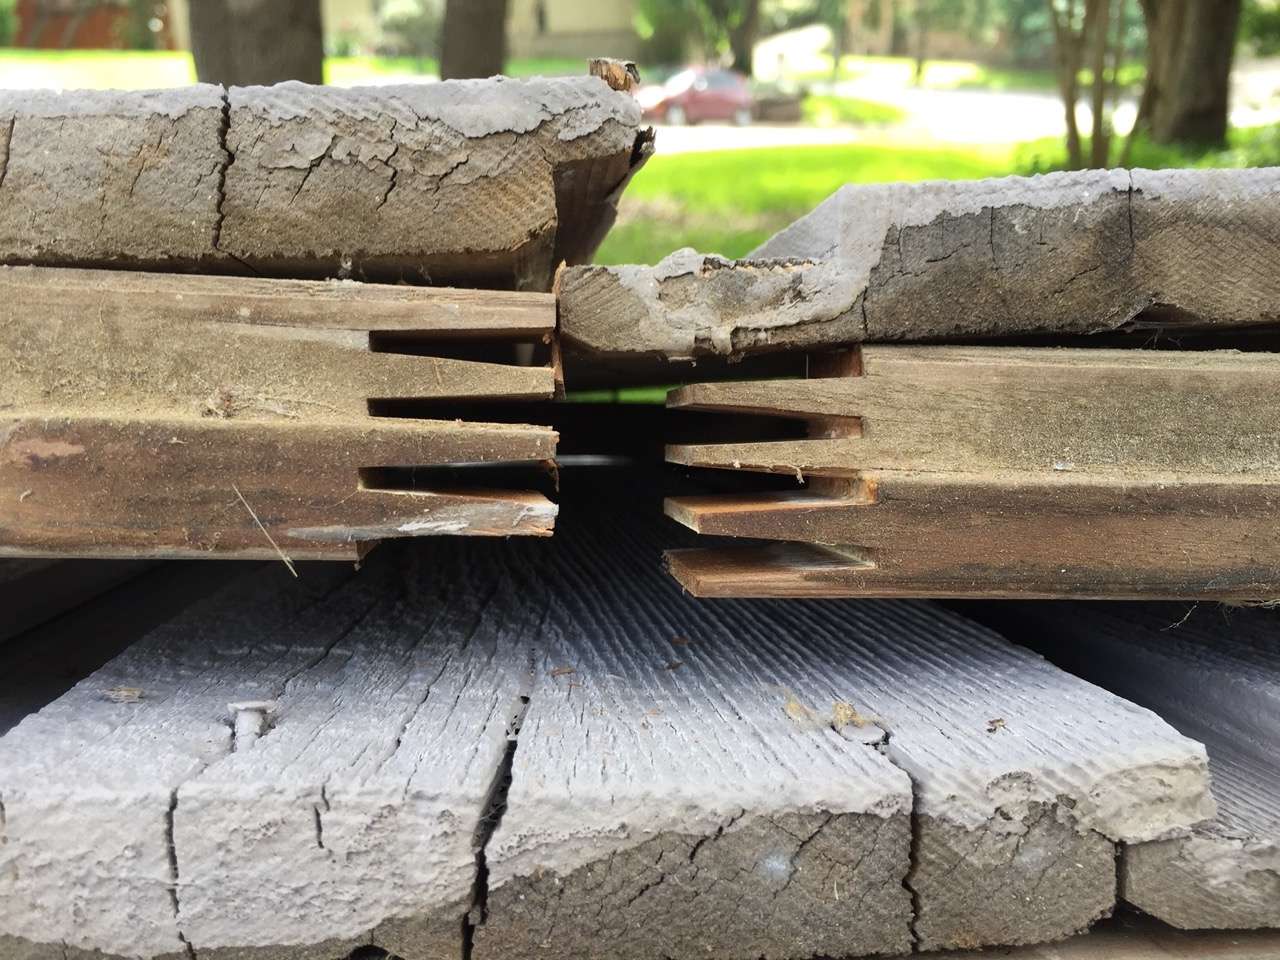
Many of the older wood garage doors were built using finger joint construction. While most of these wood doors would last a really long time, like everything else, they eventually wear out and start pulling apart. Because the section is hitting the concrete in the center first, you could epoxy a rubber threshold to the concrete on the ends to close the gaps. Otherwise, this is a very common issue with older wood garage doors, and there is not much you can do about it.
Garage Door Header Sagging in the Middle
One of the most common issues we come across in the field is the header of the garage door opening is sagging. This issue is more common on double car width garage doors, especially with 18ft widths, which are 2ft wider than the standard 16ft wide garage door.
One reason your header could be sagging is the home builder did not use an engineered beam inside the header to support the span. Engineered beams are specifically designed to support long spans and minimize deflection or sag. These beams also need to be installed correctly in the “crown up” position so they eventually settle straight, which will prevent sagging.
Garage Door Lintel Sagging

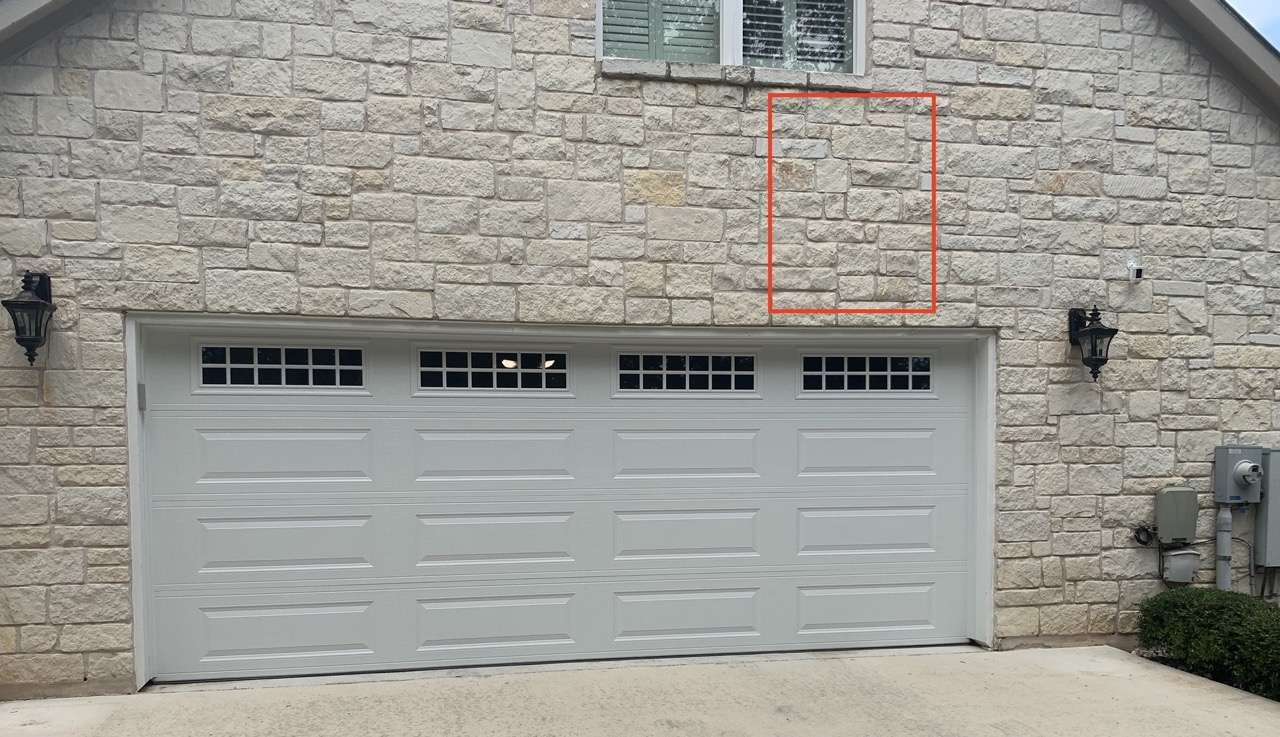
A sagging header over a garage door is more common when brick or rock is above the garage door. If the home builder tried to save money by installing an undersized metal garage door lintel (heavy-duty support angle), cracks will start to generate due to the sheer weight of the masonry.
A metal garage door lintel is a large, heavy piece of metal angle that spans the entire width of the garage door opening. It sits right at the top of your garage door opening, and it is usually painted black or another color to match the home. The first course of brick or rock is laid on the angle, which is why you don’t see much of it besides the bottom edge.
An engineering formula should be used to determine the size and thickness of the angle for the span of the opening. There is tremendous downforce applied with masonry, especially if that brick or rock is several feet tall.
There is No Easy Way to Repair a Sagging Header
Unfortunately, there is no easy way to repair this apart from hiring a masonry company to remove the rock above your garage door and reinstall it. Of course, they would need to source the proper metal lintel that will span the top of the garage door opening and support the weight of the rock. This is extreme surgery, so don’t be surprised at the high cost of bids you receive to have this work done properly.
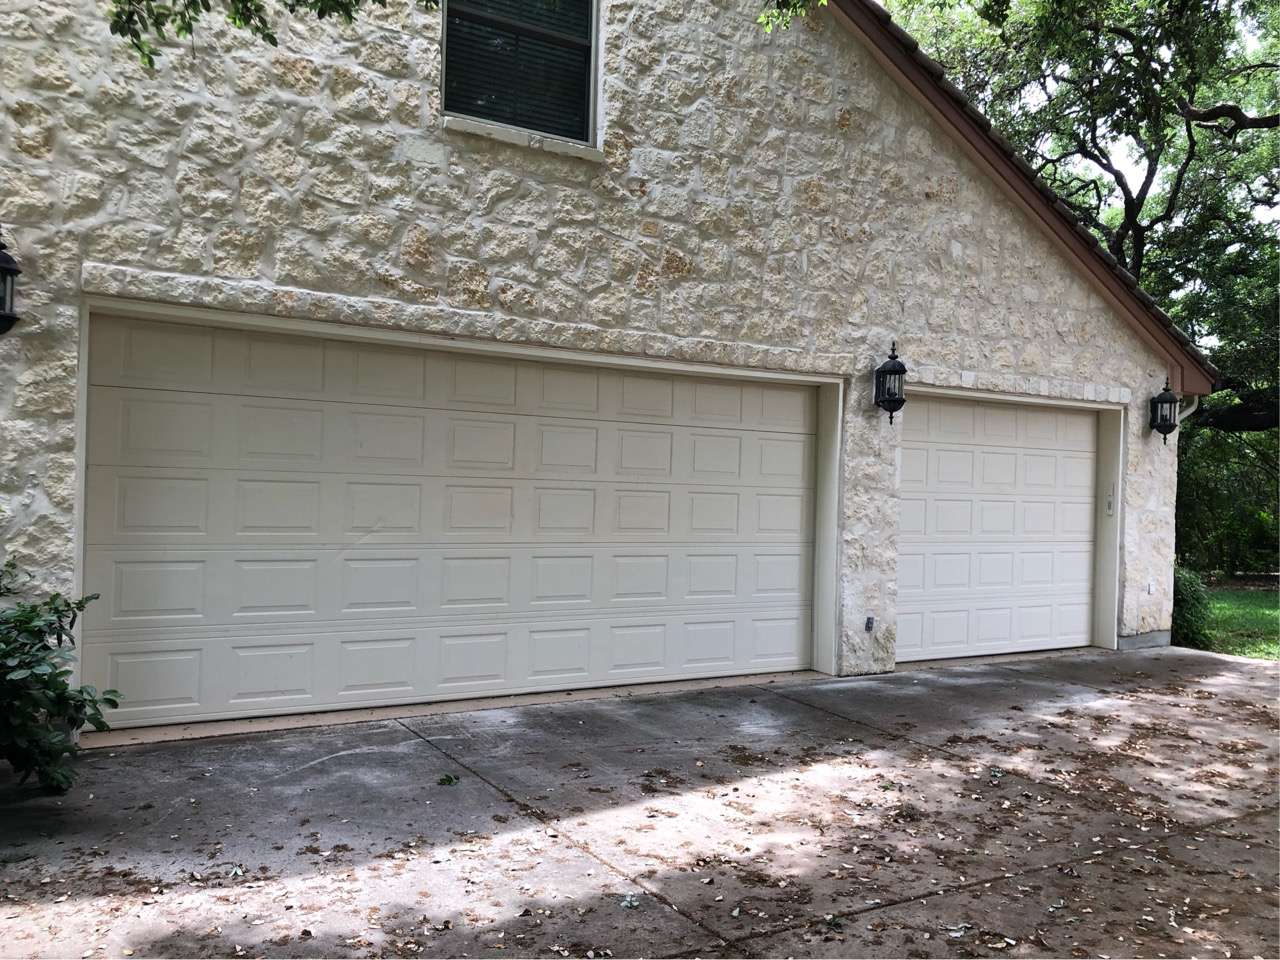
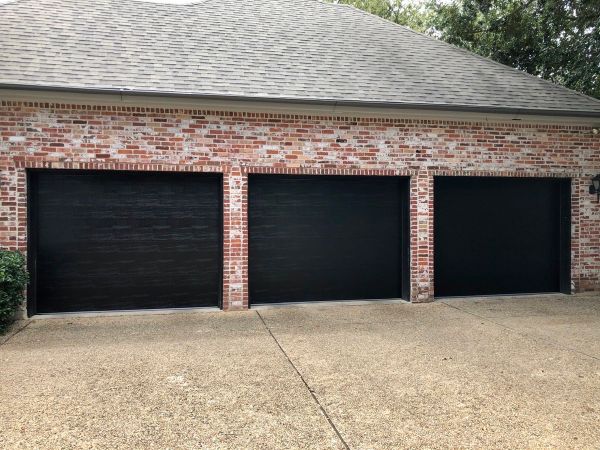
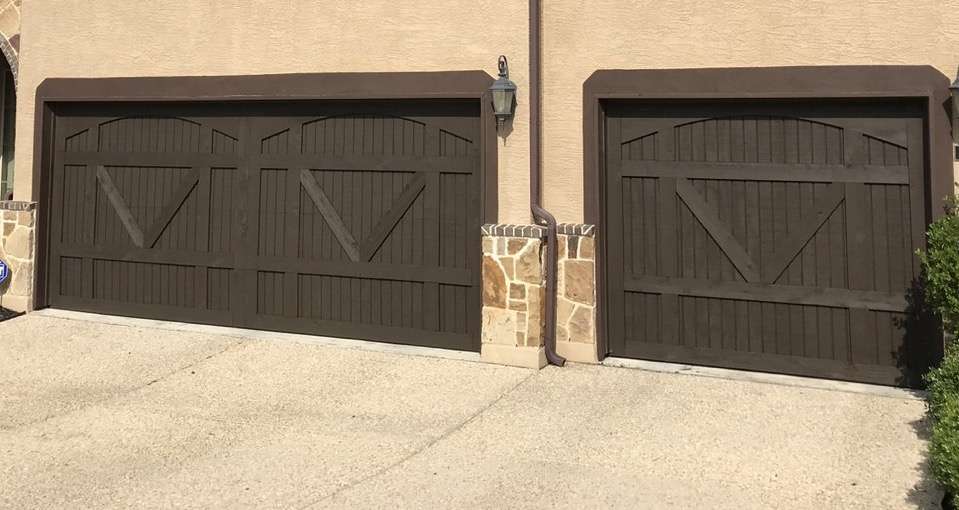
Here is another example of rock installed above garage door openings. This client had the rock removed and replaced due to extreme cracking. We installed new garage doors at this home because the masonry crew that repaired the rock ended up dropping materials and denting the garage doors.
How Much to Repair a Sagging Garage Door Header?
If your garage door header is sagging to the point it is causing major structural issues, you may want to have it replaced. The cost to have this done can vary greatly depending on what’s above the header.
A couple of the homes we pictured above have thousands of pounds of rock above the garage door that is sitting on a lintel. The cost to have this repaired and reinstalled correctly could easily run over $20,000 dollars, depending on the size of the project. Dealing with your homeowner's insurance may be best for a project that size.
If you have something more simple with siding above the garage door, you could expect to pay around $5,000-$10,000 to have a header replaced. Of course, the pricing is highly dependent on the materials used in the home, how the structure is built, and where you are located.
Building materials have skyrocketed recently, so don’t be surprised when you receive your estimate. Having the correct engineered header beam or metal lintel installed for your home will prevent future issues with your heading sagging.
Conclusion
A sagging garage door is an annoyance that will not go away until you address the issue. It will only get worse over time to the point you will need new replacement sections or an entirely new garage door.
By addressing the issue as soon as possible, you will save hundreds, if not thousands of dollars. If you have the resources, you can complete the repair yourself or have a garage door company do it for you.